In this issue:
Clinical Techniques in Prosthodontics: Relationship of the Periodontium to Impression Procedures
Authors

When planning esthetic anterior restorations, many concerns arise regarding gingival tissue architecture. After potentially traumatic impression procedures, how confident are we in predicting the final form of the tissue?
Developing an understanding of three key concepts enables the clinician to predict the gingival tissue architecture with more certainty:
- Biology of the periodontal interface.
Relationship of gingiva to the osseous crest.
Relationship of the preparation finish line to the osseous crest.
Biology of the Periodontal Interface
Anatomically, the dentogingival complex is comprised of three components: the connective tissue attachment, the junctional epithelium, and the depth of the sulcus.1,2 The average measurement of each is difficult to assess clinically (Fig. 1).3,4 When probing the sulcus, the probe can easily penetrate through the junctional epithelium. The junctional epithelium is attached in a tight approximation by hemidesmosomes. This attachment is only a few layers of cells in thickness, so the measurement that usually is considered the depth of the sulcus can be the sulcus depth plus the depth of the junctional epithelium. The most reliable measurement is the total of the entire dentogingival complex, which is from the osseous crest to the free gingival margin.5

To make an accurate measurement to the osseous crest — sounding to bone — the tooth must be anesthetized. A periodontal probe (flat-ended so it will not slip on the bone) is placed into the sulcus. Resistance will be met when the probe reaches the connective tissue attachment. The probe is kept in contact with the root surface and then it is pushed hard to the osseous crest. This sounding to the osseous crest will represent the measurement of the total dentogingival complex.
Relationship of Gingiva to the Osseous Crest
The gingival relationship to the osseous crest is always equal to or greater than the underlying osseous scallop, which is parallel to the cementoenamel junction. Before tooth preparation, two reference measurements should be established for placing the intracrevicular finish line by using the periodontal probe. The first measurement should be on the facial aspect of the tooth; the second should be on the interproximal surface. These two measurements, which should be of the entire dentogingival complex, will be the guide for placing the finish line of the preparation.

Ideally, for anterior teeth, the facial measurement should be approximately 3 mm, and the interproximal measurement, when adjacent teeth are present, approximately 4 mm. This relationship is considered a normal crest6 and exists on the facial and interproximal surfaces of normal sized teeth in about 85% of patients (Fig. 2). With this gingival-to-osseous crest relationship, if the tissue is traumatized with any type of clinical procedure, it will heal in a similar fashion.7 The healing will return to normal 85% of the time.
If the depth of the osseous crest to the gingival margin is greater than 3 mm facially and 4 mm interproximally, it is considered a low crest and exists on the facial and interproximal surfaces of normal sized teeth in about 13% of patients. The low osseous crest and thin tissue biotype pose the most variation for final gingival position. Black holes and recession are most likely with this situation. If the gingival depth to the osseous crest is less than 3 mm facially and 4 mm interproximally, the osseous architecture is considered a high crest and exists in about 2% of patients. High crests are most susceptible to biologic width violations.
Tissue biotype affects the stability of the tissue in all levels of osseous architecture. Thick biotype reduces the risk of recession and black holes. Thick biotype and a low osseous crest will yield pocket depth formation.
Preparation Finish Line to the Osseous Crest
In the normal osseous crest, the facial margin of the preparation should be 2 mm to 2.5 mm coronal to the osseous crest, or 0.5 mm to 1 mm apical to the free gingival margin. The interproximal margin of the preparation should be located 3 mm coronal to the osseous crest or 1 mm apical to the interproximal papilla. In this relationship, how the gingiva will reestablish itself to create an intracrevicular finish line can be predicted after the impression.
With low crests, the facial margin of the preparation should be a minimum of 2 mm from the osseous crest, and the interproximal margin more than 1 mm away. With high crests, the facial and interproximal margin of the preparation should be at the level of the free gingival margin or no deeper than 0.5 mm. A high crest is most susceptible to biologic width violations. If the margin of the preparation is deeper than 0.5 mm, the risk of violation of biologic width increases. This usually happens in the interproximal region or line angles of anterior teeth where the margin is placed too horizontally. The osseous crest is thicker at the line angles and will not resorb, although the finish line has been placed into the biologic width area relative to the osseous crest. Inflammation begins interproximally and proceeds to the facial surface of the tooth.
If the violation of biologic width occurs on the facial or lingual surfaces, resorption is more likely. Recession usually follows on the facial surface when there is a combination of thin osseous crest and thin tissue type. This could result in an esthetic problem. Recession is less likely to occur where the biotype is thick or the line angles of the osseous crest are intact.
Some situations may dictate the need to avoid finish line placement parallel to the scallop of the gingiva. Risk of violation of biologic width increases with these circumstances. Surgical or orthodontic intervention may be a consideration when potential violation of biologic width occurs in the esthetic zone. Accurate determination of whether there is a normal, low or high osseous crest can only be made before placement of the retraction cord.
Clinical Technique
The following clinical protocol demonstrates how these periodontal concepts work with impression making. For the purposes of this article, the following system, using silicone material and retraction cord, is very predictable.


- For more than two preparations, pre-medicate the patient with two tablets of 15 mg propantheline (induces dry field).
- Anesthetize the teeth (Fig. 3).
- Probe to the osseous crest both facially and interproximally (Figs. 4, 5).
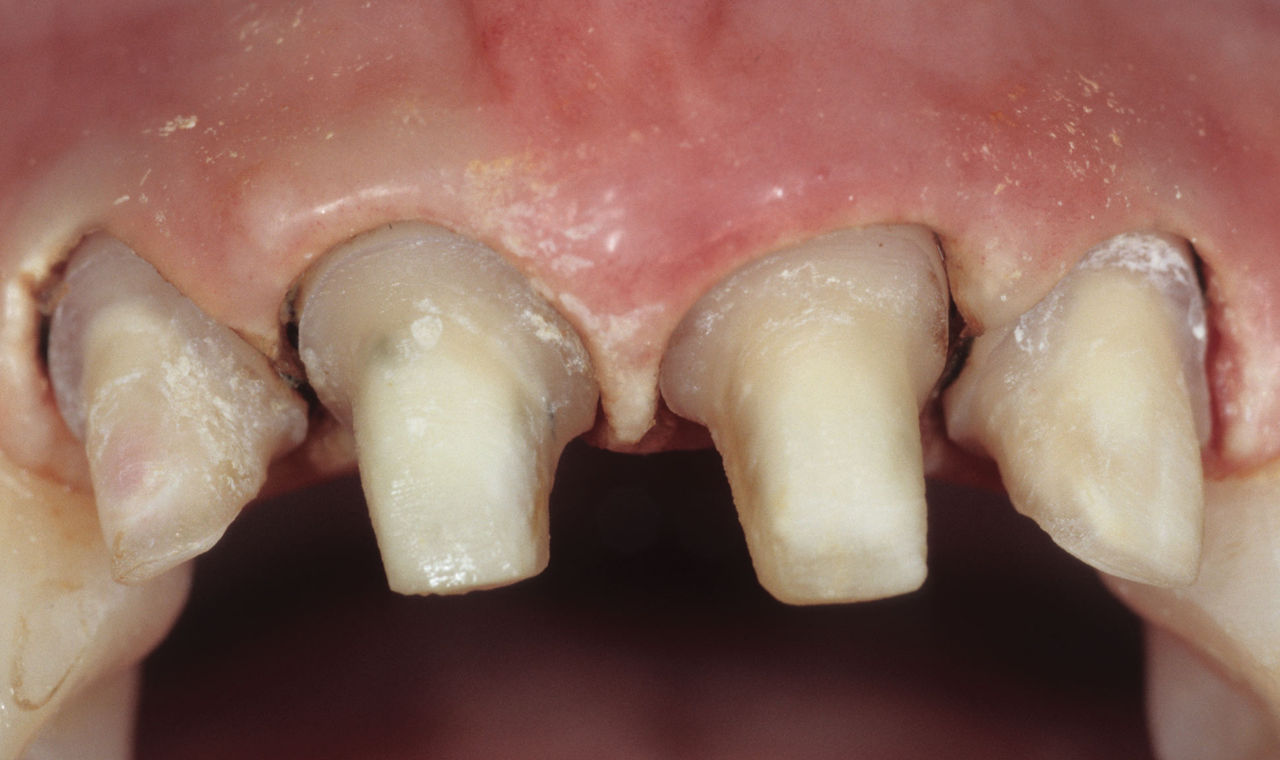
- Prepare the tooth relative to the osseous crest — follow the scallop of the gingiva and locate the finish line (Fig. 6).
- Place the primary cord. To minimize any bad taste, use a dry Ultrapak® cord.a Use a #00 cord for a normal crest and #000 cord for a low or high crest. A high crest will have minimal room for the cord. For a low crest, it is best to minimally manipulate the tissue to prevent tissue changes (Figs. 7, 8).
- Facially, extend the preparation margin to the coronal aspect of the primary cord. The margin will be about 0.5 mm into the sulcus when the restoration is completed. With a normal crest, never allow facial tooth structure to show coronally to the primary cord (Fig. 9).
- Interproximally, extend the preparation to the free gingival margin, except in low crest situations. Extending the preparation will develop a scallop.
- Place ferrous subsulfate circumferentially around tooth directly onto the primary cord (Fig. 10).
- Place the secondary cord. Depending on the tissue thickness, use either Ultrapak #1 or #2. When the secondary cord compresses into the primary cord and pushes it into the connective tissue fibers, Sharpey’s fibers may provide some resistance to the cord. Use the largest cord possible to ensure tissue deflection; however, larger cords cause more distortion (Figs. 11, 12). Leave the secondary cord in for at least four minutes.
- Cleanse with Superoxol.b This is an optional step.
- Microabrade the preparations with the PrepStar™.c
- Remove the secondary cord only (Fig. 13).
- Place lip retractorsd and large dry tips.e
- Block undercuts of any bridgework.
- Completely dry the preparations.
- Set timer to seven minutes.
- Fill the tray with Star VPS™ Ultra Heavy #80062c material, then load a syringe with Star VPS Ultra Light #80060c material.
- Flow the Star VPS Ultra Light material around the tooth preparations two to three times, then flood the preparation and adjacent occlusal surfaces with the light material.
- Insert the tray before the timer reaches four minutes and 30 seconds. Remove the impression after the timer has reached zero.
- Disinfect the impression, read and package in a laboratory bag.
The keys to impression making with respect to the osseous crest and gingival response are:
- Normal crest situations are not generally technique sensitive. The two-cord technique is best. The tissue will be distorted, but it will heal and return to the normal relationship.
- Low osseous crests are very sensitive. The thin biotype tissue should be manipulated as little as possible. A small cord should be used with light pressure. The tissue may distort and not predictably return to the original level.
- High osseous crests are moderately technique sensitive. Retraction may be limited to one small cord. High crests are most prone to biologic width violations, which lead to chronic long-term inflammation.
Normal crest situations are not generally technique sensitive. The two-cord technique is best. The tissue will be distorted, but it will heal and return to the normal relationship.
Discussion
The gingival level will not be accurately represented in the stone cast because the retraction cord displaced the gingiva laterally and apically. If preoperative sounding to the osseous crest has been accomplished, it is unnecessary for the gingiva to be accurately represented in the study cast. The osseous crest is critical in determining where the papilla will ultimately be. Now, the dentist can predict where the contact should begin on the restorations.
If the above impression technique is followed, the gingiva in a normal crest will be displaced 0.5 mm to 1 mm apically and approximately 0.4 mm laterally. If the preoperative osseous crest was normal, the laboratory technician can begin the contouring of the contact of the crown 1 mm from the interproximal margin of the die. The beginning of the contact will then be located 4 mm from the osseous crest because the interproximal margin of the preparation was located 3 mm from the bone. Predicting that the tissue will return in a normal crest situation enables the technician to place a contact area for an anterior restoration at the correct starting point (Fig. 14).
At try-in, the papilla may still be distorted from traumatic manipulation. The dentist may now see a black hole even in a normal crest. The papilla will fill into the interdental space if the technician was guided as to where to begin the contact. If the technician is not guided, the embrasure space may be overclosed and the gingival tissue will be compressed. Chronic inflammation and cervical facial fullness will occur.


Low and high osseous crests can be as predictable as normal crests if the tissue is minimally manipulated. Low crests are the most susceptible to gingival recession and loss of papilla. If the gingival tissue is irreversibly lost, the technician can compensate by changing the form and size of the teeth with tooth-colored porcelain so that there will be no black holes. Tissue-colored porcelain can be used if no tooth size change is planned.
The impression is the foundation for the final restorations (Fig. 15). In addition, the laboratory should be given an occlusal record, preoperative mounted study casts, and the base tooth shade. Diagnostic Wax-Ups, study casts of the patient’s provisionals, and preoperative extraoral and intraoral views with the shade tab are excellent adjuncts to use on a routine basis.
To contact Dr. John Kois, visit drkois.com or call 206-515-9500. Dr. Rena Vakay can be contacted at renavakay.com or by phone at 703-256-7700.
References
- ^Gargiulo AW, Wentz FM, Orban B. Dimensions and relations of the dentogingival junction in humans. J Periodontol. 1961;32:261-7.
- ^Vacek JS, Gher ME, Assad DA, et al. The dimensions of the human dentogingival junction. Int J Periodontics Restorative Dent. 1994 Apr;14(2):154-65.
- ^Maynard JG Jr, Wilson RD. Physiologic dimensions of the periodontium significant to the restorative dentist. J Periodontol. 1979 Apr;50(4):170-4.
- ^Ingber JS, Rose LF, Coslet JG. The “biologic width”—a concept in periodontics and restorative dentistry. Alpha Omegan. 1977 Dec;70(3):62-5.
- ^Kois JC. Altering gingival levels: The restorative connection. Part 1: Biologic variables. J Esthet Dent. 1994;6(1):3-9.
- ^Coslet JG, Vanarsdall R, Weisgold A. Diagnosis and classification of delayed passive eruption of the dentogingival junction in the adult. Alpha Omegan. 1977 Dec;70(3):24-8.
- ^Ingraham R, Sochat P, Hansing FJ. Rotary gingival curettage—a technique for tooth preparation and management of the gingival sulcus for impression taking. Int J Periodontics Restorative Dent. 1981;1(4):8-33.
a. Ultradent Products, Inc.; South Jordan, Utah
b. Sultan Chemists, Inc.; Englewood, N.J.
c. Danville Engineering; San Ramon, Calif.
d. Washington Scientific Camera Company; Sumner, Wash.
e. Microcopy; Kennesaw, Ga.
Reprinted with permission from AEGIS Publications, Inc: Kois JC, Vakay RT. Relationship of the periodontium to impression procedures. Compendium. 2000 Aug;21(8):684-92. Copyright ©2009. All rights reserved.