In this issue:
Achieving Success with Small-Diameter Implants
Author

It is without question that dental implants are one of the most successful additions to modern dentistry. With a success rate of greater than 95%, the root-form implant should be considered to restore any edentulous area. However, when we are presented with the need to manage a highly resorbed ridge, significant issues for the surgeon and restorative team arise if only the use of a standard body implant (3.7 mm or larger) is considered. These issues can be anatomical, medical, financial or restorative. Anatomical challenges are closely associated with how much residual alveolar ridge remains (quantity) and also its density (quality). These can sometimes be overcome with additional surgical procedures such as ridge expansion, block grafting, and other hard- and soft-tissue procedures. If these solutions are not accepted, the use of a much less invasive procedure should be considered, such as the small-diameter implant (SDI), also referred to as the mini implant.
SDIs have been around in their FDA-approved form since 1997 and share surface texture, coatings and titanium grade similar to their larger counterparts. Most implant manufacturers now have added SDIs to their systems. These SDIs now are available in one- and two-piece versions as well as crown & bridge prosthetic options.
Medical challenges should be addressed by utilizing the most minimally invasive surgical plan. The incorporation of 3D cone-beam computed tomography is rapidly increasing and can allow for presurgical planning to avoid mandatory grafting. A CBCT surgical guide can be created to deliver the implant into the bone with a flapless technique reducing surgical trauma. This may be a prudent solution for patients with systemic conditions who are unable to tolerate lengthy healing times. It is important to note that a CBCT-based surgical guide is much different from a prosthetic guide that is based on a panoramic X-ray and a stone model.
A CBCT surgical guide can be created to deliver the implant into the bone with a flapless technique reducing surgical trauma. This may be a prudent solution for patients with systemic conditions who are unable to tolerate lengthy healing times.
Restorative challenges are usually the management of restricted restorative space in the mesial-distal or buccal-lingual direction. This has always posed a high-risk problem in the esthetic area. Too wide of an implant will create potential for bone and soft-tissue loss. Convergent roots can also preclude the use of a standard body implant. In these cases, an SDI may allow for the placement of the implant and still allow proper bone support, soft-tissue space and proper spacing from adjacent tooth roots.
SDIs can be used to retain maxillary or mandibular dentures. Due to reduced surface area, it is recommended to utilize four SDIs in the mandible and six SDIs in the maxilla. The residual ridge should be of Misch Type I or II to ensure a successful case. If the SDI selected is of a one-piece design, then immediate loading must be addressed. Primary stability should be at a minimum of 30 Ncm on all of the implants, and a stable tissue-supported denture should be delivered. The implants should also be placed as parallel as possible to minimize off-axis loads.
CASE REPORTS
Case 1: Multiple-Unit Fixed Restorations
Diagnosis and Treatment Planning — A 54-year-old female presented in general good health with a history of diabetes. She had progressively lost her teeth during the previous 15 years, with the last of them being extracted about five years earlier. She was unhappy with her existing dentures due to poor retention and difficulty with eating. Both ridges were examined and found to be moderately atrophic (Figs. 1, 2). A CBCT scan was taken (i-CAT® FLX [Imaging Sciences International, LLC; Hatfield, Pa.]) with the dual-scan protocol to facilitate a prosthetically driven treatment plan (Figs. 3, 4).


Due to the height and width of the remaining bone, six SDIs would be placed in the maxilla and four SDIs in the mandible to support overdentures. The SDIs selected for this case were of a two-piece design with a Locator® attachment (Zest Anchors LLC; Escondido, Calif.). The low profile of the attachment would allow for a less obtrusive denture and a variety of retentive inserts. After the treatment plan was approved by the patient, surgical guides (Anatomage; San Jose, Calif.) were ordered (Figs. 5, 6).


Clinical Protocol — On the day of surgery, the surgical guides were tried in to verify stability and fit (Figs. 7, 8). A single 1.6 mm pilot bit was used to create the osteotomies through the surgical guide in the maxilla using an implant motor (Aseptico AEU-7000 [Aseptico, Inc.; Woodinville, Wash.]) with copious irrigation (Fig. 9). The pilot guide was removed, and the implants were inserted and carried to depth (Fig. 10). All six SDIs were confirmed to have at least 30 Ncm of torque, and the Locator attachments were secured (Fig. 11). This protocol was duplicated on the lower arch (Fig. 12). To ensure that the existing dentures would fit passively over the SDIs, Fit Test (VOCO America, Inc.; Indian Land, S.C.) material was placed and allowed to set, showing where relief areas would need to be created (Figs. 13, 14). Once the relief was complete, the process was repeated until a verified passive denture could be obtained (Figs. 15, 16). The dentures could then be soft-relined (Ufi Gel SC [VOCO America]). A final CBCT scan was taken to ensure that all of the SDIs were fully encased in bone and no vital anatomical structures were violated (Fig. 17).
All six SDIs were confirmed to have at least 30 Ncm of torque, and the Locator attachments were secured.


Case 2: Single-Unit Fixed Prosthetics
SDIs can be an excellent solution to support a single crown in areas of reduced interdental space (less than 5 mm between adjacent teeth) where it would be impossible to place a larger implant. These areas could be maxillary lateral and mandibular incisors. Case selection should have a bone type of Misch I or II, and off-axis occlusal forces should be minimized by designing the single-unit crown to have implant-protected occlusion. The use of a single SDI to support a crown much larger than a maxillary lateral is still quite controversial.
SDIs can be an excellent solution to support a single crown in areas of reduced interdental space (less than 5 mm between adjacent teeth) where it would be impossible to place a larger implant.
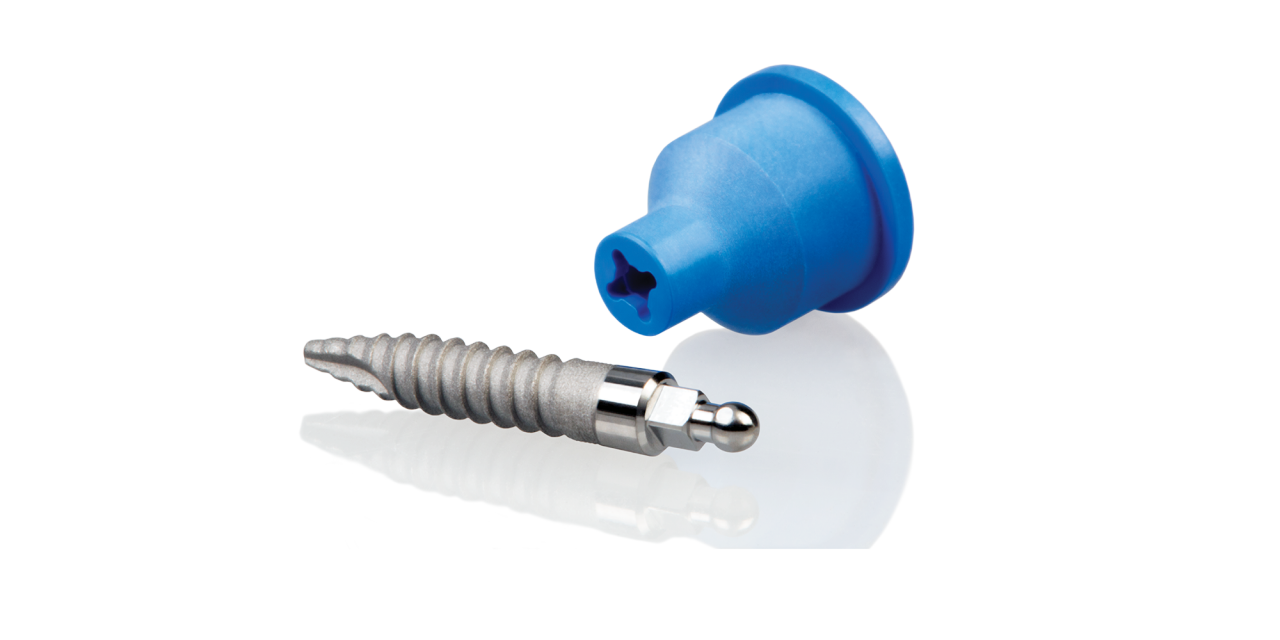
Diagnosis and Treatment Planning — An 18-year-old presented to our office after completion of orthodontics several months prior. He had lost his retainer/flipper that also replaced his missing upper lateral #7 (Fig. 18). A digital radiograph (DEXIS Platinum Sensor [DEXIS, LLC; Hatfield, Pa.]) was taken to see the position of adjacent roots, and it confirmed an extremely narrow mesiodistal space (Fig. 19). It was decided to utilize a one-piece, 3.0-mm-diameter crown and bridge SDI (I-Mini™ One-Piece Implant System [OCO Biomedical Inc.; Albuquerque, N.M.]). The decision to use this brand was due to the I-Mini’s aggressive thread design that allows for compression and fixation of the implant in Type II bone.


Clinical Protocol — A 1.8 mm pilot bit in the Aseptico handpiece was used to carefully create the initial osteotomy (Fig. 20) and another digital radiograph was taken to confirm a parallel path between the adjacent roots (Fig. 21). A final 2.4 mm osseoformer was used to prepare the bone, and the one-piece SDI was inserted (Fig. 22). After final depth was reached, the prosthetic head of the implant was shaped for interarch space with a high-speed handpiece (KaVo Dental; Charlotte, N.C.) and a titanium abutment prep bur (Komet USA LLC; Rock Hill, S.C.) (Fig. 23). A conventional vinyl polysiloxane (VPS) impression (Take 1™ Advanced [Kerr Corporation; Orange, Calif.]) was taken using light- and heavy-body materials. The case was then sent to our dental laboratory team for the fabrication of a monolithic zirconia crown (BruxZir® Solid Zirconia) (Fig. 24).


Case 3: Multiple-Unit Fixed Restorations
Many of the same principles of utilizing an SDI for single-unit fixed restorations should be embodied when applying their use for multiple-unit fixed restorations. All fixed units should be splinted together to help dissipate force and minimize any micro-movement. In function, the occlusal loads can be distributed over the multiple splinted SDIs. This reduces the functional load on any one SDI and increases the bone-to-implant contact. For full-arch cases, it is prudent to increase the number of SDIs in order to reach the desired surface area to prevent implant overload.
Diagnosis and Treatment Planning — A 62-year-old female presented with the chief complaint of difficulty chewing and keeping her dentures in place. The patient stated she had been wearing the full upper and lower dentures for 15 years. The clinical exam revealed the edentulous tissue to have a healthy appearance (Fig. 25). The patient stated that her experience with dentures had made her unhappy and self-conscious with her overall appearance, so much so that she wanted to have “fixed teeth.” A medical history review revealed the patient had had a previous heart attack and continued the use of Plavix® (Sanofi US; Bridgewater, N.J.), an anticoagulant medication. The patient also had diabetes controlled with medication.

To minimize surgical trauma and to increase the efficiency of implant-guided surgery, a flapless technique was to be employed for implant placement. A CBCT scan was taken for treatment planning and fabrication of a surgical guide. Upon completion of the CT scan, it was evident that the residual ridges were highly resorbed and would require the use of SDIs or additional surgical procedures to accommodate standard body implants. To keep within our concept of minimally invasive dentistry, multiple SDIs were prescribed to support the full-arch restorations.
The treatment plan options were discussed with the patient and the final decision was made and approved by the patient. CBCT surgical guides (Materialise NV; Plymouth, Mich.) were made for upper and lower full-arch implant placement.
Clinical Protocol — The patient presented on her appointed day with no changes made to her daily medication regimen. Infiltration with local anesthetic was administered. The surgical guides were tried in to ensure proper fit and stability (Figs. 26, 27). The surgical guides were retained, and a 1.8 mm pilot drill was used in each site to full length. The guides were then removed, and an immediate photograph was taken to illustrate the minimal amount of trauma to the implant surgical sites (Fig. 28). Each SDI (3.25 mm ERI [OCO Biomedical Inc.]) was started by hand to half depth (Fig. 29), and then taken to full depth using the Aseptico surgical motor. With the exception of the posterior upper right site, all sites accepted a two-piece 3.25 x 12 mm in the maxilla and 3.25 x 10 mm in the mandible (Fig. 30). A post-implant placement CT scan was taken; it demonstrated parallel placement in the panoramic view very closely resembling what was treatment planned (Fig. 31). In addition, the 3D slice view showed that the implants were fully encased in bone, away from the nerve canal and engaging the cortical plate for maximum stability (Fig. 32). Solid abutments (OCO Biomedical Inc.) were placed and torqued to 30 Ncm. Full-arch impressions of the duplicated dentures were taken with Take 1 Advanced. The impressions were then delivered to the lab team, and full-arch fixed bridges were fabricated for final cementation (Figs. 33, 34).
In function, the occlusal loads can be distributed over the multiple splinted SDIs. This reduces the functional load on any one SDI and increases the bone-to-implant contact.


CLOSING COMMENTS
With the use of guided surgery and SDIs, more patients can undergo implant surgery to achieve their desired goals to have teeth. SDIs, along with minimally invasive dentistry, are an ideal treatment solution to consider when standard-body implants are not feasible without additional procedures.
Dr. Patel is a graduate of University of North Carolina at Chapel Hill School of Dentistry and the Medical College of Georgia/American Academy of Implant Dentistry Maxi Course. He is the cofounder of the American Academy of Small Diameter Implants and is a clinical instructor at the Reconstructive Dentistry Institute. He has placed more than 2,500 mini implants and has worked as a lecturer and clinical consultant on mini implants for various companies. He can be reached at pareshpateldds2@gmail.com or dentalminiimplant.com.
Disclosure: Dr. Patel reports no disclosures.
Reprinted by permission of Dentistry Today. ©2014 Dentistry Today.