In this issue:
Simple Flapless Surgical Overdenture Techniques
Author

Predictable dental implant surgical placement today leads to positive long-term prognoses. Precision prosthetic components that are reasonable in cost provide stable retention and support implant overdentures well. These implant-retained overdentures act as outstanding alternatives to conventional dentures. Creating palateless reconstructions as replacements for full palatal coverage is accepted well by our patients.
Case planning and diagnosis is the critical beginning for consideration for fabrication of implant-retained overdentures. First, we must consider the desires of our patients for their final restorations. Fixed prostheses versus removable prostheses must be discussed in detail to meet patients’ expectations. Cost factors often play into the final result; however, it is my experience that creating an appliance that is esthetic and functional is a good option for many patients. Also to be considered is the manual dexterity of each patient and his or her ability to clean and maintain the site, not only initially but also in the years to come. Removable implant-retained overdentures are easy to maintain with little effort and are extremely cost-effective, considering the tremendous advantage they provide in allowing our patients to chew and function much more normally. Having the palate removed from the design allows the taste buds in the palate to function properly. It is a definite improvement in the quality of life of our patients.1
Surgical placement of dental implants in the past was done through radiographic evaluation and intraoral examination. This included manual palpation of the ridges, evaluation of the 2D panoramic radiograph, use of bone calipers to approximate width of the ridges, digital periapical radiographs with bone markers, and measuring study casts. Bone quality, especially in the maxillary region, could only be determined at the time of surgical osteotomy creation. With the advent of computed-tomography (CT) diagnostics, 3D images are created that allow the practitioner to precisely determine not only vital anatomy, such as the sinuses, but also the height and width of available bone.2 Risks are evaluated prior to any surgical intervention.
When considering implants for maxillary implant-retained overdentures, we will need a minimum of four implants in the maxilla.
When considering implants for maxillary implant-retained overdentures, we will need a minimum of four implants in the maxilla. These implants need to be in positions that allow for proper draw of the chosen attachments. Thus, placement of the implants is a critical factor in achieving ideal final prosthetic reconstruction of the overdenture. Often, improperly placed or angled implants create a hardship for the patient and laboratory technician, as proper draw is not established. This may lead to poorly seating overdentures or excessive adjustments being made to eliminate sore areas. The use of CT diagnostics and CT guides helps the practitioner to establish proper positioning.3 In addition, the quality of bone can be determined in many instances, thus establishing a platform for success.
Placement of the implants is a critical factor in achieving ideal final prosthetic reconstruction of the overdenture. Often, improperly placed or angled implants create a hardship for the patient and laboratory technician, as proper draw is not established.
CASE REPORT
Diagnosis and Treatment Planning
A 46-year-old male presented to our office with an ill-fitting conventional maxillary complete denture that made him gag, decreasing his quality of life physically and emotionally (Fig. 1). Furthermore, he felt embarrassed by his appearance. There were no medical contraindications to dental implant therapy. Options were discussed, including the fabrication of another conventional maxillary denture, or placement of implants to retain a fixed hybrid appliance and an implant-retained overdenture. Fabrication of a fixed appliance would require sinus augmentation to allow for more implants to be placed in the posterior region to support such a device. Four maxillary implants were considered to secure an implant-retained overdenture using the Locator® attachment system (Zest Anchors LLC; Escondido, Calif.). This process was determined to be cost-effective to the patient as a means of restoring form and function, and to improve esthetics dramatically.

Conventional radiographs, including panoramic and periapical digital radiographs, allowed us to visualize vertical height but not bone angulations or horizontal bone availability (Fig. 2). A CT scan advanced our visual field to a third dimension (Fig. 3). It was clear by the radiographs that placing implants in the very posterior portion of the maxilla would not have been possible without a more invasive surgical intervention because of the large maxillary sinuses.3 Certainly, other techniques (such as sinus elevations) should always be considered. Because of the significant amount of horizontal bone loss (Fig. 4), the patient also lost a good amount of lip support, so fabrication of an overdenture with some facial and lip support was appropriate. When there is bone loss vertically, following long-term resorption after tooth extraction, fabrication of fixed bridgework or hybrids can become challenging (Fig. 5). Teeth would need to be cantilevered to the facial, and they would be extremely long into the gingiva. Lip support is often compromised by such a prosthesis design. Overdentures eliminate the esthetic concerns, are easy to maintain with proper home care, are stable, and are an excellent alternative to conventional techniques.


Clinical Protocol
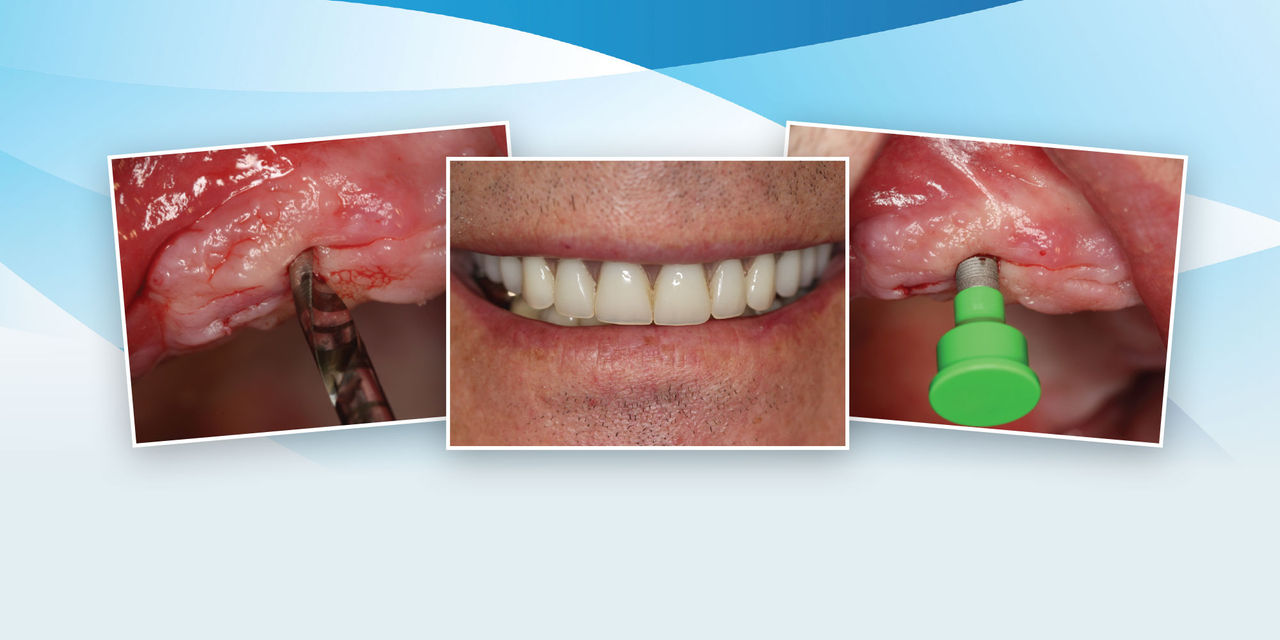
The surgical process began with making an initial opening with a 2.3-mm-diameter pilot drill (Fig. 6). This drill easily penetrated the cortical plate and allowed proper angulation of the implant in front of the maxillary sinus area. Simple digital radiographs allowed us to evaluate not only angulation but also the depth (Fig. 7). Clear markings on the surgical drill helped in visualizing proper depth. This was the only end-cutting bur used in the surgical process; subsequent burs were used to simply widen the osteotomy site. Therefore, it was imperative that proper positioning was determined while using the 2.3 mm pilot drill.


The Inclusive® Tapered Implant System was chosen here because of its high quality, incredible initial stability, and simple prosthetic applications. The Inclusive Tapered Implant design is a minimally invasive, bone-condensing implant system designed for dual stabilization of the implant in place, providing a true initial mechanical lock.3 The surgical techniques in the placement of this implant are both user-friendly and simple. Chairside efforts are dramatically reduced due to the simple stage surgical drilling. As the cost of implant materials decreases, my ability to provide high-quality dentistry at a reasonable fee increases. Our patients are very responsive to this and appreciative.
Once the angulation of the first osteotomy was determined, we moved forward to the next-diameter bur (a 2.8-mm-diameter drill). The final 3.4-mm-diameter osteotomy drill was used to create a site for the 3.7-mm-diameter implant (Figs. 8, 9), which was then threaded into position using a torque wrench (Figs. 10–13). A torque of 35 Ncm was achieved with the implant system (even in the relatively soft anterior maxillary bone) (Fig. 14).4 Once the first implant was deemed to be positioned correctly, the other implants were simply paralleled to the first (Figs. 15, 16). Four maxillary implants were then ideally placed using a flapless technique (Figs. 17–19). Because a flapless technique was used, healing occurred more promptly (Figs. 20, 21).


Conventional denture fabrication techniques were then used to create the final esthetic contours. We created an outstanding functional and esthetic result, exceeding the patient’s expectations in function. The gagging reflex that a full palate conventional denture had previously created was totally eliminated.
Visualizing the case as finished before starting is helpful in achieving outstanding functional and esthetic final results.
Because the implants were properly positioned, Locator attachments were torqued into each implant, and a palateless maxillary overdenture was fabricated. The Locator attachments provided excellent stability and, because the implants were spaced ideally, excellent retention (Fig. 22). Because of their design, the patient was able to easily align and seat the overdenture. However, it was important that the implants were placed in a parallel position to each other, thus simplifying the prosthetic construction. According to the manufacturer, the attachments resist wear and maintain satisfactory retention for up to 56,000 cycles of function. The male portions can be easily changed chairside with minimal inconvenience to the patient (Figs. 23, 24). The Locators come in a variety of retentions from extra light (blue) to heavy (clear). In this case, the light retention attachments were used. The patient’s chewing function and efficiency, as well as his quality of life, were all dramatically improved using simple, easy-to-follow, cost-effective dental surgical and prosthetic techniques (Fig. 25). Postoperative oral hygiene instructions were given to the patient. The attachments were easily maintained intraorally with brushing and a simple wipe with a washcloth. The underside of the overdenture can be cleaned with a simple brush.


Closing Comments
We are fortunate to practice in a time when we can provide our patients with comprehensive, safe and precise surgical techniques. Visualizing the case as finished before starting is helpful in achieving outstanding functional and esthetic final results. CT diagnosis and scanning software make the surgical process simpler for even the less experienced dental implant surgeon.5 Considerations for any and all vital anatomy is easier to assess. However, not every situation warrants CT diagnosis or surgical planning. Because general practitioners are the professionals whom patients consult concerning their dental condition, practitioners must educate themselves with the treatment modalities that may be appropriate.
Please go to dentalCEtoday.com to register, conveniently pay for, and take a short CE quiz; and once passed, to receive a certificate for 2 CEUs from Dentistry Today.
Reprinted by permission of Dentistry Today, ©2014 Dentistry Today.
Related Case Presentation: “Restoring the Edentulous Maxilla with Dental Implants,” originally published in Inclusive™ magazine Volume 4, Issue 1.
References
- ^Geckili O, Bilhan H, Mumcu E, Dayan C, Yabul A, Tuncer N. Comparison of patient satisfaction, quality of life, and bite force between elderly edentulous patients wearing mandibular two implant-supported overdentures and conventional complete dentures after 4 years. Spec Care Dentist. 2012 Jul-Aug;32(4):136-41.
- ^Benavides E, Rios HF, Ganz SD, et al. Use of cone beam computed tomography in implant dentistry: the International Congress of Oral Implantologists consensus report. Implant Dent. 2012 Apr;21(2):78-86.
- ^Ganz SD. Restoratively driven implant dentistry utilizing advanced software and CBCT: realistic abutments and virtual teeth. Dent Today. 2008 Jul;27(7):122, 124, 126-7.
- ^Abai S. Implant considerations in the esthetic zone. Inclusive. 2013;4:25-8.
- ^Amet EM, Ganz SD. Implant treatment planning using a patient acceptance prosthesis, radiographic record base, and surgical template. Part 1: Presurgical phase. Implant Dent. 1997 Fall;6(3):193-7.