Photo Essay: Making Clear-Cut Cases Even Simpler with In-Office BruxZir® Solid Zirconia

December 18, 2015
 image
Justin Chi, DDS, CDT
Photo Essay: Making Clear-Cut Cases Even Simpler with In-Office BruxZir® Solid Zirconia Image

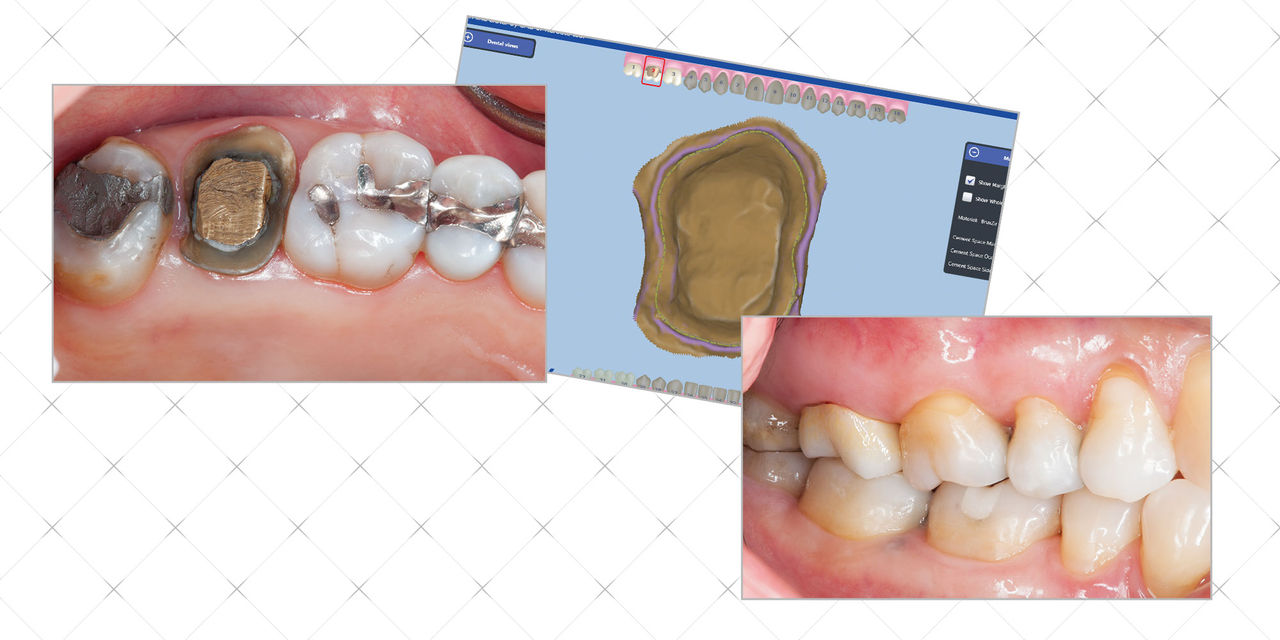
Clinicians who have embraced chairside CAD/CAM are truly empowered; they’re suitably able to deliver required treatment on a timetable that is favorable to the patient. Though the technology is not yet poised to eliminate all collaboration between dentists and the laboratory, cases that only require the restoration of a single posterior crown are ideally suited to chairside manufacturing. These simple bread-and-butter cases represent a significant opportunity for clinicians to differentiate their patients’ chair-time experiences from those provided at other offices; and now that recent advancements have placed some of the most clinically vetted materials chairside in ready-to-mill block form, they can do so without sacrificing quality of care. Practitioners can prepare for and deliver their tried-and-true material of choice in a single appointment.

Figure 1

Figure 1: Here, we have a missing restoration on tooth #2 that was previously endodontically treated. In these situations, I have a feeling that we all secretly love the previous dentist for doing most of the work for us. Before I gush too much and jump straight into taking an impression, I take a step back to see what areas can be improved upon. For this case I’ll be using BruxZir® NOW, the chairside version of the award-winning BruxZir brand. BruxZir NOW ships to the practitioner in a three-pack of post-sintered milling blocks, with three zirconia-optimized burs included. Once the material has been selected, it is now my opportunity to enhance the preparation in hopes that this next restoration provides a longer service life.

Figure 2

Figure 2: In an attempt to achieve a more retentive prep, I deepened the axial surfaces along the finish line, modifying the margins from a light chamfer to a shoulder. The change in margin type in conjunction with additional occlusal reduction will grant benefits twice over.

Figure 3

Figure 3: The next area I check is everyone’s favorite: the occlusal clearance. I follow the same protocol that most clinicians use by asking the patient to bite down while I use my laser-caliper-like vision to analyze whether or not the dark space between the prep and opposing teeth allows room for the perfect restoration. Sadly, either this method is flawed or my eyes need some recalibrating. I could see this working if tooth preps and the opposing teeth were perfect cubes, but that is certainly not the case. Joking aside, for this situation it is impossible to visualize how the buccal cusp slopes of the lingual cusps on #31 interact with the lingual portion of the prep. To more accurately determine sufficient reduction, I utilize a 1.5 mm Flex Tab™ Flexible Clearance Tab (Kerr Corporation; Orange, Calif.) combined with a strip of articulating paper to display where additional reduction is needed. The additional reduction and shoulder margin results in a stronger restoration while allowing me to create more natural contours during the restoration design.

Figure 4

Figure 4: After gingival retraction using a double-cord technique, the case was scanned intraorally using the 3M™ True Definition Scanner (3M™ ESPE™; St. Paul, Minn.) and then transferred to FastDesign™ software (IOS Technologies, Inc.; San Diego, Calif.). The first step in the software is to determine the ideal path of draw.

Figure 5

Figure 5: If a sharp finish line has been created in addition to an adequate amount of gingival retraction, the margin identification should be very straightforward.

Figure 6

Figure 6: Afterward, I establish which direction the buccal surface of this tooth faces to allow the software to propose a design that accurately fits the appropriate area of the arch.

Figure 7

Figure 7: The generated proposal is created based on the contours of the adjacent teeth and position of the opposing dentition. At this stage, there’s an adequate number of available tools that enable the clinician to control even the minutest aspects of the crown design — and all of them able to get you into trouble. Thankfully, the generated crown proposals generally do not need much added effort to become esthetic, functional restorations. For this case, I made some minor adjustments to the lingual embrasures to broaden the contacts.

Figure 8

Figure 8: The software can show as much or as little of the scanned area as desired. After clicking the button to show the opposing dentition with the bite in intercuspation, the clinician can ensure that the functional areas of the restoration are in the correct position.

Figure 9

Figure 9: By adding or subtracting the various sets of data, the screen can show a number of different views of the digital model and restoration. Removing the adjacent teeth on screen provides easy verification that the proximal contacts have been adjusted to my desired position and strength.

Figure 10

Figure 10: Once again changing the data that’s shown, I’m able to remove the opposing model so that the occlusal contacts can be verified and adjusted if need be. The software displays a heat map that depicts the contact areas in deepening shades of blue. By using the smooth tool, those areas can be either reduced or broadened. Once the view on screen meets your clinical requirements, you can move beyond the contact phase.

Figure 11

Figure 11: Prior to sending the digital file to the TS150™ milling system (IOS Technologies, Inc.), a final view of the design and the planned sprue is displayed on the screen. The software intuitively places the sprue away from proximal contacts and the margin to protect their integrity.

Figure 12

Figure 12: Each BruxZir NOW block comes with a single-use diamond bur. It is amazing to consider the evolution of CAD/CAM materials. Now, with the introduction of a millable chairside zirconia, clinicians are able to provide the strongest all-ceramic material in a single appointment. For this case, I selected a B1 block to closely match the lighter occlusal areas of the adjacent teeth. The surface finish and anatomy produced by the mill is very impressive. After milling, I used a diamond disc and diamond lab bur to finish down the sprue attachment.

Figure 13

Figure 13: The freshly milled crown can then be tried in to evaluate the marginal integrity and overall fit.

Figure 14

Figure 14: Once the proper proximal contacts and occlusion settings are dialed in on the design software and the sprue has been removed, there should be little to no adjustment needed.

Figure 15

Figure 15: After the fit and function are verified, the crown can be cemented as-is using your favorite zirconia-appropriate cement. Patients who don’t demand premium esthetics will likely be satisfied with the look of the crown in its immediate post-milling stage. If the clinician desires, stain can be added to the BruxZir NOW crown to help the restoration blend in with the surrounding dentition a bit better.

Figure 16

Figure 16: I like to really bring the restoration to life by applying a low-fusing stain and putting it through a quick 10-minute firing cycle. Some orange stain was applied to add depth to the occlusal surface and a mixture composed of shade A and orange stain was applied to the cervical half on the buccal surface to create an appearance that mimics the adjacent natural teeth.