Photo Essay: Another Use for Anterior BruxZir® Solid Zirconia Restorations

May 1, 2013
 image
Michael B. Miller, DDS, FAGD, FAACD
Photo Essay Cover Image

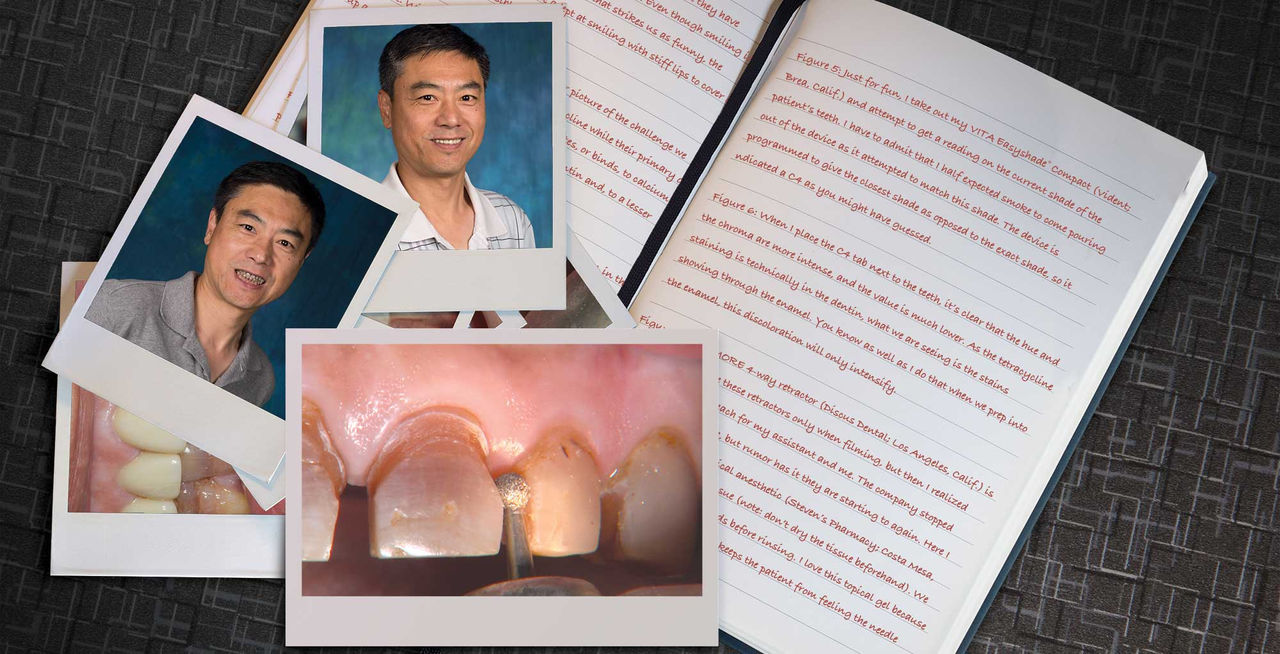
One of the most difficult clinical situations restorative dentists face in clinical practice is treating a patient with severe tetracycline staining. I treated one of these patients a few years ago with a set of veneers that were conservative but an esthetic compromise. The tetracycline stains showing through the veneers were still visible enough to bother the patient. When we removed the veneers six months later, I prepped 0.6 mm deeper to make the veneers thicker. But at the try-in appointment, it was clear that the esthetics hadn’t improved much from the first set. We ended up using lithium disilicate crowns, which provided an improved result, but there was still some minor show-through in the gingival third.

Not long ago, the patient’s brother came to see me. He was already prepared to do crowns, so I wanted to see if BruxZir® Solid Zirconia crowns (Glidewell Laboratories) could block out the prep shade. While not as esthetic as lithium disilicate crowns, I hoped to get a more esthetic overall result by entirely blocking out the stump shade. Unlike his sister, this patient had fractured nearly every PFM in his mouth, and the wear in his mouth and his edge-to-edge bite clearly revealed a severe bruxing habit. Taking this into consideration, I knew BruxZir Solid Zirconia was the only ceramic material that would stand a chance of surviving in this hostile oral environment.

Figure 1

Figure 1: My experience with tetracycline patients is that they have spent most of their lives trying not to smile. Even though smiling is an involuntary reaction to something that strikes us as funny, the majority of these patients become adept at smiling with stiff lips to cover as much of their teeth as possible.

Figure 2

Figure 2: With retractors, we get a much better picture of the challenge we are up against. When a young patient takes tetracycline while their primary or permanent teeth are forming, the tetracycline chelates, or binds, to calcium ions present on the hydroxyapatite crystals in the dentin and, to a lesser degree, in the enamel.

Figure 3

Figure 3: This view of the maxillary arch reveals the abuse that goes on in this patient’s mouth. The effect of his edge-to-edge bite is clear from the wear on the unrestored teeth. The strength of this patient’s musculature is also clear from the broken PFMs. Kudos to the dentist who put the cast metal crown on tooth #15; it’s doing fine!

Figure 4

Figure 4: This view of the mandibular arch shows the same type of destruction evident in the maxillary arch. The patient said no dentist had ever told him that he needed a nightguard, which surprised me. (Keep in mind, I’ve found patients to be wrong more than they are right when relaying clinical facts.) Again, the cast metal crown on the lower right is the only tooth — natural or restored — that is doing well in this oral environment.

Figure 5

Figure 5: Just for fun, I take out my VITA Easyshade® Compact (Vident; Brea, Calif.) and attempt to get a reading on the current shade of the patient’s teeth. I have to admit that I half-expected smoke to come pouring out of the device as it attempted to match this shade. The device is programmed to give the closest shade as opposed to the exact shade, so it indicated a C4 as you might have guessed.

Figure 6

Figure 6: When I place the C4 tab next to the teeth, it’s clear that the hue and the chroma are more intense, and the value is much lower. As the tetracycline staining is technically in the dentin, what we are seeing is the stains showing through the enamel. You know as well as I do that when we prep into the enamel, this discoloration will only intensify.

Figure 7

Figure 7: A SeeMORE 4-way retractor (Discus Dental; Los Angeles, Calif.) is placed. I used to use these retractors only when filming, but then I realized they freed up a hand each for my assistant and me. The company stopped making them for a while, but rumor has it they are starting to again. Here, I am placing PFG Light topical anesthetic (Steven’s Pharmacy; Costa Mesa, Calif.) onto moist mucosal tissue. (NOTE: Don’t dry the tissue beforehand.) We leave it in place for 45–60 seconds before rinsing. I love this topical gel because it is the only one I have found that keeps the patient from feeling the needle insertion.

Figure 8

Figure 8: Next, I use my Wand® STA® device (Milestone Scientific; Livingston, N.J.) to give anesthetic. This anesthesia system has removed so much stress from my time spent in the operatory, especially when it comes to giving anterior infiltrations — a simple injection to give in a very sensitive area of the patient’s mouth. It never occurred to me that I was tensing up during these injections and concentrating on giving the anesthetic as slowly as possible. With the STA, I can set it to the slow speed and tell my assistant jokes, creating a low-stress environment for the patient.

Figure 9

Figure 9: The first step in the Reverse Preparation Technique is to break the proximal contacts. We will be prepping all of the patient’s anterior teeth, so we start by simultaneously breaking the contact between teeth #8 & #9. Usually we use a #56 bur for this; however, by using an 856-025 bur (Axis Dental; Coppell, Texas), we not only break the contact, but we also begin to form our interproximal margins at the same time.

Figure 10

Figure 10: Here, we are starting to break through the contact, pushing the bur toward the palatal. With my KaVo ELECTROtorque handpiece (KaVo Dental; Charlotte, N.C.) spinning at 40,000 rpm, this big bur easily makes its way through the contact. The one thing to watch out for is nicking the gingival papilla. We also go to great lengths not to go subgingival, unless the existing crown has subgingival margins.

Figure 11

Figure 11: I then move on to the rest of the interproximal contacts using the 856-025 bur to create separation and begin the formation of the interproximal margins. When I reach the most distal tooth I am going to prepare, I can still use the 856-025 bur on the mesial, but I must switch to the 856-016 bur (Axis Dental) on the distal to avoid over-preparing the tooth or damaging the adjacent tooth.

Figure 12

Figure 12: This is the Razor® Carbide bur from Axis Dental, my favorite bur for cutting through PFM crowns. The Razor even cuts well on those metal substructures we see on patients who went to Mexico to have their dentistry done. It feels like you are cutting through a 1950s Chevy bumper when replacing those types of restorations. The Razor cuts through porcelain as well, so it’s the only bur I ever need to get through a PFM.

Figure 13

Figure 13: What’s not to love about the 90-degree angle of the Christensen Crown Remover (Hu-Friedy; Chicago, Ill.)? I’ve owned this one for at least 15 years and it still looks like it did the first time I used it. It’s a good thing Hu-Friedy’s scalers and explorers need to be replaced; otherwise, they might put themselves out of business!

Figure 14

Figure 14: This is a better shot of the Razor Carbide bur going though the porcelain of a PFM we are replacing. I used to use a diamond bur to cut through the porcelain and would then switch to a carbide to cut through the metal coping. But with the Razor, it’s one and done. It even has a reinforced shank to prevent breakage.

Figure 15

Figure 15: Sometimes when I use the Christensen Crown Remover to open a crown, it still won’t come off because of the contacts. Rather than cutting through the lingual portion, I try to grab the coping with my hemostats and do my best to wiggle it off. Having cut off many high-strength, all-ceramic crowns, I will never again complain about cutting off a PFM.

Figure 16

Figure 16: The next step of the Reverse Preparation Technique is to prepare the gingival margin. Unlike in dental school where I was taught to prep the margin as the last step of the preparation, I now do it as the second step. In my experience, doing it at the end feels 10 times harder than doing it at this point. In fact, most dentists who try this never go back to placing the margin at the end of the procedure.

Figure 17

Figure 17: The 801-021 bur (Axis Dental) is a round diamond, and when used parallel to the tooth, it cuts a half-circle into the gingival third. This ensures we have enough reduction in the gingival third for an esthetic restoration that won’t have an over-contoured emergence profile. An ugly gingival third is almost always the cause of ugly anterior crowns.

Figure 18

Figure 18: With the gingival margin prepped on all teeth, we are now going to place incisal edge depth cuts. The three rings that are visible on the shank indicate that this is a 1.5 mm depth cutter, which will provide an adequate amount of reduction for the dental technician to build the desired incisal edge. This is especially true when working with IPS e.max® crowns (Ivoclar Vivadent; Amherst, N.Y.), because they can be cut-back and layered for the best esthetic result.

Figure 19

Figure 19: The benefit of using a self-limiting depth cutter is not having to guess like you do when using a #330 bur as a depth cutter. The shank is much wider than the cutting surface of the bur, making it impossible to go too deep. Once the shoulder of this bur is on the incisal edge, I can move the bur to the lingual to complete the depth cut.

Figure 20

Figure 20: On posterior teeth, this depth cutter is also used to establish reduction, which is typically 2 mm for bilayered restorations such as PFMs or Lava™ crowns (3M™ ESPE™; St. Paul, Minn.). For lithium disilicate crowns, I prefer 1.5 mm of occlusal reduction. I prefer 1 mm for BruxZir crowns, but this material can be prepped as thin as 0.6 mm. On this cuspid, we are reducing the incisal edge 1.5 mm, like we did for the other anterior teeth.

Figure 21

Figure 21: I am now placing a 1 mm depth cut on the facial surface of the teeth to be prepped. I prefer to do this at the height of contour, or incisal to the height of contour, to ensure that I reduce enough in that area. One of the most frequent mistakes I used to make was under-reducing in this area, which leads to bulky, opaque, ugly crowns.

Figure 22

Figure 22: This image shows the payoff of spending a little extra time up front to make these depth cuts. Now we can grab our 856-025 bur again and go to town, secure in the knowledge that we know exactly where we are going. These depth cuts are a road map that keeps us from under-prepping or over-prepping these teeth, allowing us to fly through this part of the prep sequence.

Figure 23

Figure 23: Typically, I start this part of the prep sequence by reducing the incisal edges. I intentionally use the middle third of the bur to do this reduction because I want to save the tip of the bur for finishing the gingival margin. There is little chance that the tip will be dulled by then, but I’m prepping multiple teeth and I want it as new and as sharp as possible.

Figure 24

Figure 24: Here, I am using the 856-016 bur to do the occlusal reduction on the bicuspid. I use the bigger 856-025 bur on molars, but it is a little too big to use on bicuspids without accidentally nicking the adjacent teeth. You could also use a football bur to do this reduction (the convex shape of the bur will give you some “bonus” reduction).

Figure 25

Figure 25: The 856-025 bur does a great job on the facial surface of anterior teeth as well. You can see that I already finished the facial reduction on tooth #10 as I reduce tooth #9 here. Notice how dark the staining is on tooth #10 compared to tooth #8. Tooth #9 is right in the middle in terms of shade because we have removed about half of the enamel. You can already see that the margin looks good on tooth #10 — that’s the beauty of the round bur.

Figure 26

Figure 26: I use the 379-023 football bur (Axis Dental) to reduce the lingual surfaces of the anterior teeth. The convex shape of the bur helps to prepare a concave shape that will allow room for the incisal edges of the lower anteriors. Unlike other all-ceramic materials that require at least 1 mm of reduction, we can reduce just 0.6 mm on the lingual for a BruxZir crown. I have a 0.6 mm depth cutter in my bur kit to measure this precisely.

Figure 27

Figure 27: Toward the end of the prep sequence, I like to start rounding things over, especially the junctions of the facial surfaces and the incisal edges. I also try to avoid leaving sharp corners on the mesial and distal corners of the incisal edges. While BruxZir crowns are strong enough to be placed on these sharp angles, CAD/CAM mills are not able to replicate those sharp angles with their round burs.

Figure 28

Figure 28: Even though we know we reduced the proper amount on the incisal, facial and gingival surfaces, there are interproximal areas where it is impossible to place depth cuts. This makes it prudent at this point to try on the BioTemps® prep stent (Glidewell Laboratories) for the BioTemps Provisionals we will be placing to make sure we have reduced enough in all dimensions. The BioTemps are prepped as thin as possible, so there should be plenty of clearance, except maybe interproximally.

Figure 27

Figure 27: Toward the end of the prep sequence, I like to start rounding things over, especially the junctions of the facial surfaces and the incisal edges. I also try to avoid leaving sharp corners on the mesial and distal corners of the incisal edges. While BruxZir crowns are strong enough to be placed on these sharp angles, CAD/CAM mills are not able to replicate those sharp angles with their round burs.

Figure 30

Figure 30: The rubber really meets the road when you try in the BioTemps for the first time. If you have followed every step detailed so far, nine times out of 10 the BioTemps will drop into place passively. This is our objective. If you skip the first stent that was made on the BioTemps prep model, the BioTemps may not passively seat. (For BioTemps techniques and troubleshooting tips, view the CE course “BioTemps Techniques for Indirect Temporization.”)

Figure 31

Figure 31: Here, we have placed the Luxatemp Ultra into the BioTemps and are seating them on the preps. I insist on Luxatemp Ultra because it is the only bis-acryl temporary material that goes through a doughy stage, which allows me to pump the BioTemps up and down in it as though it were methyl methacrylate — other bis-acryl materials go from soft to hard too quickly for this technique, potentially locking the BioTemps into place too soon.

Figure 32

Figure 32: My assistant has trimmed the BioTemps with a thin, perforated diamond disc, taking extra care to make sure she opens the gingival embrasures. If anything, she will intentionally create black triangles on the temps so the patient can swish Tooth & Gums Tonic® (Dental Herb Company; Lancaster, N.H.) through the spaces. This also avoids blunting the papilla with the temps, which can lead to real black triangles when we try in the permanent crowns. I have made that mistake too many times in the past, and have had to drop the prep margins and re-impress.

Figure 33

Figure 33: The BioTemps are now cemented with TempBond® (Kerr Corp.; Orange, Calif.), and the temporary cement is cleaned up with an explorer and Thornton 3-in-1 Floss (Thornton International; Norwalk, Conn.). The proper overjet and overbite relationship has been reestablished with the BioTemps, and the next two weeks will give us a good chance to see if the patient has any issues with this change. My assistant did a good job with the embrasures, but she over-trimmed the gingival margin on tooth #9. If I were concerned about gingival overgrowth on the margin, I could place some flowable composite, but I feel confident it will stay put.

Figure 34

Figure 34: Two weeks later the patient returns, reporting no functional or phonetic issues with the BioTemps, so we can ask the dental technician assigned to the case to fabricate the final BruxZir crowns based on the digital scan of the BioTemps. Thanks to digital technology, we can now duplicate BioTemps in the contours of the final restorations by scanning them, storing the digital information and then using the stored digital file to mill the final crowns to match. (To request this “scan & save” service, simply note this preference on your BioTemps prescription.) Things look pretty good when we remove the BioTemps, and there are just a few spots of minor gingival irritation. It’s now time to take the final impression.

Figure 35

Figure 35: Not taking the impression during the prep appointment for large anterior cases was a difficult lesson to learn, but now I won’t do it any other way. I have had too many cases of crowns having to be remade because the temps blunted the papilla. The first thing my assistant does is place an Ultrapak® #00 cord (Ultradent; South Jordan, Utah). This cord does not have any hemostatic agent or epinephrine on it. Its purpose is to create vertical retraction of the tissue and sit against the inflamed base of the sulcus to prevent bleeding when I pull the top cord.

Figure 36

Figure 36: I prefer to use straight, non-serrated cord packers when placing the #00 cord. In this shot, you can see that this cord is braided and hollow. Its hollowness makes it easier to pack into the sulcus; however, even #00 solid cords are fairly easy to pack. Because it is braided, the #00 cord starts to expand once it is placed in the sulcus, absorbing any crevicular fluids. Trying to pack a #00 cord when it is wet is frustrating, so we try to dry the sulcus as much as possible first, especially at the gingival margin.

Figure 37

Figure 37: Now that the #00 cords are all in place, we can inspect the margins and see if any of them need to be dropped subgingivally. Our goal is to have slightly subgingival margins without taking a bur subgingival. We are able to achieve this because the #00 cord has vertically retracted the tissue approximately 0.5 mm. I typically drop the margins with the 856-025 bur, and most times I turn the water off and my electric handpiece down to 3,000 rpm. This way, I can clearly see what I’m doing.

Figure 38

Figure 38: Even though I am a huge fan of the Two-Cord Impression Technique, I continue to try every non-cord retraction technique that comes on the market, hoping that one day I can stop packing cord. So far I haven’t found anything that works as well as cord, but the search continues. My common complaint about the paste retraction systems has been the difficulty in getting retraction material into the sulcus, so I ordered the 3M ESPE Retraction Capsule after seeing an ad about its narrow tip that the company claims fits directly in the sulcus. You can see us trying it out here.

Figure 39

Figure 39: The retraction paste is left in place for a minimum of two minutes, but typically closer to eight minutes. Just like we do with the two-cord technique, we place ROEKO Comprecap Anatomic compression caps (Coltène/Whaledent; Cuyahoga Falls, Ohio) over the preps to help keep the retraction paste in place and the patient’s tongue away. The pressure also drives blood out of the capillaries, providing us with additional temporary hemostasis.

Figure 40

Figure 40: I find that the 3M ESPE retraction paste rinses out more easily than other retraction pastes — another common complaint I have with them. As I examine the final impression, I am impressed with how good it looks. I still think I would have had more retraction with a second cord on top of the #00 cord, but it might be the best cord-free impression I have taken. I’m not switching from retraction cord just yet, but this new product is a step in the right direction.

Figure 41

Figure 41: Having practiced around dental technicians for the last 12 years, I always hear them talking about what they want to see in a bite registration. They want the bite registration material to be only on the hard tissue. They also want the material to be between only the prepped and the opposing teeth; they don’t want any material between the unprepared teeth. It simply needs to capture the incisal thirds of the prepped teeth and the incisal thirds of the opposing teeth. After taking the bite registration, we put the temps back on and schedule the patient to come back one week later.

Figure 42

Figure 42: Seven days later we remove the temps. To clean up the preps, I know no better way than with my KaVo SONICflex® scaler (KaVo Dental). This scaler will blast any temporary cement — even Durelon® (3M ESPE) — off the preps, leaving behind no trace of cement that could interfere with seating. The scaler doesn’t spin, so even if you accidently bump the tissue, it won’t cause bleeding.

Figure 43

Figure 43: After trying in the crowns and getting the patient’s approval, we place two one-minute coats of G5™ All-Purpose Desensitizer (CLINICIAN’S CHOICE; New Milford, Conn.) on the preps. We are going to use Ceramir® Crown & Bridge cement (Doxa Dental; Newport Beach, Calif.) to place the BruxZir crowns, so we don’t need to use the Ivoclean® solution (Ivoclar Vivadent) or Z-PRIME™ Plus (Bisco Inc.; Schaumburg, Ill.). Because Ceramir doesn’t rely on phosphates to bond to the zirconia, the salivary phosphates do not affect it, so there is no need to use a zirconia primer. As always, we place teeth #8 & #9 first to ensure proper seating, applying pressure apically with pinewood sticks.

Figure 44

Figure 44: Retracted facial view of the cemented BruxZir crowns. In addition to being the only permanent cement that bonds to BruxZir restorations without the use of a zirconia primer, Ceramir is also a breeze to clean up due to its gel state during set-up that allows for any excess cement to be peeled off in one piece. While these crowns likely won’t be mistaken for IPS Empress® (Ivoclar Vivadent) or IPS e.max in terms of esthetics, these glass-ceramic materials would have resulted in show-through due to the dark stump shade color. This is definitely one case where the lower translucency of BruxZir Solid Zirconia is advantageous.

Figure 45

Figure 45: Retracted left lateral view of the cemented BruxZir crowns. An interesting thing to note is the visible broken PFM in the lower left quadrant. We prescribed BruxZir Solid Zirconia for this case because we wanted to use a material that would completely mask the dark underlying stump shade. It’s just a coincidence that we can see a broken PFM, but broken restorations typically are my primary reason for prescribing BruxZir crowns. I don’t give a patient more than one chance to break restorations.

Figure 46

Figure 46: Retracted right lateral view of the cemented BruxZir crowns. Here, we see another broken PFM in lower right quadrant. My point in noting these broken PFMs is that, even if this patient didn’t have tetracycline staining and instead required replacement of all of these anterior crowns due to old, leaky composites and recurrent decay, BruxZir Solid Zirconia still would have been my restorative material of choice. PFMs have a pretty good track record over the last 50 years, but when I see a patient who breaks them, their two choices in my mind are cast gold and BruxZir Solid Zirconia.

Figure 47

Figure 47: Occlusal view of the cemented BruxZir crowns. How are these restorations going to hold up against this patient’s difficult occlusal situation? There are no guarantees in dentistry, but single-unit BruxZir crowns have the lowest fracture rate of any restoration in our lab, with the exception of cast gold, but that material really wasn’t an option in this case. Because BruxZir Solid Zirconia is a monolithic material (solid zirconia with no porcelain overlay), I have a high degree of confidence that these crowns will be intact for years to come.

Figure 48

Figure 48: The final result — not a bad smile for a guy who told me he hasn’t smiled for the last 30 years. This type of patient really does need some coaching to learn to smile again, and I encourage them to practice in front of the mirror, as silly as that sounds. To me, it’s not that different from physical therapy, where a patient needs to relearn a physical skill that they haven’t been able to do for an extended period of time. With this patient, I am already wondering what I will do if he wants to do the lower arch as well. I’m not a big fan of doing full crowns on lower anterior teeth and typically prefer veneers, but I’m not sure whether BruxZir veneers will block out the dark shades. If he opts for this treatment, you will see it here. Stay tuned!

References

  1. Zarone F, Russo S, Sorrentino R. From porcelain-fused-to-metal to zirconia: clinical and experimental considerations. Dent Mater. 2011 Jan;27(1):83-96.
  2. Holt LR, Boksman L. Monolithic zirconia: minimizing adjustments. Dent Today. 2012 Dec;31(12):78, 80-1.
  3. Janyavula S, Lawson N, Cakir D, Beck P, Ramp LC, Burgess JO. The wear of polished and glazed zirconia against enamel. J Prosthet Dent. 2013 Jan;109(1):22-9.
  4. Rinke S, Schäfer S, Lange K, Gersdorff N, Roediger M. Practice-based clinical evaluation of metal-ceramic and zirconia molar crowns: 3-year results. J Oral Rehabil. 2013 Mar;40(3):228-37.
  5. Shahin R, Kern M. Effect of air-abrasion on the retention of zirconia ceramic crowns luted with different cements before and after artificial aging. Dent Mater. 2010 Sep;26(9):922-8.
  6. Kern M, Swift EJ Jr. Bonding to zirconia. J Esthet Restor Dent. 2011 Apr;23(2):71-2.
  7. Sasse M, Eschbach S, Kern M. Randomized clinical trial on single retainer all-ceramic resin-bonded fixed partial dentures: Influence of the bonding system after up to 55 months. J Dent. 2012 Sep;40(9):783-6.