In this issue:
Place and Restore Dental Implants Economically
Author

Let’s face it: In today’s economy, dentists are seeing more and more patients who have put off treatment for several years. However, it’s not all gloom and doom. Implant dentistry is also becoming increasingly accepted and requested by more patients. This growing population now actively seeks to replace their missing teeth with implants. New technologies are emerging that make implant placement a reality for well-trained general practitioners.
In the latest ADA survey, it was noted that around 45 million teeth are extracted on an annual basis.1 Only two million of those teeth will get replaced with implant therapy. An increase in the market penetration of dental implant therapy is greatly needed, as are cost-effective implants and associated restorative components.
As a general dentist who practices in a small, blue-collar town where unemployment is higher than 10%, one of the challenges that I face is how to price my implant restorations. With the growing number of new implants entering the marketplace, it can be difficult to know what laboratory components will cost when restoring a case. Some cases have 300% variability in cost for just a single unit, due mostly to the implant restorative component pricing.

One solution to this dilemma is to use a dental laboratory that can offer the entire restorative and surgical process for one flat fee. A simple flat fee provides a straightforward approach to both treatment and financial planning, and helps guide clinical decisions involved in restoring the patient’s dentition from start to finish. It embodies the philosophy of beginning the surgical process with the end restorative goal in mind.
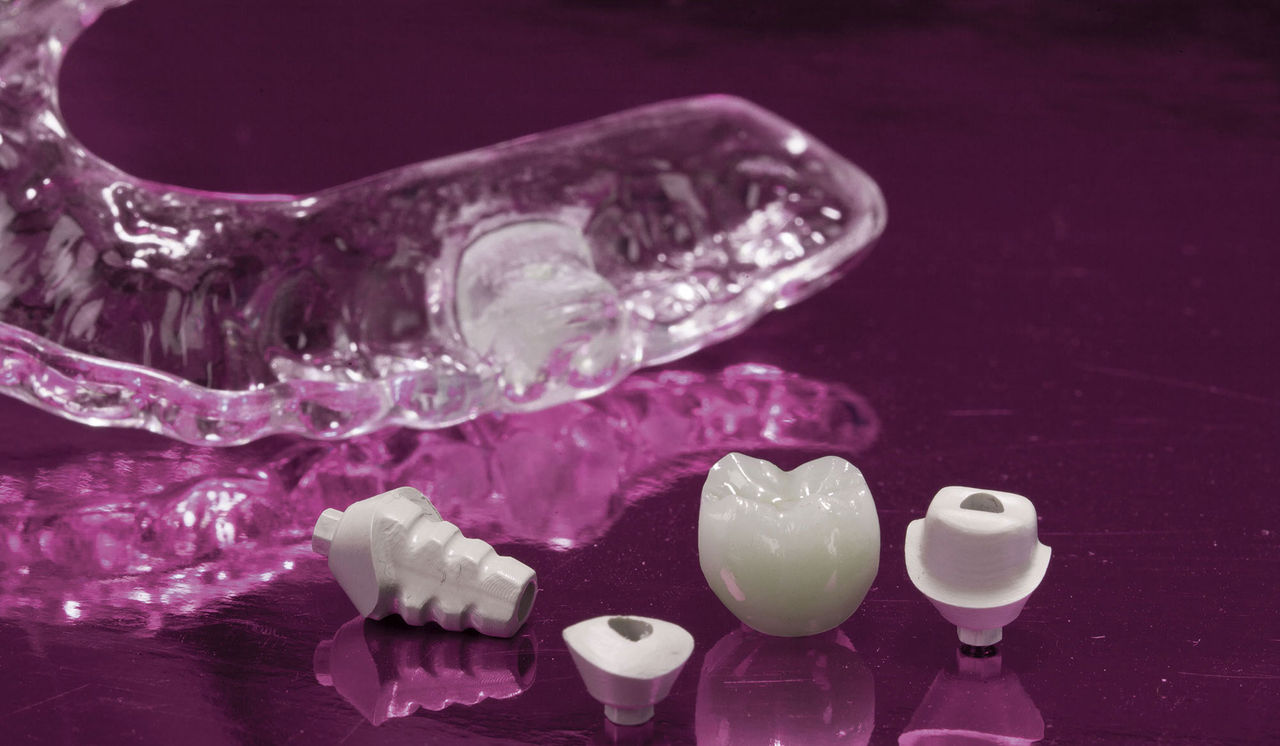
This article will present a case example in which a missing premolar is replaced with this philosophy in mind. The Inclusive® Tooth Replacement System (Glidewell Laboratories; Newport Beach, Calif.) was utilized, a system in which all implant and restorative components and services are included for one fixed price (Fig. 1). This comprehensive laboratory package includes:
- Prosthetic stent
- Implant (not pictured)
- Custom healing abutment
- Custom temporary abutment
- Matching custom impression coping
- Provisional crown
- Final restoration (delivered at a later date)
If the clinician prefers to use the implant of his or her own choice, the system is available for most major brands.
CASE REPORT
Diagnosis and Treatment Planning
A 50-year-old woman presented with an unremarkable medical and dental history. Her chief complaint was her missing upper left premolar, tooth #13 (Fig. 2), which had been removed two years prior because of a vertical fracture. The patient did not wish to consider a partial denture or bridge to replace the missing tooth, and had been saving money to restore the area with an implant.
Clinical examination utilizing the bone sounding technique, stone study models and a panoramic radiograph revealed bone structure of adequate width and height. There was a noted decrease in the buccal-lingual dimension of bone, but it was determined that sufficient volume was present to proceed with implant therapy. Attached gingiva was sufficiently present and the surrounding tissue was in good health. The adjacent teeth would eventually require new cast restorations, but they did not pose any immediate risk or complications for the proposed implant treatment.


Presurgical Laboratory Phase
To accurately begin the laboratory phase of the case, full-arch vinyl polysiloxane (VPS) impressions (Capture® VPS [Glidewell Direct; Newport Beach, Calif.]) were taken and sent to Glidewell Laboratories to start the Inclusive Tooth Replacement System process. Shade and clinical photos were taken to help facilitate fabrication of the components.
A simple flat fee provides a straightforward approach to both treatment and financial planning, and helps guide clinical decisions involved in restoring the patient’s dentition from start to finish.
It was determined that a prosthetic placement stent would be adequate for this case (Figs. 3a, 3b). The prosthetic stent, based on the diagnostic wax-up, was fabricated to identify the ideal position of the implant platform. If the dentist performs the osteotomy with this stent, the implant can be inserted in the trajectory best suited to maximize the effectiveness of the custom temporary abutment and crown. All contraindications, such as anatomy and bone contour, that cannot be determined from a stone model and panoramic radiograph, must be accounted for by the treating dentist. In this clinical case, these factors were taken into consideration at the treatment planning phase with bone sounding.
Prior to the surgery date, all of the necessary components were received and inspected (Fig. 4). These components included:
- One 3.7 mm x 13 mm Inclusive® Tapered Implant (Glidewell Direct) (not pictured)
- Custom healing abutment
- Custom temporary abutment
- Custom impression coping
- Custom temporary crown (BioTemps® Provisional [Glidewell Laboratories])
The final crown was included in the fixed price, but delivered at a later date.
Clinical Treatment Protocol
The implant was placed without a flap utilizing a tissue punch (OCO Biomedical; Albuquerque, N.M.) to expose the bone crest (Fig. 5). A parallel pin (ACE Surgical; Brockton, Mass.) was placed to verify the correct angulation based off of the prosthetic stent (Figs. 6a, 6b). The final insertion of the implant was done with the implant motor (Aseptico AEU-7000 [Aseptico; Woodinville, Wash.]) set to 40 rpm and 40 Ncm (Fig. 7). Although the implant felt stable, a torque of 35 Ncm, the accepted stability required to consider immediate loading, was not achieved.2,3 As a result, it was decided not to temporize the implant, and the custom healing abutment was placed to sculpt the tissue. Close inspection of the custom healing abutment showed that it was contoured much like a natural tooth and not round like a stock healing abutment (Fig. 8). This allowed the soft tissue to be "trained" (formed) for optimal esthetics.


Eight weeks later, the custom healing abutment was removed. The tissue and stability of the implant were evaluated. Greater than 45 Ncm of torque and an implant stability quotient of 72 were registered on an Osstell stability meter (Osstell; Linthicum, Md.). The custom impression coping was placed, and a VPS impression was taken to precisely communicate to the lab our hard work sculpting the soft tissue. The patient was sent home with a custom temporary abutment and custom temporary crown (Fig. 9).
From the impression, a final titanium custom abutment was milled, and a BruxZir® Solid Zirconia crown (Glidewell Laboratories) was fabricated (Figs. 10, 11).
At the seating appointment, the included abutment positioning jig helped to ensure the correct placement of the titanium abutment (Fig. 12). The abutment was screwed to the recommended torque, and a radiograph was taken to confirm proper fit. The monolithic zirconia crown was tried in, and the interproximal and occlusal contacts were adjusted as needed. The crown was left out of occlusion by approximately 30 μm to allow for equal dissipation of biting forces during clenching. Next, the abutment screw hole was covered with Teflon tape, and then the crown was cemented with resin cement (Maxcem Elite™ [Kerr Corp.; Orange, Calif.]) by applying a thin layer to the inside of the crown. All excess cement was carefully removed, and a final radiograph was taken to verify exact final fit and confirm that no excess cement had been left behind (Figs. 13, 14).


IN SUMMARY
With laboratory solutions like the Inclusive Tooth Replacement System described herein, clinicians can now remove much of the anxiety often associated with both implant placement and treatment with implant-retained prosthetics. This laboratory solution offers: a prosthetic stent for simple implant placement; a custom healing abutment to achieve prime esthetics through soft-tissue sculpting of the emergence profile; a custom temporary abutment; a custom impression coping for taking extremely accurate soft-tissue impressions; a custom provisional crown; a custom titanium or zirconia abutment for optimal crown strength and emergence considerations; a final cement- or screw-retained restoration made from a material of your choice; all for a simple fixed flat fee that includes consultations and planning assistance for the clinician during any phase of treatment. In the author’s opinion, this is a welcome solution to complex and time-consuming challenges that dental practitioners face in today’s market.
Dr. Paresh Patel has placed more than 2,500 small-diameter implants and has worked as a lecturer and clinical consultant on mini implants for various companies. Contact him at pareshpateldds2@gmail.com.
Disclosure: Dr. Patel reports no disclosures.
References
- ^American Dental Association, 1999 Survey of Dental Services Rendered; estimates from Nobel Biocare, Zurich, Switzerland, September 2002.
- ^Flanagan D. Fixed partial dentures and crowns supported by very small diameter dental implants in compromised sites. Implant Dent. 2008 Jun;17(2):182-91.
- ^Uribe R, Peñarrocha M, Balaguer J, Fulgueiras N. Immediate loading in oral implants. Present situation. Med Oral Patol Oral Cir Bucal. 2005 Jul 1;10 Suppl 2:E143-53.
Reprinted by permission of Dentistry Today, ©2012 Dentistry Today.