In this issue:
How to Succeed in Dentistry with Digital Photography
Author

Digital photography is taking the dental profession by storm!
Digital cameras and accessories are being purchased by thousands of dental offices across the country. Photography gives the dental team a method to communicate visually with patients and get them involved in their diagnosis.
Digital gives us the unique opportunity to communicate instantaneously with patients and store these photographs as part of our digital record.
The key to harnessing the capabilities and power of photography starts with choosing the right camera and logically integrating the camera into your practice. This article will outline these keys and help you get started on the road to joining the digital revolution.
Choosing the Right Camera
The most common question I’m asked is, “Which camera should I get?” The answer isn’t as simple as a single camera model. Today, there are two main choices with digital dental photography. You can choose a digital SLR camera or a digital point-and-shoot camera. Both options are traditional consumer cameras outfitted with accessories and attachments that make them capable of use in the dental office.
Electronic Gear


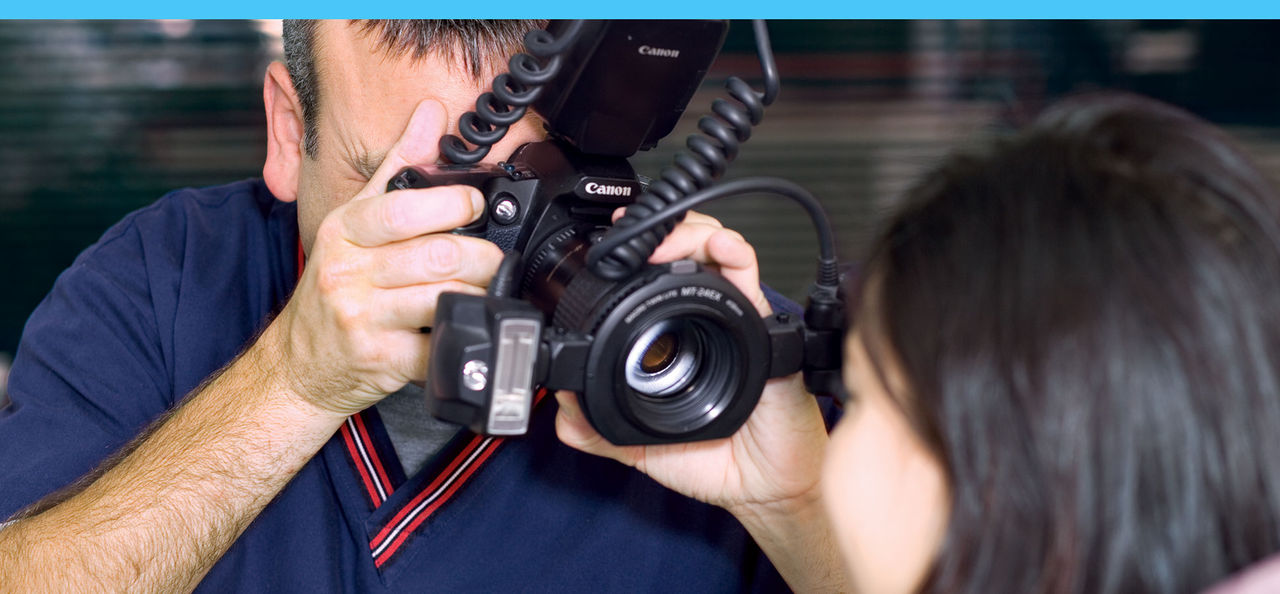
The digital SLRs (Canon EOS 20D, Canon Digital Rebel XT, Fujifilm FinePix S2 Pro, Nikon D70) are cameras that allow you to change lenses and have complete control over the photograph. These cameras produce the highest quality photographs because they have a greater depth of field, focus faster and crisper, and give you more control over lighting. The major drawbacks to SLRs are their size and weight. The typical dental SLR weighs approximately 10 pounds. This may not seem like much, but when trying to take close-up photographs the weight can become an issue, especially for team members. However, newer digital SLRs are becoming smaller and lighter. The Canon Digital Rebel XT is 33% smaller and lighter than its predecessor, without losing any image quality.
The digital point-and-shoot cameras (Canon PowerShot G5/G6, Olympus Camedia C-5050) have a fixed, built-in lens that requires a magnifying attachment for dental use. These cameras produce a very nice photograph that is adequate for showing patients. Because these cameras have a limited depth of field, the pictures aren’t as crisp as the SLRs. For example, if taking a picture of a patient’s smile, the central incisors would be in full focus and the premolars would be slightly out of focus. Additionally, the mechanism for focusing pictures isn’t as fast as the SLR cameras. The major advantages of point-and-shoot cameras are their size and weight. The typical point-and-shoot dental camera weighs about three pounds. This would be easier for your team member to hold and use on their own.
So which camera do you choose? My suggestion is to answer the following question: “Who do I want to show these photos to?” If your answer is just patients, then the Canon Digital Rebel XT with Ring Flash. If your answer is other dentists, then the Canon EOS 20D with Dual Point Flash is your best choice. If your answer is both, then my suggestion is to have both. Please remember that size and weight of the camera will play a role, depending upon who is taking your photographs.
Digital Output


Integration
So now that you have chosen the right camera, what’s next?
Let’s put together a list of the proper accessories that are needed to integrate the camera into your office. You will need to get equipment that will allow you to take the photographs, print the photographs, show your photographs and store your photographs.
To take great photographs, you will need two accessories — retractors and mirrors. My suggestion for retractors is to choose plastic retractors that are double-ended. These retractors will allow you to have a single retractor that can be used for larger and smaller patients. For mirrors my suggestion is to choose double-sided mirrors, not stainless steel mirrors. These mirrors will last longer and won’t show scratches as quickly in your photos. For sizes I suggest an adult occlusal and the buccal #1. The occlusal mirror will allow you to take photographs of the entire arch, and the buccal mirror will allow you to take lateral photographs and quadrant photographs.
The next step is printing your photographs. Your printed photographs can be attached to insurance claims, given to patients, framed for hanging on walls and/or sent with lab cases for shade communication. There are three main types of color printers available today: color lasers, photo inkjet printers and dye sublimation printers. Each has its own unique benefits and drawbacks.
Color lasers are now affordable options for dental practices. A typical color laser printer can be purchased for under $1,000 at most major electronic stores. Color lasers are fast and usually easily networked in your office.
But color lasers lack the ability to print detailed photographs and print on photo paper. Color lasers are best used to print color brochures and PowerPoint® (Microsoft Corporation; Redmond, Wash.) presentations.
For less than half the cost of a color laser, you can have a dye sublimation printer that can produce prints that rival those of professional processors. The advantages are print quality and print speed. The disadvantages are the need for specific paper for the specific model, cost per print and limited print sizes. Additionally, dye sublimation printers are meant only for printing photos. These printers cannot be used to print out other documents.
Photo-quality inkjet printers are the workhorse for printing digital photos. Inkjet printers can range in price from $100 to $600, and can print photos from as small as 3 × 5 to as large as 13 × 44. The quality is rivaling dye sublimation printers, and the print speeds are getting better with each new release. Inkjet printers allow you to print all types of documents and use all types of paper. The major drawback with inkjet printers is the rising costs of replacement ink and the amount of ink used in printing high-quality photographs. Still, I choose to use a photo inkjet printer as my daily printer for digital photographs.
Now, let’s turn to showing our photographs to our patients. Remember that patients who see their problems, own their problems. In my opinion, a photo is useless unless you take the time to show it to the patient. To show digital photographs to our patients, we need to have operatories equipped with televisions and/or computers.
The simplest method of displaying your digital photographs doesn’t involve the use of a computer. Nearly every digital camera can be connected directly to a television using a supplied video cable. This method is very similar to your old intraoral camera. The major advantage and difference is that you can use the camera control to zoom and move around the photograph. This means that you can take a picture of a full arch or quadrant and zoom into a single tooth. Connecting your camera directly to your television is, in fact, the quickest and easiest method you can use to show your photos to your patients.
Another method to show your photos to patients is directly through a computer. The computer screen can be shown to the patient, or the computer screen can be duplicated on a separate television for patient viewing. To view your pictures through a computer, you need to connect your camera directly to the computer using the supplied computer cable or transfer the photos onto the computer using a card reader. Then, utilizing software, you can zoom into the photos, crop the photos, adjust the color, image the photos and/or create a photo slideshow.
Finally, let’s talk about storing your photos for future retrieval. Storage of your digital photos requires a computer and software. The photos must be transferred to your computer and then saved to the computer. Depending upon your software, these photos can be categorized by patient name or by procedure type. Once the photos are stored in your computer, they are easily retrieved. This allows you to create a library of photos that can be used for legal documentation and/or patient presentation. Imagine being able to show another patient a series of photos of a similar case and how you solved that concern!
Digital photography isn’t a question of maybe or a little later — digital photography is right now. The equipment is better, the integration is easier and the benefits are plentiful. Someone once said, “A picture is worth a thousand words.” In dentistry, this is very appropriate. I encourage you to step into the digital world and reap the rewards of digital photography.