In this issue:
Seeing Is Believing: A Case Study in Handling and Explaining Occlusal Disease
Author

Occlusal disease is one of the most destructive and neglected elements in dentistry and plays a major role in reducing the longevity of our finest restorative efforts. It can present itself in the form of painful, clicking TM joints, sore facial muscles, headaches, tooth wear, tooth looseness, sensitivity and migration. It is a dominant factor in the fracture of restorations on posterior teeth.
Although a dentist may understand the cause and effect of these destructive forces, explaining these concepts to patients and their families can be very difficult. It is much easier to discuss the solution for caries or fractured teeth than it is to describe how excess wear is caused by a movement of the mandible from maximum intercuspation, in and out of a centric relation position. Likewise, understanding how interferences on the balancing or non-working side during lateral excursions occur is difficult enough for dentists to see and detect; this difficulty is only compounded when we try to explain these problems to patients. Difficult or not, we are obligated to offer a treatment plan for the resolution of all disease categories which fall within our scope of health care service.
Case Report
A middle-aged lady reported to my office with a request to have an implant crown placed on an integrated implant in the lower left #18 area (Fig. 1). Upon cursory examination, I observed signs of severe wear, occlusal disease, throughout the mouth and quite notably in the lower left quadrant (Fig. 2). I informed her of my concern, that implant success or failure after osteointegration was largely dependent on having proper distribution of the biting forces. I assured her we’d restore the implant for the greatest potential for long-term success and asked for the opportunity to study her case further prior to making restorative decisions. She rescheduled for a complete examination, which included (1.) full-mouth X-rays, (2.) nine intraoral photographs (Canon Digital Rebel), (3.) Panorex, and (4.) mounted study models (SAM® 3 [Great Lakes Orthodontics; Tonawanda, N.Y.]) in centric relation.
A complete examination was conducted evaluating the TMJ, muscles, periodontal structures and occlusion, and an oral cancer screening was performed. The tooth by tooth exam, looking for excess wear, looseness, fractures and caries, was aided by the use of a dental operating microscope (Global Protégé).
Due to facial muscle tightness, I fabricated an anterior deprogramming device and asked her to wear it at night and monitor the effects on her muscles and jaw. She was then scheduled for a treatment plan consultation.
The History
The patient’s history included tooth loss of #18 due to a fracture of the crown as well as a recent history of loosening, fracturing and early replacement of all-ceramic restoration on #8 and #9 (Figs. 2, 3). She stated she has a habit of grinding her teeth and felt that was contributing toward the crown failure. Additionally, the patient was not pleased with the appearance of her smile as she felt her teeth were too short. Her long-term goal was to keep her natural teeth for life and avoid repeated dental treatment.
Case Report


Clinical Findings
The periodontal structures were quite healthy and there was minimal evidence of caries. There was muscle tenderness upon direct palpation of the masseters, temporalis and medial pterygoids as well as the lateral pterygoids upon indirect palpation.
There was excessive hypertrophy of the masseters as well as the temporalis muscles. The mandible had full range of motion in all possible movements. There were no intracapsular disorders of the TMJ as determined by Doppler auscultation and load testing. There was severe wear throughout the mouth as well as abfractions along with slight tooth mobility. There was a CR contact on the distal of #19, with a 2 mm vertical component and a 2 mm forward component into maximal intercuspation (MI). There were interferences in lateral excursions on the working and non-working sides bilaterally. Protrusive was WNL.
The potential for repeated crown fracturing, as well as potential implant failure due to destructive forces of occlusion, was very high. Allowing these destructive forces to persist could cause implant failure, restorative failure or tooth loss. Not treating this disease would have severe implications for the patient.
Consultation Time
Using her mounted models, I was able to show my client how worn her natural teeth had become. The models were mounted in CR so the first contact was on tooth #19 and there were lateral interferences in all eccentric jaw movements.
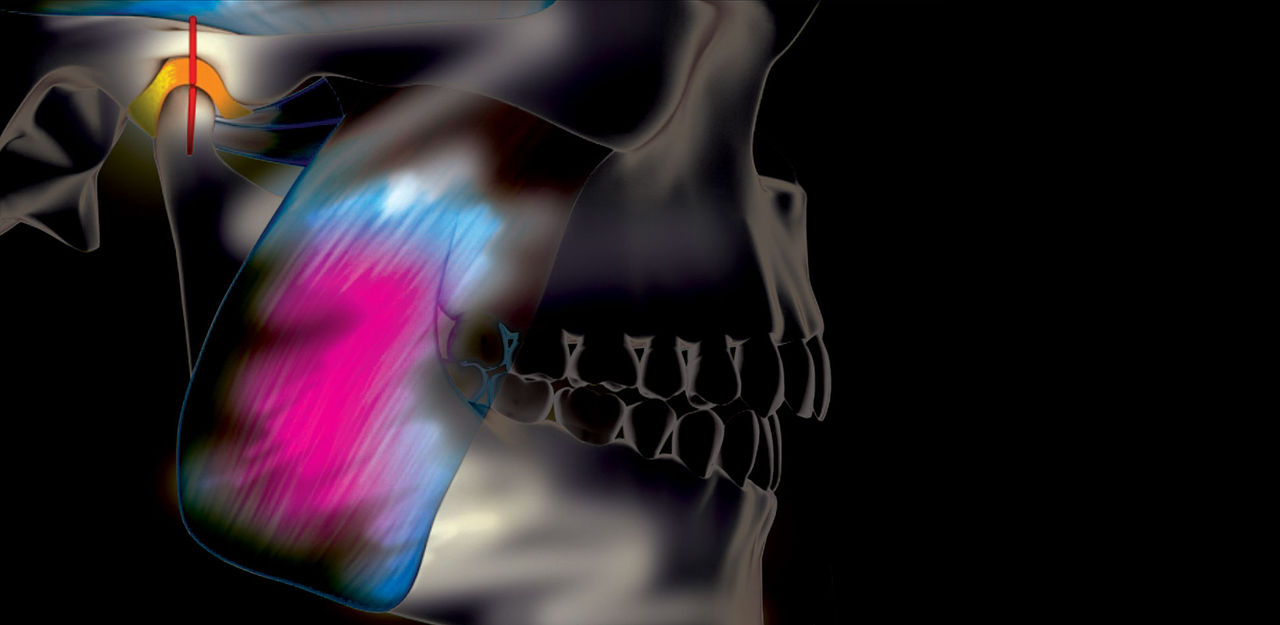
In the past, these findings were important yet difficult for the patient to understand even with mounted models. My goal in creating BiteFX™ (D2Effects, LLC; Truckee, Calif.) was to show patients the relevance of proper joint position, normal muscle function, the role of proper anterior guidance, and finally the value of ideal tooth contacts in a way that could be easily understood.
The patient had experienced remarkable relief of facial muscle soreness with the deprogrammer, so I began by educating her on the reason behind this success. Through animations (Figs. 7, 8), the client could see how the muscles closed the jaw and allowed the joint to fully seat, removing the tension in the pterygoid muscles. This had the net effect of changing the mandible position and causing the teeth to fit differently after nighttime usage.
Proper Joint Position
I was able to show the patient the difference between a stable bite, with CR in harmony with MI and no ability to slide forward and backward on the back teeth, and an unstable bite by showing two contrasting BiteFX animations (Figs. 9, 10).
Demonstrating Joint Position


Normal Muscle Function
To explain her muscle tenderness, I showed her two animations: one illustrating normal muscle function (Fig. 11), and the other showing hyper-muscle activity (Fig. 12).
It was easy to illustrate that, when the jaw closes into a stable bite, it requires no usage of the muscles that position the jaw forward and sideways.
Proper Anterior Guidance
The patient exhibited severe wear and lateral interferences on both the working and balancing sides. Using BiteFX animations, she could visualize the destructive effects of her existing occlusal disease, and the benefits of proper anterior guidance as snapped in Figures 13–16.
Muscle Function / Anterior Guidance


Proper Tooth Contacts


Proper Tooth Contacts
The animations illustrated in Figures 17 and 18 showed the patient proper tooth contacts, which minimize the contact, wear and stress to the teeth, as compared to destructive contacts, which can wear, move or break teeth.
Attaining Centric Relation Position
I’m often asked how I determine the proper position of the joint. In this case, I replicated the action of the closing muscles of the jaw by using bimanual manipulation. In addition, I had her clench repeatedly on an anterior deprogrammer. I was able to attain CR records using both techniques.
Treatment Planning for Success
Once the patient began to understand the advantages of a stable occlusion, she started to focus on the esthetics of her smile. The occlusal attrition was dramatic and the central incisors were as long as they were wide. To establish longer upper front teeth required opening the vertical dimension as determined by mandibular translation and the closest speaking space. Evaluation of this parameter combined with the patient’s desires, I requested maxillary centrals 12 mm long and corresponding lowers 10 mm in the diagnostic wax-up.
Treatment Plan
Step 1.
Continued anterior deprogrammer therapy followed by occlusal equilibration to include anterior guidance using composite buildups on the cuspids.
Step 2.
New impressions for mounted study models in CR and a full-mouth diagnostic wax-up to the desired tooth lengths.
Step 3.
Preparation, impression taking and provisionalization of both arches simultaneously.
Step 4.
Evaluation of the form, function and comfort during the provisionalization period (six months).
Step 5.
Final shade selection, fabrication of all ceramic restorations from first bicuspid to first bicuspid, and porcelain fused to gold on the remaining posterior teeth.
Step 6.
The final phase is impressions and fabrication of the lower implant crown #18. Ironically, this last procedure was the first item requested at the initial office visit.
Temporaries


Implants / Final Restorations


Treatment Phase
Visit #1 – Equilibration and Diagnostic Wax-up
Wearing the anterior deprogrammer had relaxed the muscles, which allowed for an easy and complete occlusal equilibration. Full-arch impressions using VPS were made. A SAM 3 axiomatic bite fork and face-bow were taken, as well as CR bite records using Futar® D (Kettenbach; Huntington Beach, Calif.).
Because centric relation is independent of tooth contact or position, I take the record at a 2–4 mm vertical opening to maintain adequate thickness of the recording material. This enables the laboratory to avoid breakage due to thinness of material. The client selected a smile she liked, and that guided the Rx for the diagnostic wax-up.
Digital photos of the client’s existing smile were included with the prescription. The vertical dimension of occlusion (VDO) was determined by the height necessary to accommodate adequate speaking space.
Visit #2 – Preparation
Preplanning and visualization of both the occlusal scheme and final tooth shape and position are essential for predictable and efficient treatment.
Beginning with “the end in mind” includes having clear provisional matrices, “suck down” prep guides and replica stone models of the diagnostic wax-up, as well as mounted waxed models available at the start of treatment.
An electric handpiece and new Brasseler diamonds allowed for an effective five-hour visit during which both arches were prepped, final impressions were taken and provisionals placed. CR bite records as well as face-bow were taken.
Visit #3 – The Test Drive
This is the period where the newly increased VDO is evaluated with emphasis on speech and esthetics. The temporaries (Figs. 19–22) were modified to the patient’s desires (i.e., more pointed canines), and alginate impressions, digital photos and face-bow records were given to the lab to create the final restorations.
Visit #4 – Shade Selection
The client opted for very white teeth. The Vitapan 3D shade guide (Vident; Brea, Calif.) was used. A single incisor was fabricated and tried in to get the patient’s approval prior to completing the entire case.
Visit #5 – Expect the Unexpected
During the six-month trial test drive, the pulp of #3 was irreversibly inflamed. The tooth had a prior history of severe pain after a crown was placed several decades ago. The client rejected the option of saving the tooth with root canal therapy and chose extraction and bone grafting, followed by implant placement and implant retained crown (Figs. 23, 24). The extraction and bone graft were completed using Grafton matrix (BioHorizons; Birmingham, Ala.) and PepGen P-15 (DENTSPLY; York, Pa.).
After four months, a 6 mm x 9 mm BioHorizons D4 Maestro implant was placed, and simultaneously a “sinus lift” of 3 mm was performed with flat ended osteotomes and a conservative tissue punch access rather than a full flap.
Visit #6 – Completion
The final restorations (Figs. 25–30) were placed using RelyX™ bonding agent (3M™ ESPE™; St. Paul, Minn.) for the refractory porcelain and GC Fuji luting cement (GC America; Alsip, Ill.) for the posterior PFMs. The delivery appointment went smoothly and required only “spot adjusting” in several areas. There was no hint of a CR slide and all eccentric jaw motions were WNL!
Conclusion
Placing an implant or any final restoration in an environment where it has the potential to fail due to destructive occlusal forces is unwise. Communicating the effect of occlusal disease can be frustrating and difficult, yet nonetheless it is our responsibility as health professionals.
Final Restorations


Realizing that all patients may neither require nor want extensive full-mouth reconstruction, a simpler solution would have been to equilibrate and restore anterior guidance with a minimal approach using composites. Her muscle soreness would be eliminated and the potential for repeated porcelain failure would be very minimal.
The beauty of understanding and presenting solutions to occlusion disease is that, whether you are doing something very minimal or, as in this case, major, the case can be completed in phases (one arch or anterior segment at a time). The treatment principles are the same regardless of scope of treatment. This case started with a desire to do a single implant crown on #18. The patient was also concerned about repeated crown loosening and fracture, and she was aware of grinding her teeth.
With the help of 3D animations, I was able to demonstrate the destructive effects caused by an unstable occlusion, which increased her understanding and confidence to accept a rather extensive treatment plan. The result is a beautiful, healthy smile that will last.