Creating a More Professional Smile

May 30, 2023
Lex Pierre, DDS image
Lex Pierre, DDS
Creating a More Professional Smile

A smile can be an outward reflection of how we feel about ourselves. And, of course, as we evolve and change, sometimes that reflection needs to change as well.

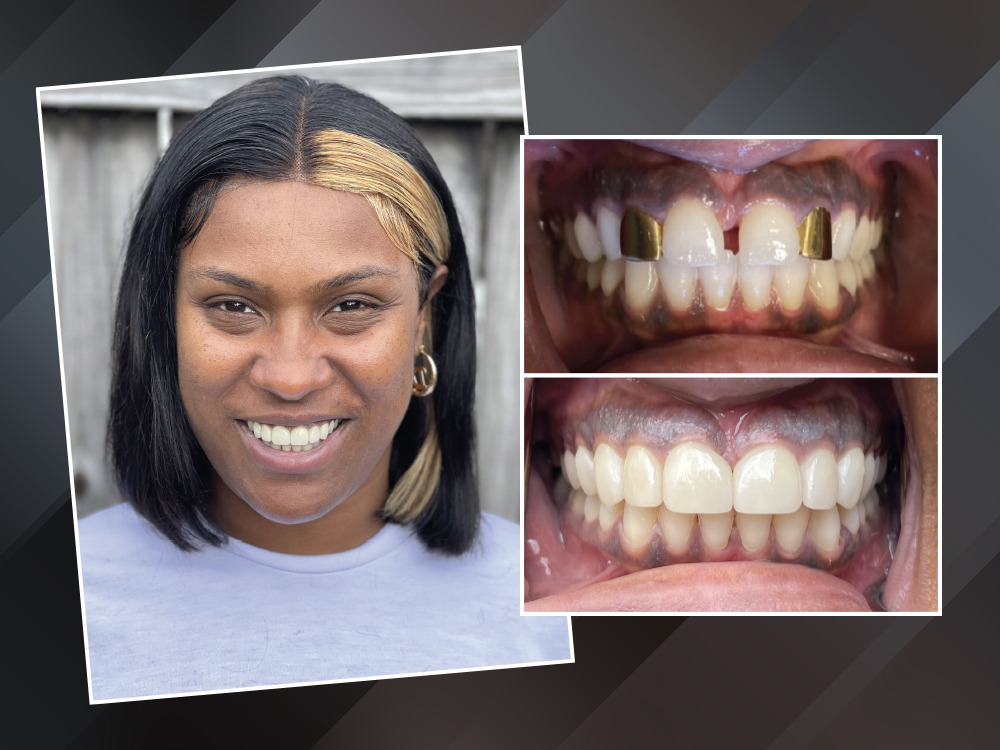
A recent case illustrates this point vividly. My patient was in the beauty industry and had high esthetic demands. In addition, she wanted a social-media-ready solution that we could implement quickly. Her demands were threefold: She wanted to remove her gold shell crowns on #7 and 10, remove the diastema between #8 and 9, and brighten her overall smile.

Like so many patients who are eager for a quick result, she declined orthodontic treatment to close the diastema. That left me with the additional challenge of determining the correct proportions to provide natural looking teeth while absorbing those extra millimeters.

At first, I was hesitant. The diastema was large, and the patient’s high expectations and sense of urgency were a little intimidating. Thankfully, I knew the lab would support me as we determined the correct tooth proportions.

CASE REPORT

Figure 1a Patient's before photo
Figure 1b gold crowns on teeth #7 and #10 and diastema between #8 and #9

Figures 1a, 1b: Although she had previously completed tooth whitening with us, the patient felt her smile was still not the attractive and professional smile she wanted. We decided to remove the gold crowns on #7 & 10 and close the diastema between #8 & 9 with ceramic veneers. 

Figure 2a diagnostic wax-up
Figure 2b open mouth of teeth
Figure 2c bulky teeth

Figures 2a–2c: I started with a treatment plan and diagnostic wax-up of teeth #7–10. After preparing the teeth and cementing the provisionals, I felt the teeth looked too bulky. I reached out to the lab with a detailed description of what I was looking for, along with photos of the patient. 

Figure 3a
Figure 3b
Figure 3c

Figures 3a–3c: The lab sent back new design images with varying shapes and sizes for the incisors. I then requested additional design images that included no-prep veneers on #6 & 11 to allow me to slightly decrease the final width of the centrals. With a new smile design created for teeth #6–11, I knew we had the correct solution. 

I knew the lab would support me as we determined the correct tooth proportions.
Figure 4a Patient's after photo smile
Figure 4b before procedure
Figure 4c after procedure with IPS e.max® and veneers used

Figures 4a–4c: IPS e.max® was used to fabricate crowns for #7 & 10 and veneers for #6, 8, 9 & 11. The technicians at Glidewell used my submitted shade along with the preoperative photos to obtain the desired shade for the restorations. The patient was thrilled with the outcome.

CONCLUSION

This patient had high demands and very specific requirements. Fortunately, with the laboratory team supporting me behind the scenes, I was able to provide the new smile she wanted. When you begin a case by communicating your patient’s needs to your lab, you can help your patients achieve that bold Hollywood smile every time.

IPS e.max is a registered trademark of Ivoclar Vivadent.