Clinical Technique: Diagnostic Wax-Ups

January 3, 2008
 image
Michael DiTolla, DDS, FAGD
Clinical Technique: Diagnostic Wax-Ups

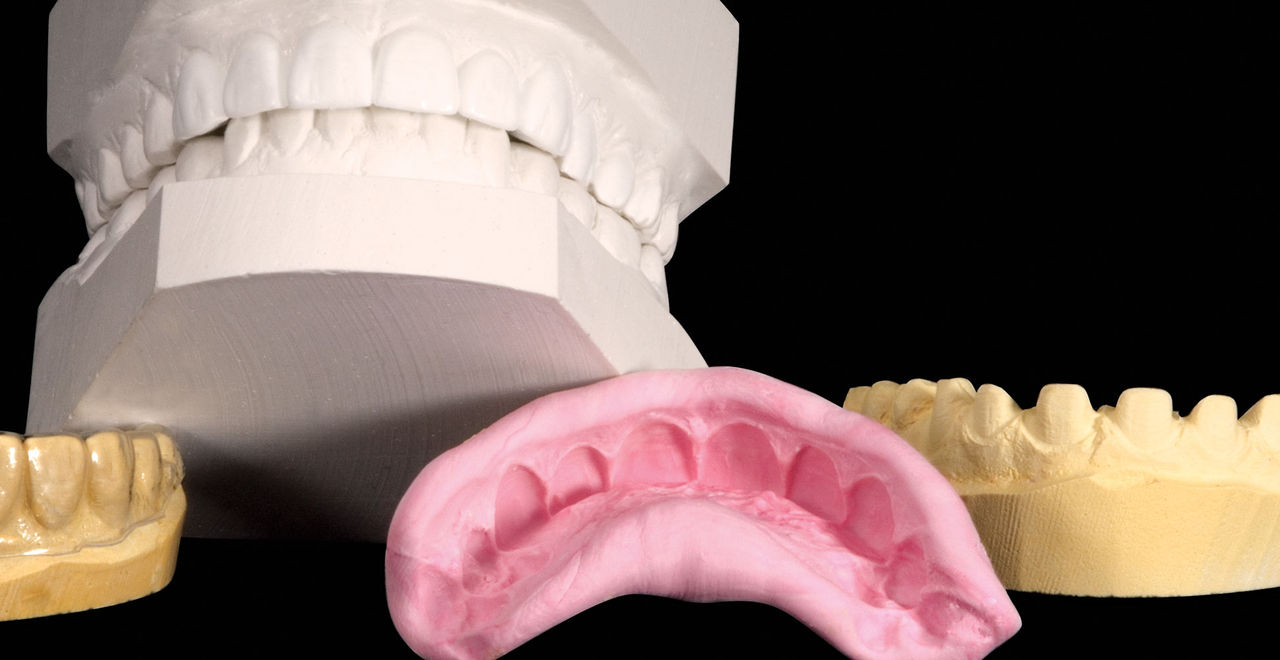
During my 20 years of practice, diagnostic wax-ups have become increasingly important to me. In the beginning, it was merely a sales tool I could show to the patient to demonstrate porcelain veneers. Today, the diagnostic wax-up serves three main purposes: 1) To help the patient commit to treatment by showing them the desired outcome. 2) As a preparation template, it shows me which teeth to prepare and how much to prepare. 3) After years of trying, I still haven’t found a better way to make temporary veneers than using a putty/wash matrix of a diagnostic wax-up.

Figure 1

Figure 1: This 35-year-old female presented with multiple esthetic and functional concerns. She was missing teeth #3, #12 & #14, and did not like the size and shape of teeth #7, #8, #9 & #10.

Figure 2

Figure 2: Frontal view of the wax-up. After considering several restorative options, including implants, the patient decided to go with fixed bridgework to replace the missing teeth, minimal-prep veneers on teeth #7, #8, #9 & #11 and no-prep veneers on #6 & #10.

Figure 3

Figure 3: Occlusal view of the diagnostic wax-up. The missing teeth have been replaced, and the alignment of the anterior teeth has been corrected.

Figure 4

Figure 4: To help show the patient the improvements that have been made on the wax-up, I hold the preoperative model next to the diagnostic wax-up. While many patients are excited to see the changes that can be made to their teeth, the magic of their new smile often doesn’t happen until transferred into their mouth.

Figure 5

Figure 5: I am using a half-Hollenbeck to define the gingival margins on the diagnostic wax-up. This is often an area that the lab unintentionally leaves undefined. By getting rid of any excess wax in the area of the gingival sulcus, we make sure our putty/wash matrix will have a tight fit at the gingival margin, which saves us a lot of time and effort during temporization.

Figure 6

Figure 6: A putty/wash matrix is simple to make, and much more accurate than a vacuum-form stent could ever be. For this reason, the putty/wash matrix is the ideal veneer temporization technique. Start with equal amounts of putty catalyst and putty base.

Figure 7

Figure 7: Mix together with glove and powder-free hands until all the streaks have disappeared.

Figure 8

Figure 8: Roll into a cigar-shaped cylinder, ensuring that all of the streaks from Figure 7 are all gone.

Figure 9

Figure 9: Push the putty down onto the arch, making sure to cover all the teeth. It is important to cover unprepared teeth in addition to the ones you will prepare to help with the seating of the matrix.

Figure 10

Figure 10: On the facial aspect of the matrix, make sure it is pushed down all the way to the borders of the model. We want to ensure that we have captured the entire facial aspect of the anterior teeth with the putty matrix.

Figure 11

Figure 11: This is what the putty matrix should look like when removed from the diagnostic wax-up model. Be sure not to remove it until your fingernail can no longer indent the outer surface of the putty matrix.

Figure 12

Figure 12: Choose a syringe of your favorite light or extra-light body syringe material.

Figure 13

Figure 13: Fill the entire length of the putty matrix with the light body impression material and push it back onto the diagnostic wax-up model, ensuring that it is all the way down.

Figure 14

Figure 14: You should see some excess light body material leaking out from under the edges of the putty matrix; it is normal and desirable to have excess material on both the lingual and the facial.

Figure 15

Figure 15: Wait until the light body material has set and then remove the putty/wash matrix. It should look like this, where the light body material is clearly visible throughout the entire matrix.

Figure 16

Figure 16: Using a Bard-Parker knife or a scalpel, carefully trim the putty/wash matrix. Here, I am trimming the top of it back to ensure it will go back in place without interference from the patient’s upper lip. Obviously, you should be careful not to cut into the gingival margin.

Figure 17

Figure 17: The matrix is usually too thick on the facial aspect as well. I am using a scalpel to trim away some of that facial thickness. It makes it easier to get the matrix in and out of the mouth if it’s not the size of a hockey puck.

Figure 18

Figure 18: Look down on the matrix from above and mark the midline with a Sharpie. Because you will not have any reference points when placing the matrix back in the mouth, aligning this mark with the labial frenum will ensure you get the proper positioning.

Figure 19

Figure 19: The matrix is filled with Luxatemp® (Zenith/DMG; Englewood, N.J.) bleached shade (shown in Figure 24), and seated in the mouth. While not completely accurate, using the putty/wash matrix to do a mock-up in the mouth allows the patient to see new potential in their smile. Interestingly enough, most patients aren’t convinced until the mock-up is removed and they see their actual teeth once again. That’s when patients tend to ask me, “When can we start?”

Figure 20

Figure 20: By holding the diagnostic prep model next to the patient’s mouth, it becomes easy to see where I need to reduce. According to our model, the distal half of tooth #8 needs reduction and the mesial half needs none. Using an 856-025 diamond, I reduce the distal half.

Figure 21

Figure 21: To make the diagnostic wax-up, the lab duplicates the preoperative model and prepares the teeth to help achieve the esthetic outcome I have asked for. As you can see, they have clearly marked these areas of preparation for me with a red marker. Many dentists would have prepared all the anterior teeth for full veneers on this case but, as this model shows, minimal preparation on teeth #7, #8, #9 & #11 is all that was needed.

Figure 22

Figure 22: This is an occlusal view of the preoperative model next to the lab prepared model. By viewing these models at this angle, it makes it easy to see where the lab has removed the facial limiting factors standing in the way of esthetic success. It is typically only these facial limiting factors that need to be removed in a minimal-prep veneer case.

Figure 23

Figure 23: The reduction on tooth #7 is fairly minor as well. The reduction is confined to the distoincisal quarter of the tooth. If you refer back to Figure 22, you will see how this was a facial limiting factor on the preoperative model and how it had been removed in the diagnostic preparation model.

Figure 24

Figure 24: For the temporaries, I prefer to use the bleached shade of Luxatemp. Because minimal-prep veneers are so thin, there tends to be a lot of show through from the underlying tooth color. The bleached shade Luxatemp helps to offset this. Fill the putty matrix completely to ensure complete facial coverage.

Figure 25

Figure 25: Using the midline indicator, seat the matrix using finger pressure. Because of the minimal amount of tooth structure removed for these veneers, it may take more finger pressure to seat the matrix completely than you might imagine.

Figure 26

Figure 26: With the matrix fully seated, you should see excess Luxatemp material on the facial and the lingual. I especially like to see excess on the facial, as it tells me I have covered the entire facial surface with the temporary material. Let the Luxatemp sit for two minutes and then remove the excess on the facial. I wait to remove excess on the lingual until the matrix is removed.

Figure 27

Figure 27: Remove the matrix and observe the beautiful results. If you took the time to clean up the wax-up, as shown in Figure 5, this is where you’ll see your dividends pay off. Typically, nothing will have to be done on the facial and I’ll use a 7408 bur to remove excess Luxatemp from the lingual.

Figure 28

Figure 28: LuxaGlaze® (Zenith/DMG) is then painted onto the facial surface of the temporaries and cured into place. This unfilled resin is a great finishing touch for these temporary restorations and helps them to look more like porcelain and less like plastic.

Figure 29

Figure 29: Left lateral view of temporaries.

Figure 30

Figure 30: Right lateral view of temporaries.

Figure 31

Figure 31: Facial view of temporaries. The patient is able to evaluate the temporaries accurately because no local anesthesia was given for this minimal-preparation veneer case.