2201 Dupont Dr., Irvine, CA 92612
© 2026 Glidewell. All rights reserved.
800-854-7256 USA
Avoid a few common errors in digital impression scanning to improve final accuracy.

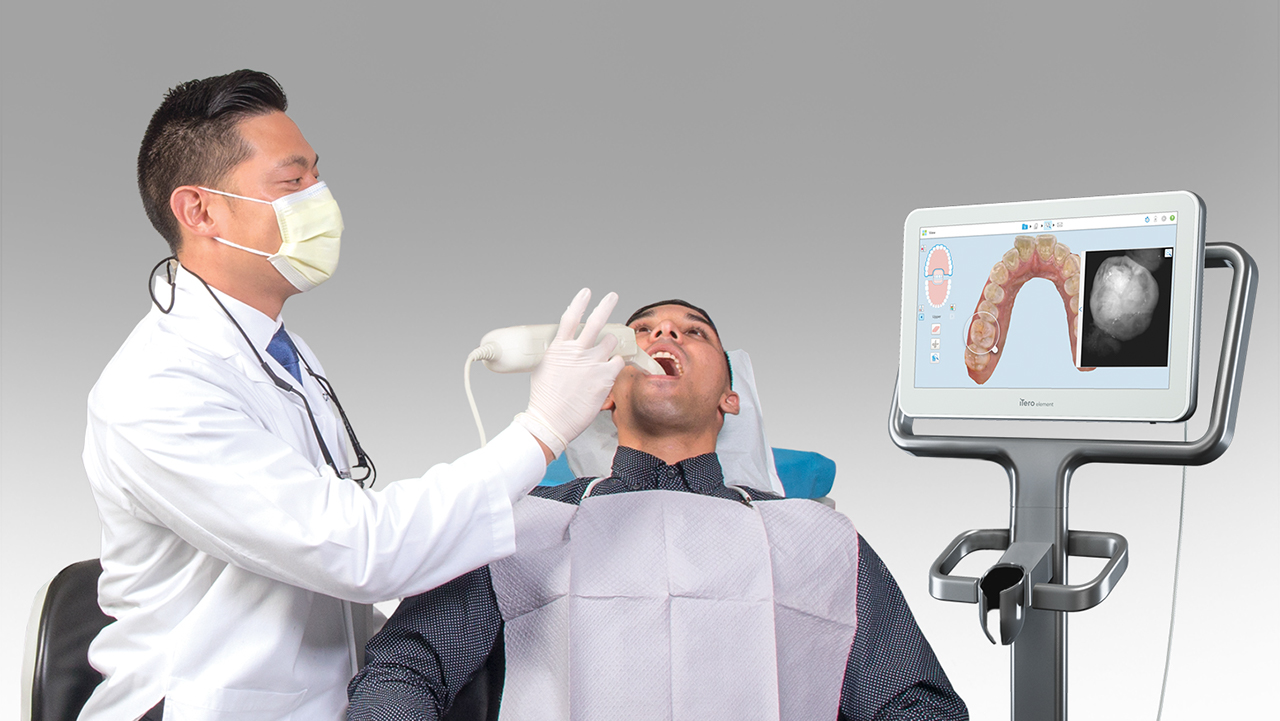
As with any skill, capturing digital impressions with an intraoral scanner is largely a matter of practice. With the emergence of digital technology as a major part of the dental industry, mastering your scanning technique is more important than ever. Although recent technological advances are making the scanning process simpler and more intuitive, errors can still occur. Fortunately, just providing a little extra effort for digital impressions will lead to a more accurate restoration — as well as time and money savings.
If you’re still within the learning curve in terms of capturing perfect digital scans, don’t worry — you’re not alone! According to the Centralized Digital Order Processing (CDOP) team at Glidewell, which handles all incoming digital impressions from doctors, there are three mistakes that most frequently cause issues with digital impressions and lead to delays and the need for retakes.
The good news is that it’s easy to correct once you know what to watch for. Read on for the list of the top three, and learn how you can keep these errors from happening. Before you know it, digital impressions — a key building block of digital dentistry — will be routine.
This one wins the award for “occurs most often” by a landslide. Achieving angles with an intraoral scanner wand can sometimes be difficult, and any areas of the dentition not scanned fully will result in missing information and blank spots on the impression. It happens most often on the hard-to-capture surfaces of the mesial and distal teeth adjacent to the preparation.
When this happens, the lab will typically have to ask you for a new intraoral scan before they can get to work on the restoration. While submitting digital impressions to Glidewell is a simple task, calling in the patient for a second round of intraoral scanning is not, so it’s best to avoid this however you can.

Figures 1a, 1b: Mesial and distal surfaces of teeth adjacent to the preparation are the most-often missed areas when scanning (1a). Any difficult-to-access areas, like the opposing teeth in a posterior bite (1b), should be checked to confirm they were fully captured for a complete and accurate impression.
Obtaining superb digital impressions takes time. The more you work with the intraoral scanner wand, the better you’ll be able to manipulate it in ways that are comfortable for both you and the patient, while still capturing the information you need.
Below are a few checkpoints you should keep in mind when performing a digital scan. These will be useful in ensuring that you’re covering all of the areas you need to, and before long it’ll become second nature to do them.
Distortion or missing information caused by moisture in a scan is caused by the reaction of the intraoral scanner to anything that reflects back on it, such as saliva or other fluids. The scanner can’t differentiate between that reflection and the rest of the image it’s capturing. Depending on the viscosity and amount of liquid, it will either warp or entirely blot out the dentition beneath it, leading to models that don’t reflect reality or are missing information.
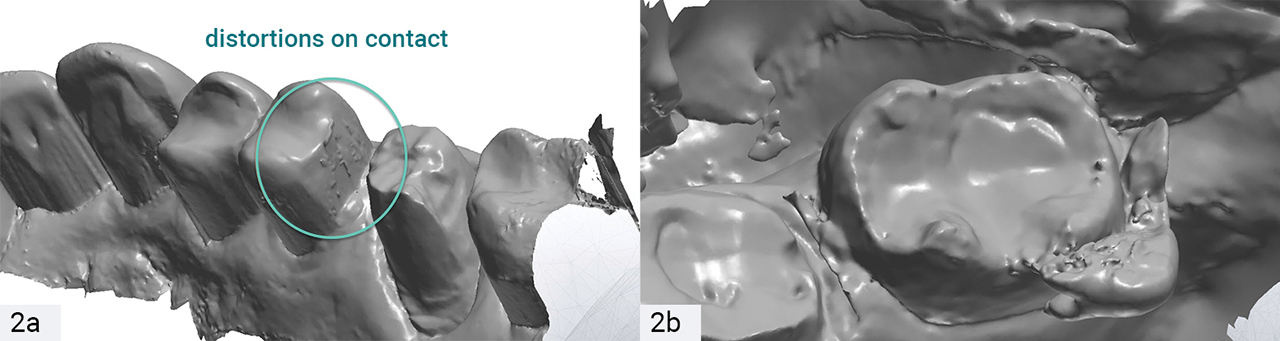
Figures 2a, 2b: When too much moisture is present during digital impressions, the intraoral scanner picks up the reflection of the liquid and treats it like part of the dentition. This results in errors ranging from misleading shapes and textures on the teeth (2a), to the presence of actual droplets in the 3D image that blot out the dentition you’re trying to capture (2b).
As with many things, when it comes to taking clear digital impressions, preparation is the key. Taking the time to remove moisture completely from the area is essential to getting a full and accurate 3D model and saves you time in the long run by eliminating the need for rescans. The tips below may also help.
Digital impressions of the buccal view are particularly prone to inaccuracy due to the cheeks and tongue. They’re also prone to errors caused by an abnormal bite.
Misaligned occlusion in a buccal scan can give you a digital impression that shows the bite being open or misaligned in a way that it isn’t in reality. It can also cause artifacts or distortions that interfere with the image by causing misshapen teeth or inaccurate alignment. These issues can’t always be seen during the scanning phase, and often not until the digital impression is completed. Luckily, there are a few things you can do to help minimize the chance of this misalignment.
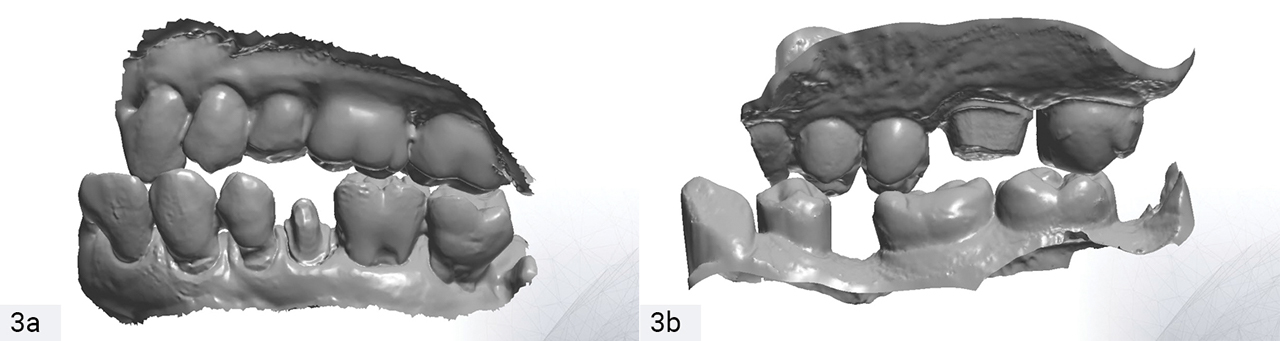
Figures 3a, 3b: An unnatural or abnormal bite on the patient’s part can result in an inaccurate buccal scan (3a). Interference from the cheeks and tongue can also lead to missing data, which results in a digital impression that may or may not match reality (3b). Both issues create misaligned buccal scans that can result in an improperly fitting restoration.
Once you’ve identified the areas where your digital impressions have fallen short of ideal in the past and where you might benefit the most from these tips, it’s simply a matter of practicing them consistently until they become a natural part of your workflow. At that point you’ll find yourself quickly rewarded with increased accuracy — not only in your digital impressions, but also in the final restorations that rely upon them. Once you reach that point, you’re well on par with the latest trends in dentistry and positioned for future success.
P.S. If you're ready to move beyond digital impressions and get started in the world of in-office crown milling with same-day delivery, check out the glidewell.io™ In-Office Solution. It works with any intraoral scanner and makes the digital workflow simple and affordable.
Send blog-related questions and suggestions to hello@glidewell.com.

2201 Dupont Dr., Irvine, CA 92612
© 2026 Glidewell. All rights reserved.