How to Immediately Place Implants at Extraction Sites

Discover a surgical procedure that can replace a broken tooth in one appointment.

July 15, 2021
 image
Leif Löberg, DDS
Glidewell Blog 47A: Emergency Hahn Tapered Implant Case Report with Dr. Leif Löberg Hero Image

When patients present for treatment with a broken tooth in the esthetic zone, they are typically in an urgent, even panicked, state of mind. In addition to the pain and compromised dental function, there is the fear that they will have to be around other people without the ability to talk and smile with their usual confidence. The extraction with immediate implant placement procedure is an invaluable service for such patients, as it quickly addresses their dental emergency in a single appointment. Since I have learned to perform this procedure, I have been able to extract the broken tooth, place an implant and deliver an immediate provisional restoration for nearly every patient who visits my office with a fractured tooth in the anterior.

In addition to addressing the urgent need of the patient, this procedure establishes an incredible reputation for your practice. Many patients are shocked that their broken tooth can be replaced on the very day they sought treatment, and are quick to tell their friends and family about their experience. And the final outcome is just as predictable as the results achieved through delayed implant placement, so you’re also providing a restoration that the patient can count on over the long term.1,2

Here, I will outline this life-changing and practice-building procedure, including diagnosis, tooth extraction, immediate implant placement, and immediate provisionalization. To illustrate each step, I’ll include a case report that shows how simple this procedure can be and the exceptional results it produces when the proper techniques, protocol and principles are observed. Implant and material selection are also important considerations, so I’ll discuss the implant system and biologics that have worked best for me in my practice.

CASE REPORT AND STEP-BY-STEP PROCEDURE

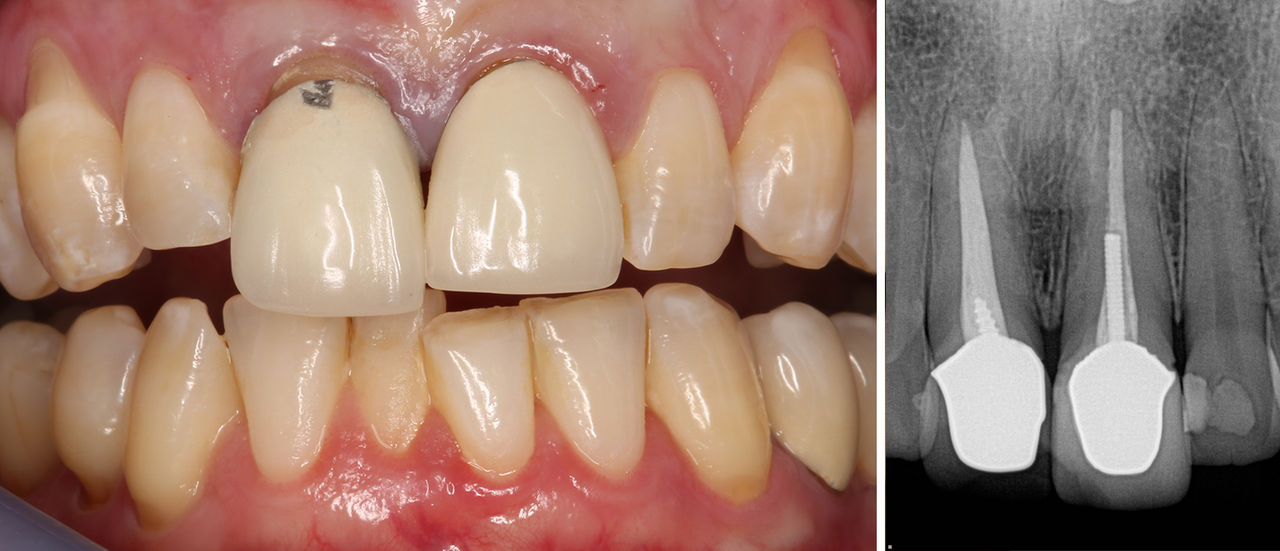
The patients who are best served by the extraction with immediate implant placement procedure — or, as some call it, “the emergency implant” — have commonly experienced some kind of accident that has damaged a tooth in the esthetic zone. In this particular case, the patient suffered an injury that caused her existing crown on tooth #8 to completely fracture off at the gumline. The tooth and her other central incisor, both of which had received root-canal treatment in the past, suffered from severe recurrent caries necessitating tooth replacement. The patient did not want to depend on a removable appliance or have her healthy lateral incisors reduced to support a 4-unit bridge, so I evaluated her bone levels intraorally and radiographically for immediate implant placement.

A fractured crown off the gumline

The patient sought urgent treatment for a crown that had fractured off at the gumline, as well as her other central incisor. Both teeth had received prior endodontic treatment and exhibited recurrent decay that rendered the teeth untreatable.

The patient had sufficient vertical and horizontal bone levels for implant placement, and the buccal plate was intact. Her healthy bone and soft tissue, as well as her urgent situation in the anterior, made her an excellent candidate for extraction with immediate implant placement, and she happily agreed to move forward with the procedure. After anesthetizing the patient, I atraumatically removed the central incisors. The practitioner’s extraction method of choice may be used as long as great care is taken to preserve the buccal plate, which is essential to the emergency implant procedure. In this case, the buccal plate was not damaged during the extractions, so I proceeded with immediate implant placement. Note that an immediate implant should not be placed in cases where the buccal plate is damaged. Instead, a “graft and wait” protocol should be followed.

The patient’s central incisors were removed atraumatically

The patient’s central incisors were removed atraumatically. With the buccal plate intact, the decision was made to move forward with immediate implant placement.

For the implant placement procedure, two 3.5 mm x 13 mm Hahn Tapered Implants were selected. The Hahn Tapered Implant is my implant system of choice, and the deep, sharp threads of the implant are ideal for the emergency implant procedure as they keep the implant engaged with the palatal wall during placement and excel in establishing the high primary stability needed for a predictable outcome.

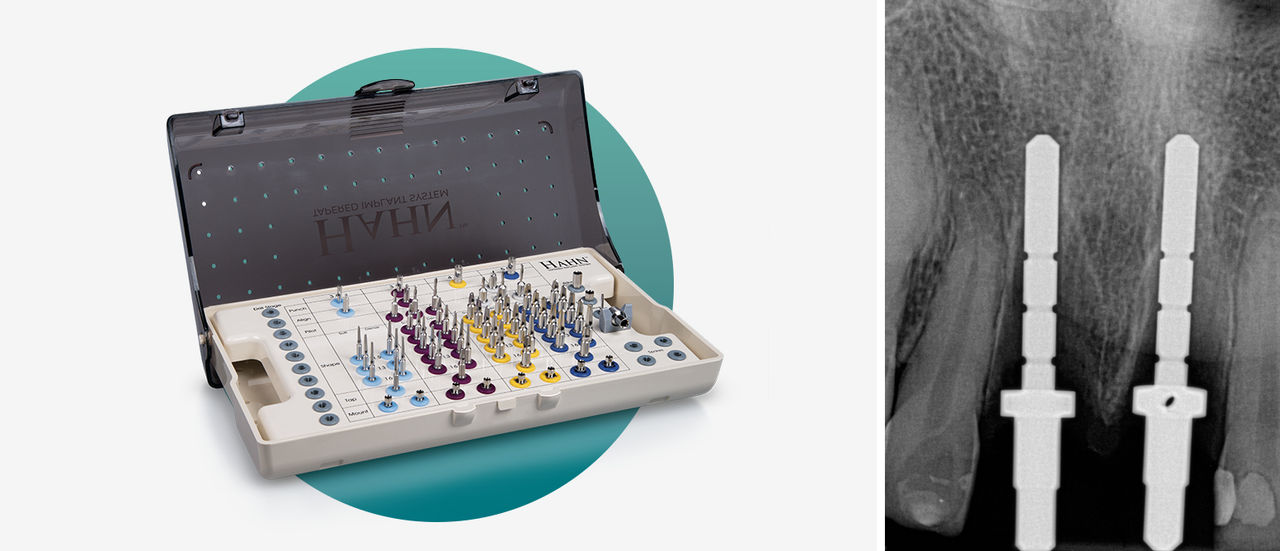
A Hahn Surgical Kit used for the surgical procedure

After creating the initial osteotomies following the straightforward drilling sequence for 3.5 mm x 13 mm Hahn Tapered Implants, radiographs were taken to confirm proper angulation and positioning. With the Hahn Surgical Kit, each shaping drill is color-coded and implant-specific to precisely determine both the diameter and the depth of the osteotomy, which greatly simplifies the surgical procedure.

The implant osteotomies were completed, and the Hahn Tapered Implants were placed into the prepared extraction sites. The implants were positioned a safe distance from the buccal plate and achieved excellent initial stability. Next, I filled the gaps between the implants and the extraction sockets with Newport Biologics Mineralized Cortico/Cancellous Allograft Blend . This blend of cortical and cancellous grafting material is optimal for immediate implant cases due to its ability to enable complete, predictable bone regeneration and formation at the extraction site.

The implants were threaded into place by the Hahn Tapered Implant

The implants were threaded into place and maintained position against the palatal wall with the help of the aggressive thread design of the Hahn Tapered Implant. Note the safe margin of distance between the final position of the implants and the buccal plate of the extraction sockets. The space between the implant and the walls of the extraction socket was grafted with Newport Biologics Mineralized Cortico/Cancellous Allograft Blend.

Chairside Magazine banner ad

With high primary stability established, we moved forward with the chairside fabrication of provisional restorations, which are essential to the “teeth in a day” concept that makes the emergency implant procedure so appealing to patients. Note that if a minimum of 35 Ncm is not achieved for the initial torque value, the implants should not be loaded until the implant sites have healed, and a removable partial appliance can be provided as a temporary solution.

I made the provisionals chairside using temporary abutments and bisacryl material to create screw-retained temporary crowns. First, I trimmed the temporary abutments to support the desired contours of the provisional crowns. Next, I used an impression produced from the patient’s original crowns to shape bisacryl material around the temporary abutments and created a screw access channel after the material set.

By delivering the patient immediate provisional crowns, I was able to minimize migration of the gingival position of the tissue, including the scallop, maintaining the position of the soft tissue while the implant sites healed. So, in addition to providing for the urgent needs of the patient, the immediate provisional helps set up the emergence profile for the final outcome, which is crucial for implant restorations in the esthetic zone. In this case, the patient was pleasantly surprised that she was able to leave the surgical appointment with fixed teeth in place.

Hahn Tapered Implants installed providing excellent primary stability

The Hahn Tapered Implants established excellent primary stability, allowing us to move forward with the chairside fabrication and delivery of immediate provisional crowns.

The patient left the surgical appointment in very good spirits after initially presenting for treatment in a distraught state. After four months, she returned so I could assess the healing of the implant sites and the integration of the Hahn Tapered Implants. Excellent soft tissue health and contours were evident around the provisional crowns, and radiography revealed excellent bone levels around the Hahn Tapered Implants.

Save 20% Hahn Special Intro Offer
Positive results after four months of the implant placement

Four months after implant placement, the patient exhibited excellent tissue and bone health, and the implant sites were ready to restore.

Hahn Tapered Implant impression copings were seated, and final impressions were taken using vinyl polysiloxane (VPS) impression material. The case was sent to Glidewell for restoration, including a prescription for all-ceramic crowns over custom abutments and photographs of the patient’s provisional restorations in place.

Closed-tray impression copings connecting to the Hahn Tapered Implants

Closed-tray impression copings were connected to the Hahn Tapered Implants, and final impressions were made and sent to the lab for fabrication of the final restorations.

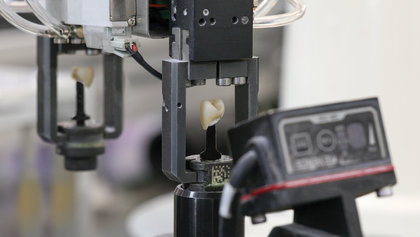
Upon receipt of the final impressions, Glidewell digitized the case by pouring and scanning the master model. A lab technician designed the final restorations using advanced CAD software. The titanium custom abutments were fabricated from titanium alloy and anodized to achieve a gold tone, facilitating lifelike esthetics and eliminating any concerns with gray show-through in the esthetic zone. All-ceramic implant crowns were produced, featuring esthetics that aligned closely with those of the provisional crowns, with which the patient was pleased. The case was returned to the practice for final delivery of the implant restorations.

At the final delivery appointment, the gold-tone custom abutments were seated and established precise, slightly subgingival margins for the implant crowns.

The gold-tone custom abutments placed using an acrylic delivery jig

The gold-tone custom abutments were placed using an acrylic delivery jig. The abutments established precise margins just below the gingival surface. Note the milled grooves on the surface of the custom abutments, which maximize retention of the implant crowns.

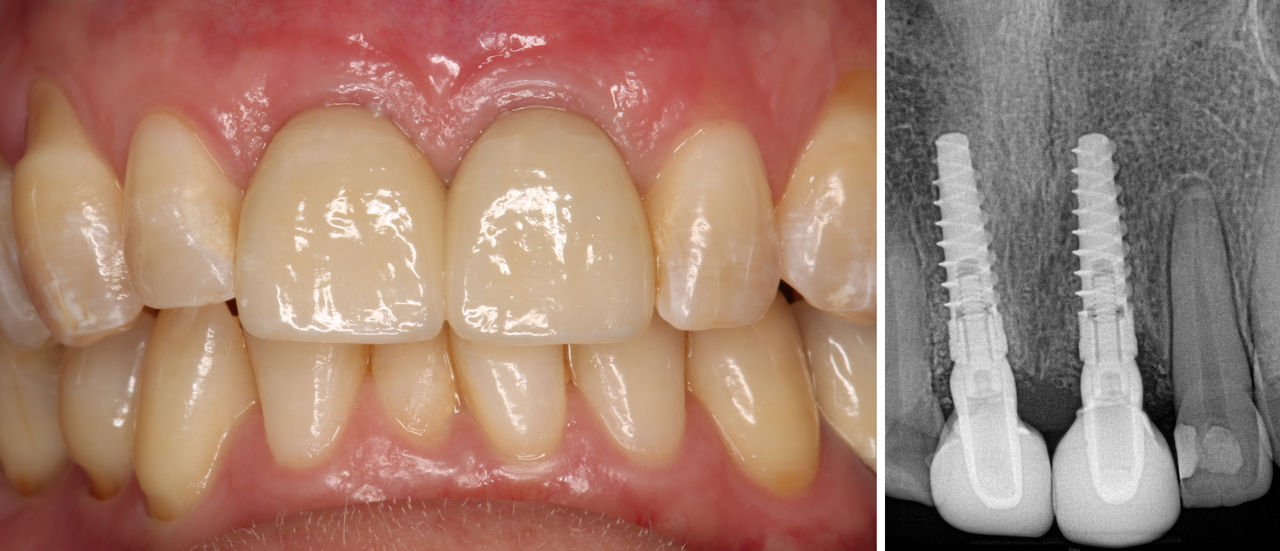
The implant crowns were tried in and then cemented over the custom abutments. Because the position of the gingiva was maintained throughout treatment with the immediate provisional crowns, as well as the custom fit and margins of the custom abutments, the final restorations exhibited lifelike emergence profiles. The patient was extremely happy with the final outcome, which improved her smile in addition to restoring function. She was especially pleased that she was able to have fixed teeth throughout treatment and remarked that she frequently shares her experience with her friends and family.

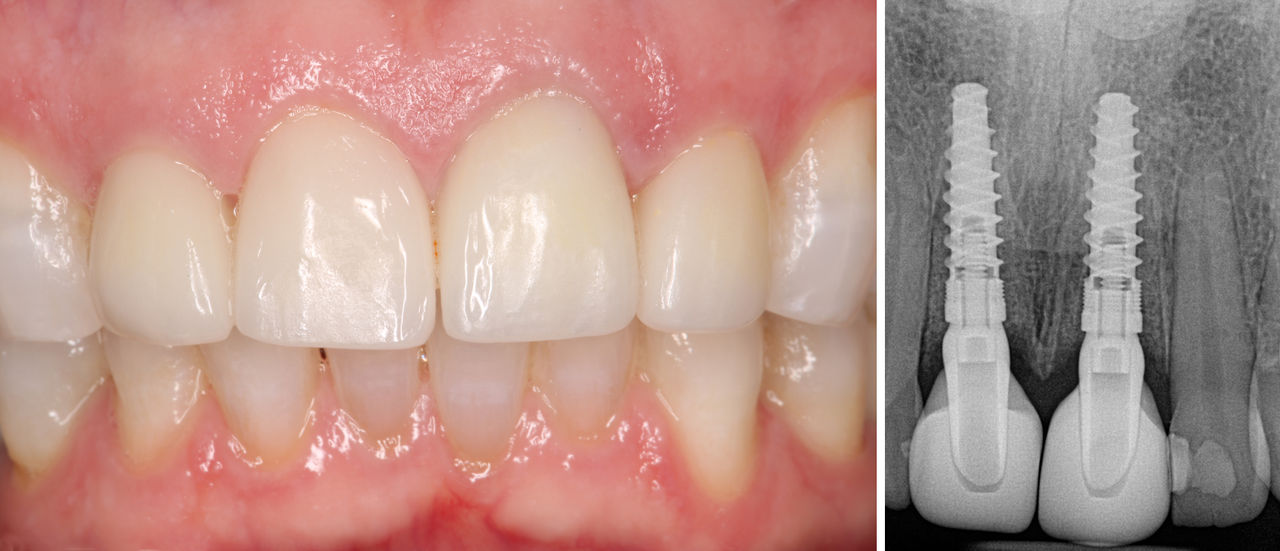
Final crowns delivered over the custom abutments

The final crowns were delivered over the custom abutments, which simplified the cleanup of excess cement at the implant site. The restorations fit precisely and established optimal gingival margins thanks to the use of the immediate provisional crowns, which maintained the contours of the soft tissue during healing.

CONCLUSION

Extraction with immediate implant placement can be a predictable, straightforward procedure that transforms a dental emergency into a rewarding experience for the clinician and patient alike. By giving someone back their tooth in a single appointment — and with it their confidence and dignity — we are able to provide for the immediate and long-term needs of the patient. I have found that this type of treatment contributes to excellent long-term relationships with my patients and has generated numerous referrals for my practice.

Sign up for Dr. Jack Hahn's Course

REFERENCES

  1. Lang NP, Pun L, Lau KY, Li KY, Wong MC. A systematic review on survival and success rates of implants placed immediately into fresh extraction sockets after at least 1 year. Clin Oral Implants Res. 2012 Feb;23 Suppl 5:39-66.
  2. Covani U, Cornelini R, Calvo JL, Tonelli P, Barone A. Bone remodeling around implants placed in fresh extraction sockets. Int J Periodontics Restorative Dent. 2010 Dec;30(6):601-7.

More to Know

Dental CE

Related Dental Articles

Dental Implant Video

In-Person Dental CE Course

Send blog-related questions and suggestions to hello@glidewell.com.

Implant Surgery