In this issue:
The Lost Art of Saving Natural Teeth That Have Been Severely Compromised
Author

My grandson’s first primary teeth were coming in. As I gazed into his mouth to see them, I was shocked to glimpse two titanium implants budding through his soft tissue. Holy moly! I jumped up from a deep sleep profusely sweating. It was just a dream. However, considering how we look at natural teeth today, maybe it should not have been such a shocking moment.
I spend a great deal of time listening to stories about why implant treatment is better than restoring natural teeth that have been compromised by deep decay, root canals or any other problem that requires definitive treatment. I have heard some profess that Class I furcations on molars require the molar to be extracted so there will be better bone support for an implant. Many ask, “Why do endodontics when the teeth will only become space maintainers for implants?” and simply push on to an implant when endodontic treatment could be very beneficial. In essence, the emerging thought is that teeth are expendable, as we now have implants to solve these problems. The fact that peri-implantitis is no simple problem to treat does not seem to affect many who hold that thought; however, I know I’d prefer to take care of an ailing natural tooth any day, rather than a failing implant.
Thus, my title: “The Lost Art of Saving Natural Teeth That Have Been Severely Compromised.”
Of course, this is neither a claim that all teeth can be kept, nor that implants are wholly unsuitable in all circumstances. One of the great uses for implants is when individuals have lost all their teeth. Another is when replacing bridges; the pontic area can now be restored with an implant. But with all of the wonderful restorative materials today, teeth that have broken down many times can be treated and maintained indefinitely.
The history of long-term stability of broken-down teeth starts with the concept of the team approach that dates back to the ’60s or possibly even earlier. Drs. Gary Maynard and Richard D. Wilson and Drs. Myron Nevins and Howard M. Skurow produced the ultimate dentistry with the team approach.
For me it started in 1973, when I was trained at Boston University. It was mandatory to work with the prosthetics graduates. I realized early on in my periodontal career that without a team my work was virtually worthless and would not stand the test of time. In 1975, I was fortunate enough to team up with Dr. William Strupp, who at the time was teaching the team approach and was creating several more “Bill Strupps” in my area to work with. Several years later, I was blessed again with the opportunity to team up with Dr. Howard Chasolen. Together, we taught about the importance of the team approach in comprehensive perio-restorative cases.
Since the advent of bonded composite resins in the late 1980s, the success rate of restoring tooth surfaces in comprehensive perio-restorative cases has seen a major improvement; and due to the continuing evolution of wonderful restorative materials,1,2 every day we get better and better results that continue to stand the test of time. Yet here we are today, extracting teeth and replacing them with implants at an incredible rate never seen before. In this article, I would like to show cases that demonstrate a team approach method of treating broken-down teeth based on sound dental principles that have proven themselves over a 40-year period.
Since the advent of bonded composite resins in the late 1980s, the success rate of restoring tooth surfaces in comprehensive perio-restorative cases has seen a major improvement.
Case 1
This clinical case performed by Dr. Kevin Melker demonstrates that definitive endodontics is necessary for any long-term success when endodontic treatment is required.


Figures 1a–1c: Two cases of failing root canals caused by the lack of treatment for the accessory canals. No other procedure was performed other than re-treatment of the root canals. With the growing opinion surrounding implants, would both of these teeth be considered for extraction? Notice also the location of the lesions, which signals that an apicoectomy would serve no purpose in treating these teeth.


Figures 2a–2c: Two cases of failing root canals caused by the lack of treatment for the accessory canals. No other procedure was performed other than re-treatment of the root canals. With the growing opinion surrounding implants, would both of these teeth be considered for extraction? Notice also the location of the lesions, which signals that an apicoectomy would serve no purpose in treating these teeth.
Case 2
This comprehensive perio-restorative case by Dr. Strupp demonstrates what can be done when the desire for perfection is undertaken and combined with the knowledge of how to carry out such treatment.


Figures 3, 4: Significant decay was observed under the previous crowns.


Figures 5, 6: Occlusal view noting the severe loss of tooth structure once all of the decay is removed. In many offices, would these teeth simply be slated for implants? Do many consider the other thought process of endodontics? I often hear doctors say, “Might as well extract and place an implant.”


Figures 7–9: Bonded composite resins are placed in a totally dry environment, ensuring the maximum bond strength possible. To me, the backbone of a compromised perio-restorative case lies in correctly bonding the composite resins.


Figures 10, 11: Upon reflection of the flap, it is noted there is not sufficient space for the biologic width. Additionally, a ferrule effect is necessary because these teeth have been treated endodontically. Dr. Strupp is of the opinion that the ferrule is only needed in cases where endodontics have been performed on a tooth. Normally Drs. Strupp and Chasolen finish their final margins just apical to the core buildup in their final preparation. It is the job of the surgeon to give his or her restorative dentist sound tooth surface that can have a margin placed supragingival. This means no core can be subgingival after surgical healing. If a tooth exhibits a dark substructure, it’s an indication that the final margin must be placed in the sulcus.


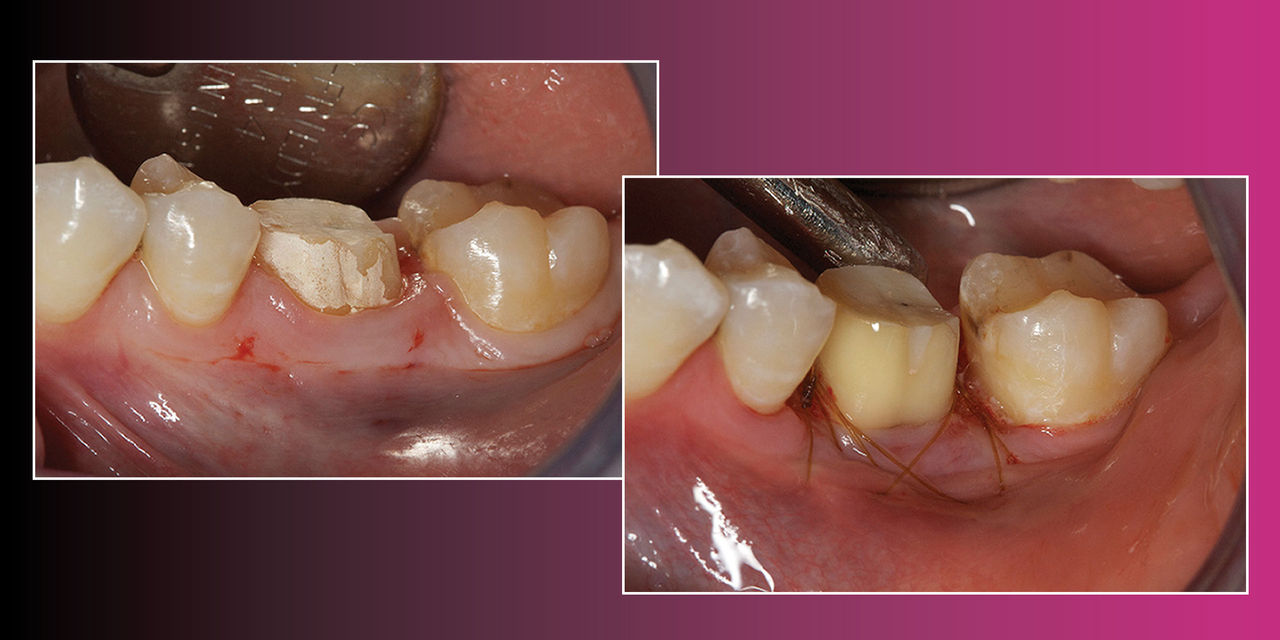
Figures 12, 13: Retention of papilla is critical when reflecting a flap to enhance the chances of primary closure. Prior to closure, the bone is contoured to create a parabolic architecture, which ensures close adaptation of the bone and flap. Then, the root surfaces are smoothed a full 360 degrees around each prep to remove all CEJs as well as concavities, and the furcations are corrected for patient and hygienist maintainability. At this stage there is a great deal of importance in ensuring there is plenty of attached connective tissue to protect the underlying periodontium. The flap is closed once all necessary surgical procedures are performed, with care taken to ensure that all bone is completely covered. Primary closure is critical in preventing postsurgical discomfort as well as in expediting the healing process.


Figures 14–16: The day of impression, 14 weeks post-surgery. A #7 SilTrax® retraction cord (Pascal International, Inc.; Bellevue, Wash.) is placed in the sulcus to allow for the lab to trim the die. All margins are placed supragingival to greatly increase the chance of a perfect impression. Doing so also ensures the total removal of bonding materials will be simple during final cementation, along with perfect margins as the lab sees the entirety of margin location when waxing restorations.
Case 3
The patient in this exquisite case had been one of Dr. Chasolen’s for many years. Despite the fact that the patient’s wife had recently had her entire mouth rehabilitated back to cosmetics and function, the patient only agreed to have his own tooth #3 restored. Using the team approach, I convinced the patient that not only was #3 a problem, but that his entire mouth had poor restorative dentistry that was breaking down. I explained to the patient that each time an old crown would have to be replaced, surgery would be necessary to create an environment suitable for Dr. Chasolen to restore. I informed the patient that cores as well as provisionals would be necessary to adequately treat him. I also noted that if #3 was the only tooth he desired to be restored, I could only definitively offer treatment for said tooth because I could not produce great results without removing the old dentistry on the other teeth. With this information, the patient committed to quadrant dentistry, and in the end the entire mouth was rehabilitated where needed. This was the same message Dr. Chasolen had conveyed to the patient for 15 years, but hearing it from another clinician seemed to convince the patient of the procedure’s necessity.
Using the team approach, I convinced the patient that … his entire mouth had poor restorative dentistry that was breaking down.


Figures 17–19: Various stages of decay removal for tooth #3.


Figures 22–24: Once the patient had committed to quadrant dentistry, crowns on teeth #2, #4, #5 and #6 were removed, allowing Dr. Chasolen to place cores and provisionals.


Figures 25, 26: On the day of surgery, the provisionals were removed, showing the cores and allowing the surgeon vertical access to carry out surgery for a restorative outcome.


Figures 27, 28: The core placed on #3 ends apical to the furcation (Fig. 27). Without surgery, this area would break down via future decay or due to the bonding material in the furcation causing periodontal issues. Through biologic shaping, a method of removing furcations and old margins, the problem is solved without destroying the bone in the furcation.


Figures 29, 30: The day of impressions, approximately 14 weeks post-surgery. All margins are placed supragingivally. A #7 SilTrax cord is placed to create space for the lab to trim the dies without fear of touching the margin.


Figures 31, 32: Perfectly contoured restorations for an ideal long-term maintainable result are shown. The crowns are made with the furcation area in metal to allow for a thinner restorative wall and better contouring. The furcation should be barreled into the occlusal surface to allow for better maintenance. All margins on the restored teeth are supragingival. Today, IPS e.max® (Ivoclar Vivadent; Amherst, N.Y.) restorations could be used in place of PFMs.
Biologic Shaping
When doing conventional crown lengthening, the previous margin of the old restoration is used to determine the necessary amount of alveolar bone removal to create adequate space for the biologic width.3,4,5 Creating a space for the biologic width enables a healthier new margin. One significant problem with this procedure is that there’s a chance enough bone will be removed to weaken the tooth or create a weakened furcation area, further increasing the likelihood of future problems with maintenance. It is critical to try to preserve as much bone as possible to support the tooth, doubly so in the furcation area. The clinical prerequisites and steps for success with biologic shaping6,7 are as follows:
- All previous restorative materials and decay should be removed.
- A core buildup made from a bonded composite resin should be placed where necessary to add volume to the teeth and to seal dentinal tubules. The core helps the periodontist determine where the final margin of the new restoration must be placed.
- Provisionals are then placed with Durelon® Polycarboxylate Cement (3M™ ESPE™; St. Paul, Minn.). Durelon is antimicrobial and may help decrease sensitivity.
- At the time of surgery, the provisionals are removed to allow access.
- During surgery, the root is shaped and the old margins are removed, in addition to the removal of the CEJs, a full 360 degrees around each prep.
- Any reverse architecture is corrected and bone is removed to eliminate any biologic width issues that are still present.
- Sufficient connective tissue is added to protect bone from bacterial infiltration. The connective tissue also serves to protect underlying periodontal tissues from impression material and cementation irritation.
- Once the flaps are adapted, potassium oxalate should be used to help decrease sensitivity. The liquid is applied to the root surface for 45–60 seconds and then lightly air-dried. Repeat two to three times as necessary.
- The provisionals are cemented with a polycarboxylate cement. I recommend either Durelon or Tylok® Plus (Dentsply Caulk; Milford, Del.).
- Home care requires the use of chlorhexidine twice daily as well as Colgate® PreviDent® (Colgate-Palmolive Company; New York, N.Y.) just prior to sleeping. After meals the patient rinses with water or LISTERINE® (Johnson & Johnson; New Brunswick, N.J.) to remove any food particles.
- At four weeks, the provisionals are either remade or relined, leaving 1 mm of space between the tissue and provisional to allow for continued biologic width growth in the coronal direction. There is no margination of the tooth surface at this time. Prior to reseating the provisionals, the existing cement is removed. The patient may need to be anesthetized because the cement from the provisionals will be directly on the tooth surface.
- At 14 weeks, chamfer margins (0.3–0.6 mm) are placed just coronal to the gingival collar, and impressions are taken. Where endodontic issues are present, the new margin may be placed within the sulcus if there is a dark substructure.
Reasons for Biologic Shaping:
- Replace or supplement the current indications for clinical crown lengthening.
- Minimize ostectomy.
- Facilitate supragingival or intrasulcular margins to preserve the biologic width.
- Eliminate developmental grooves.
- Eliminate previously subgingival restorative margins.
- Reduce or eliminate furcation anatomy to facilitate margin placement.
- Allow supragingival or intracrevicular impression techniques.
- Facilitate hygiene and maintenance procedures.
- Reduce or eliminate cervical enamel projections.
- Facilitate ideal restorative emergence profile. Flat contours are better than fat contours.
Case 4
This case demonstrates how following the proper protocol can eliminate unnecessary removal of bone structure.


Figure 43: An occlusal view shows the resulting ideal tooth surface to place a margin at the gingival collar once it has healed.
Desensitizing Treatments
Outlined below is my proven treatment protocol for reducing sensitivity in comprehensive perio-restorative cases.
Desensitizers Used
Super Seal® Dental Desensitizer Liner (Phoenix Dental, Inc.; Fenton, Mich.)
Colgate PreviDent Gel (1.1% sodium fluoride)
Colgate PreviDent Varnish (5% sodium fluoride)
Colgate Sensitive Pro-Relief™ Desensitizing Paste
3M ESPE CavityShield™ (5% sodium fluoride)
Sultan Healthcare Topex® In-office Fluoride Rinse (York, Penn.)
Surgery
Super Seal should be used after suturing. The teeth must be dry. One drop is placed on each tooth and lightly air-blown dry after 30–40 seconds. Repeat three to four times. If the teeth have been severely barreled into the furcation, a drop of prednisolone 1% is also placed on the teeth.
The patient is given PreviDent gel (1.1% sodium fluoride) to mix with water and rinse with at home twice daily for one minute.
Week 1
The patient’s teeth are scaled with a universal implant scaler (double end) because it is made with plastic and is more comfortable for the patient.
The patient’s teeth are then polished with Colgate Sensitive Pro-Relief desensitizing paste. The wooden end of a cotton-tipped applicator is used to spread paste interproximally.
If the patient cannot brush, a drop of prednisolone is placed on the teeth. The patient rinses with Sultan Healthcare Topex In-office Fluoride Rinse for one minute. The patient is to rinse two times a day with PreviDent solution, which is expectorated after use. The patient cannot eat, drink or rinse for 30 minutes after use.
If the patient is able to start brushing, a drop of prednisolone is placed on the teeth. PreviDent Varnish or 3M ESPE CavityShield is also placed on the teeth. The patient is instructed to brush off in four hours with regular toothpaste. The patient is to start brushing with PreviDent gel twice a day for one minute after brushing with regular toothpaste. PreviDent gel is to be expectorated after brushing, and the patient cannot eat, drink or rinse for 30 minutes after use.
Following Weeks
All treatments are based on whether the patient is allowed to brush.
All treatments are based on whether the patient is allowed to brush.
If the patient cannot brush, a drop of prednisolone is placed on the teeth. The patient is to keep rinsing two times a day with PreviDent, and the patient rinses with Sultan Healthcare Topex In-office Fluoride Rinse for one minute.
Case 5
The following case by Dr. Strupp shows how proper diagnosis aids in the location and restoration of problematic furcations.

Figure 44: Tooth #19 is to be restored. The furcation was located, and it was determined that biologic shaping would be necessary. Cores and provisionals were then placed prior to surgery to allow for increased vertical access.


Figures 45–47: Though there is only 1 mm of depth during initial probing, proper diagnosis confirms that the existing margin is located in the furcation. Any long-term prognosis would be greatly at risk if the margin was left in this location. Figure 46 confirms the location of the margin, and Figure 47 displays a 3 mm horizontal component of the furcation.


Figures 48, 49: The furcation was totally removed. The removal was confirmed by placing a probe at the height of the bone in the area of the furcation, then moving the probe coronally and feeling for catches. If the probe exits smoothly, the furcation has been removed. Figure 49 shows the flap placed just coronal to the bone to allow for minimal discomfort for the patient. Primary closure of the flap greatly reduces postoperative discomfort. Endodontic concerns should never be a factor.


Conclusion
The art of salvaging broken-down teeth is a team concept. Each part of the team puts forth his or her best effort to create an ideal environment in which teammates can work.
In essence, cosmetic and functional restoration of severely compromised natural teeth can be achieved without implant treatment in some clinical situations by following this workflow:
- Patient presents with decayed tooth.
- Diagnosis to ensure trying to keep a tooth or teeth does not negatively affect existing healthy teeth.
- Removal of decay through proper methods and then replacing lost tooth structure with bonded composite resins.
- Placement of a provisional to allow for ideal contours and tissue health. The provisional is critical, as it allows the surgeon vertical access to the underlying periodontal issues.
- Surgical procedures are undertaken to remove pocketing. Surgery should encompass the creation of a parabolic architecture of the bone, biologic shaping of each tooth for long-term maintenance, and the addition of an abundance of connective tissue for protection of the periodontium. The end result of the surgery must permit the restorative dentist to place a margin supragingivally in his or her final restorations.
- At four weeks, a reline or remake of the provisionals is undertaken, creating a 1 mm gap coronal to the existing tissue. No margination is to be undertaken at this time.
- Fourteen weeks from the day of surgery the final margins are placed with the final margin being just supragingival to the gingival collar. A chamfer margin is recommended.
- Final placement of restorations, with care taken to make sure they are properly contoured with full 360-degree margin closure. Special care of proper contours where furcations have been removed is critical.
Dr. Daniel Melker is in private practice in Clearwater, Florida, and lectures nationwide on periodontics and prosthodontics. Contact him at 727-725-0100.
For those who are interested in these techniques, Drs. Strupp and Chasolen teach courses on the subject throughout the year. In addition, I believe learning biomimetic techniques can be beneficial in treating broken-down teeth. The technique is incredible; however, there is concern about the lack of protocol for when periodontal issues are present. In short, the procedure works beautifully when treating teeth that do not have periodontal issues.
References
- ^ Vaidyanathan TK, Vaidyanathan J. Recent advances in the theory and mechanism of adhesive resin bonding to dentin: a critical review. J Biomed Mater Res B Appl Biomater. 2009 Feb;88(2):558-78.
- ^ Strupp WC Jr. Crown & Bridge Update 1999;4(1):1-7.
- ^ Gargiulo AW, Wentz FM, Orban B. Dimensions and relations of the dentogingival junction in humans. J Periodontol. 1961 Jul;32(3):261-7.
- ^ Vacek JS, Gher ME, Assad DA, Richardson AC, Giambarresi LI. The dimensions of the human dentogingival junction. Int J Periodontics Restorative Dent. 1994 Apr;14(2):154-65.
- ^ Dibart S, Capri D, Kachouh I, Van Dyke T, Nunn ME. Crown lengthening in mandibular molars: a 5-year retrospective radiographic analysis. J Periodontol. 2003 Jun;74(6):815-21.
- ^ DiFebo G, Carnevale G, Sterrantino SF. Treatment of a case of advanced periodontitis: clinical procedures utilizing the “combined preparation” technique. Int J Periodontics Restorative Dent. 1985;5(1):52-62.
- ^ Melker DJ, Richardson CR. Root reshaping: an integral component of periodontal surgery. Int J Periodontics Restorative Dent. 2001 Jun;21(3):296-304.