In this issue:
Simply Beautiful – A Venus Reconstruction of a Class II Malocclusion
Author

“Venus” is a name preserved in the mythology of ancient Greece, meaning natural beauty. One of the goals of ceramic dental reconstructions is to recreate the intrinsic beauty of natural tooth structure within a ceramic matrix that can also withstand the functional test of time in the oral environment. Venus® porcelain (formerly known as HeraCeram) (Heraeus Kulzer; Armonk, N.Y.) is fabricated from a patented synthetic quartz glass that provides a crystal-clear foundation, free of the impurities and inconsistencies seen in many feldspathic porcelain products. Its manufacturer reports that the uniform leucite structure seen in Venus porcelain allows a smoother surface, with the clinical advantages of easier adjustment and intraoral polishing to a consistently high luster. A multiple fitting process during manufacturing allows consistent shading, bottle-to-bottle, which is an important feature, whether fabricating full-mouth restorations, restoring a few teeth, or a quadrant or arch at a time. The following case report features Venus porcelain and Venus stacked on zirconium in the functional and esthetic ceramic rehabilitation of a Class II post-orthodontically treated patient.
Most of the posterior teeth had received large restorations that were breaking down.
Diagnosis and Treatment Planning


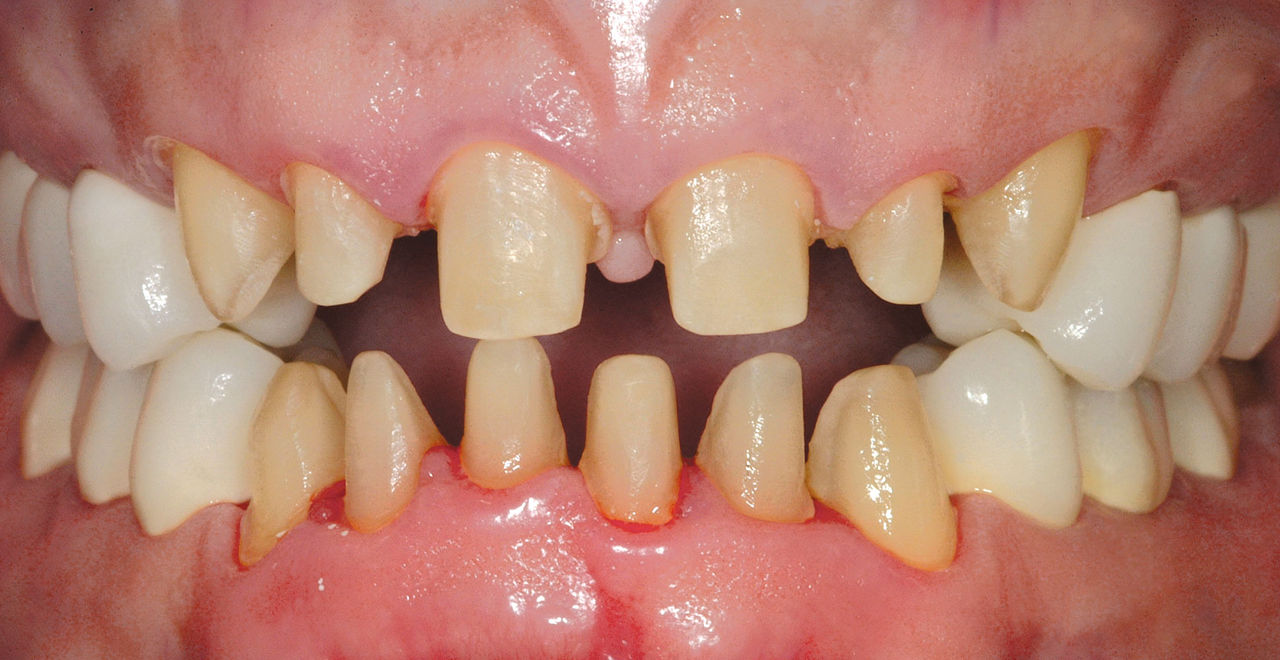
The patient presented for a comprehensive examination after more than two years of orthodontic treatment to correct a Class II malocclusion (Fig. 1). The limitations of orthodontic tooth repositioning are evident, based on the final treatment positions (Figs. 2–5). This case was an orthodontic retreatment — the first premolar extractions and the first-time orthodontics had been performed several years previously. Without corrective skeletal surgery, the patient was left with the following conditions:
- A deep overbite and the inability to retract the maxillary anterior segment sufficiently enough to close the diastemata (interproximal spaces) without inclining the incisors palatally.
- A Bolton’s discrepancy, due to the extracted first premolar teeth, leaving the orthodontist unable to close the spaces distal to the maxillary cuspids, due to inadequate mesialdistal widths of the remaining teeth and the excessive arch length.
From a dental perspective, most of the posterior teeth had received large restorations that were breaking down and were in need of repair and/or replacement. The short cervico-incisal heights of the posterior teeth and the limited inter-arch space created a problem in reducing the posterior dentition enough occlusally (1.5 mm to 2.0 mm) to create adequate space for restorative materials. Based on the need for posterior dental rehabilitation, the deep overbite and the anterior spacing, it was decided that the patient would need a porcelain rehabilitation to conservatively “resurface” anterior teeth and close the interproximal spaces. At the same time, the vertical dimension of occlusion would be opened, or recaptured (approximately 3 mm), to gain occlusal space for the posterior reconstruction and correction of the deep overbite (100% overbite). The patient also desired to have a more youthful, whiter smile.
Because the platinum foil remains in the feldspathic restorations, it is not possible to assess marginal integrity, proximal contact or color of the anterior teeth.
To accomplish these goals, it was decided to use a feldspathic porcelain on the anterior teeth, so that the preparation could be performed in a more conservative manner, with zirconium crowns on the posterior dentition for esthetics and strength.1,2
Treatment Methodology
Diagnostic Wax-Up

At the first visit, preoperative photographs, maxillary and mandibular impressions for a Diagnostic Wax-Up, a facebow with interocclusal records, and full-mouth digital X-rays were taken. The dental technician poured up the models and mounted the case on a semi-adjustable articulator (Denar® [Teledyne Water Pik; Fort Collins, Colo.]). The completed Diagnostic Wax-Up is shown in Figure 6. To create sufficient posterior space to develop normal cervico-incisal heights for the clinical crowns, the dental technician had to open the pin on the articulator by 3 mm. This procedure allows the height of the posterior teeth to be corrected, decreases the overbite of the maxillary anterior teeth, and allows the mandibular anterior teeth to be visible during maximum intercuspation.
Provisional Stent


A silicone matrix was made from the maxillary wax-up, to be used as a provisional stent. Another matrix was made and the facial portion was cut away, allowing the palatal outlines of the corrected tooth forms to remain. When placed in position, this stent can be used as a preparation guide to aid in the reduction of teeth during the preparation process (Fig. 7).3
Once the tooth preparation was completed, a bisque acrylic provisional material (LuxaTemp® [Zenith DMG; Englewood, N.J.]) was dispensed into the maxillary stent and then placed over the maxillary preparations for approximately two minutes. When the provisional material is set, it can be removed from the matrix, carved and polished. It is then placed upon the maxillary preparations, while the mandibular teeth are prepared. A clear plastic provisional stent is made from a plaster duplicate of the mandibular wax-up, filled with bisque acrylic, and placed over the mandibular preparations (Fig. 8). The clear plastic stent was used rather than a silicone matrix, so that the patient could close into centric occlusion (CO), while the provisional material polymerized. Figures 9 through 11 are views of the completed provisional restorations.
Evaluation

All eccentric movements of the mandible from the CO position should result in immediate disclusion, due to anterior guidance and canine disclusion. The patient was now to be evaluated for eight to 12 weeks at the restored vertical dimension of occlusion. Any muscle tenderness or abnormal occlusal wear of the provisional restorations might require the provisional occlusion (occlusal vertical dimension) to be lessened toward the preoperative position. The patient tolerated the change in vertical dimension well, and no adjustments were required to the provisional restorations. Figure 12 demonstrates the “occlusal lock” position, formed when the provisional stamp cusps are properly interdigitating in their respective opposing fossae. The prepared maxillary and mandibular teeth can be seen in the position of CO, and incisal reduction is then verified and corrected, if necessary.
The second molars were left unprepared to preserve a reference to the preoperative position.
The gingival tissues surrounding all preparations were then readied for the registration of master impressions. First, interpapillary injections of 2% lidocaine with 1:50,000 epinephrine were used buccally and lingually to aid in retraction and for sounding around preparations for marginal correction, as it relates to the crestal bone position. As recommended by Kois,4 the restorative margin should be located no closer than 3 mm incisally (occlusally) from the crestal bone on the facial surfaces of all teeth, 4 mm interproximally for anterior teeth, and 3 mm for posterior teeth.
Sounding
Sounding is a technique to measure the dentogingival complex (gingival sulcus, connective and epithelial attachments) by pushing the periodontal probe parallel to the long axis of the root, until the tip stops on the osseous crest. A #00 retraction cord (Ultrapak® [Ultradent; South Jordan, Utah]) was placed circumferentially around each preparation. One can sound to the osseous crest by placing the periodontal probe between the retraction cord and the tooth. The restorative margin can then be corrected to the appropriate position and smoothed, using a rotary diamond instrument. A #1 cord was then placed above the #00 cord for each preparation.
Interocclusal Records


After the retraction was completed, the #1 cord was removed, and the #00 was left in place. The light-bodied impression material was then syringed into the retracted sulci. The impression tray was filled with heavy-bodied impression material and placed over the teeth.5 After master impressions were made, a facebow registration was taken of the maxillary preparations, using an earbow (Denar® Slidematic Facebow [Whip Mix Corp.; Louisville, Ky.]). Interocclusal records in CO were taken, a sextant at a time, while the remaining provisional restorations maintained the vertical dimension of occlusion position.
The first series of interocclusal records was taken “prep to prep” (Fig. 13), using a polysiloxane bite registration material (Registrado X-tra [Voco; Cuxhaven, Germany]). A second series of interocclusal records was taken “provisional to prep” (Fig. 14). These records allow the dental technician to cross-mount models of the provisional restorations with the prepared teeth, which will aid in design and fabrication of the definitive restorations.6,7,8,9,10
There is a natural texture, translucency and cervico-incisal blend of color.
Bisque Try-in
The purpose of the bisque-bake try-in is to evaluate occlusion, marginal integrity, proximal contacts of the posterior ceramic restorations, and anterior ceramic contours. Because the platinum foil remains in the feldspathic restorations, it is not possible to assess marginal integrity, proximal contact, or color of the anterior teeth. These parameters will be refined by the ceramist during the finishing process and evaluated at the delivery appointment. Figure 15 shows the case at bisque-bake try-in, with the patient’s dental arches lightly closed in CO. The precision of the occlusion on the first closure is due primarily to the accurate interocclusal records and cross-mounting with the provisional restoration models.


A thin articulating medium (AccuFilm® [Parkell; Edgewood, N.Y.]) was introduced between the posterior teeth without anterior restorations in place to evaluate the “occlusal lock.” (Note the provisional occlusal lock in Figure 12.) The anterior restorations were removed because the platinum foil does not permit complete marginal seating of the restorations. The AccuFilm would mark centric prematurities and was left on the teeth for the ceramist to adjust during the finishing process (Fig. 17).11 A periodontal probe was used to verify the position of the gingival papillae at the proximal facial line angle of 3 mm incisal to the crest of the alveolar bone (Fig. 18). This would ensure that a “black triangle” would not be created and that the gingival papillae would fill the gingival embrasure space completely.
Finishing and Glazing
The restorations were then sent back to the ceramist for finishing and glazing. Figures 19 through 21 show the finished Venus restorations for the case from various views. Note the natural appearance of the ceramic and how well the posterior zirconium restorations blend and match the feldspathic anterior restorations. Also note that the vertical dimension of occlusion, based on the unprepared second molars, was opened posteriorly approximately 3 mm. The second molars were left unprepared to preserve a reference to the preoperative position; they will be prepared and restored at a later date.


Cementation and Delivery of Final Restorations
The cementation process was begun with the maxillary arch. The maxillary central incisors were evaluated individually for marginal fit and together for the mesial proximal contact. Because these restorations were made of Venus feldspathic porcelain, the preparations were etched with 37% phosphoric acid for 15 seconds, thoroughly rinsed, and air-dried. A desensitizer (AcquaSeal™ B [AcquaMed Technologies; Chicago, Ill.]) was applied to the preparations, and the excess was removed with a high-volume suction. A fifth-generation bonding agent (OptiBond® Solo™ Plus [Kerr; Orange, Calif.]) was applied to the preparations, air-thinned, and light-cured. A resin cement (NX3 Nexus® Third Generation [Kerr]) was syringed directly from its auto-mix syringe into the restorations, and they were placed on the preparations. The excess resin cement was removed from the margins, using an artist’s brush (#2 Keystone [Patterson Dental; St. Paul, Minn.]). The adjacent lateral incisor restorations were seated on their respective preparations to ensure proper positioning of the central incisors, and the central incisor restorations were then “flash-cured” into position. This procedure allows most of the remaining resin cement to be cleaned away with a small scaler prior to the completion of the cure. This “two-by-two” procedure is followed until all the anterior restorations on the maxillary arch are placed.
The posterior zirconium restorations (Venus stacked on zirconium) were evaluated individually for marginal fit, and then seated to evaluate the collective fit. They were then cemented, one by one, using self-etching resin cement (Maxcem™ [Kerr]). Figure 22 shows a retracted full-facial view of the cemented maxillary arch in CO, opposing the provisional mandibular restorations. The same protocol was used to cement the mandibular restorations, as previously described.12 Figures 23 through 27 show the definitive restorations following delivery. Note the gingival health and natural appearance of the Venus restorations, even though the patient requested a “bright smile.”
The gingival zenith positions above the maxillary anterior teeth are correct, the central incisor being slightly apical to the lateral incisor, and the canine at the same level or slightly apical to the central incisor. Note that the zenith position on the mandibular right central incisor is incisal to the left central incisor. The patient opted not to have this gingival zenith level surgically corrected because it did not show in his smile (Fig. 27).
Summary
This article has presented a detailed case report of full-arch corrective and restorative procedures using Venus porcelain. As noted at the full-smile final postoperative view, there is a natural texture, translucency and cervico-incisal blend of color. The gingival papillae fill in the embrasure spaces well. The patient was pleased with the restoration and will enjoy it for many years to come.
Acknowledgment
The author would like to acknowledge the ceramic artistry of Vincent DeVaud, CFC, MDT, in the fabrication of this beautiful Venus reconstruction.
To contact Dr. Bob Lowe, call 704-364-4711 or email boblowedds@aol.com
References
- ^Rufenacht CR. Fundamentals of esthetics. Hanover Park (IL): Quintessence Pub.; 1990. Chapter 4, Structural esthetic rules.
- ^D’Amico A. The canine teeth: Normal functional relation of the natural teeth of man. J So Calif Dent Assoc. 1958;26(1-6):6-208.
- ^Lowe RA. Methodical tooth preparation for predictable esthetic excellence. Esthetic technique. Contemp Esthet & Rest Pract. 2002;2(4 suppl.):3-10.
- ^Kois JC. Altering gingival levels: The restorative connection. Part 1: Biologic variables. J Esthet Dent. 1994;6(1):3-9.
- ^Lowe RA. Mastering the art of impression making. Inside Dentistry. 2006 Jan/Feb;2(1):38-9.
- ^Lowe RA. Predictable techniques for successful multiple unit dental restruction. Cont Esthet & Rest Pract. 2004 Jun:2-13.
- ^Shavell HM. The art and science of complete-mouth occlusal reconstruction: a case report. Int J Periodontics Restorative Dent. 1991;11(6):438-59.
- ^Lowe RA. Provisionalization: Mastering the morphology. Dent Prod Report. 2003 Aug:56-8.
- ^Lowe RA. Predictable fixed prosthodontics: technique is the key to success. Compend Contin Educ Dent. 2002 Mar;23(3 Suppl 1):4-12.
- ^Shavell HM. Mastering the art of tissue management during provisionalization and biologic final impressions. Int J Periodontics Restorative Dent. 1988;8(3):24-43.
- ^Boucher LJ. Occlusal articulation. Dent Clin No Amer. 1979;23:157-241.
- ^Lowe RA. Dr. Robert A. Lowe discusses dental cements. The Dalin Exchange. Dent Econ. 2006 Oct:2-4.
Reprinted with permission of The Journal of Cosmetic Dentistry. Copyright ©2009 American Academy of Cosmetic Dentistry. All rights reserved.