Using Margin Placement to Achieve the Best Anterior Restorative Esthetics
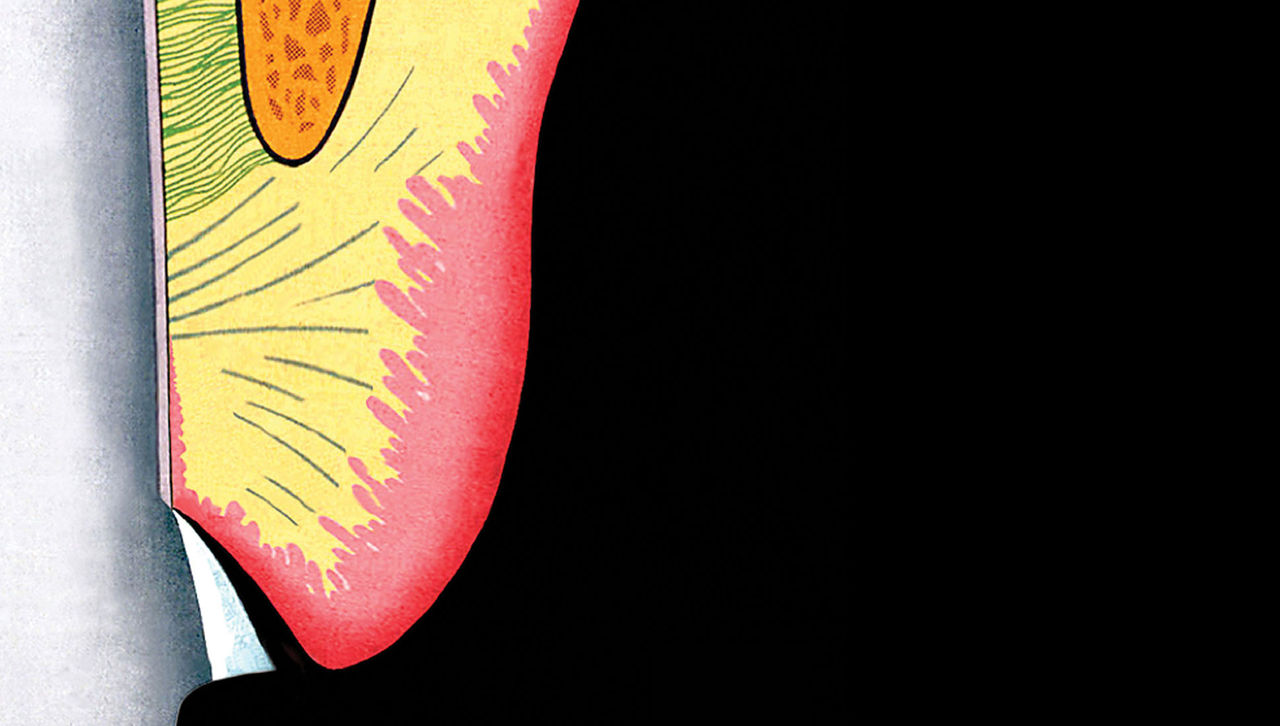
Today’s clinician faces a myriad of options when considering the best esthetic solution for restorative dentistry or cosmetic changes in anterior teeth. He or she can use numerous materials, each with highly specific properties and qualities, to solve almost any clinical dilemma. Regardless of the material the clinician chooses, however, he or she has only three possibilities in terms of margin placement: supragingival (above the tissue), equigingival (even with the tissue) and subgingival (below the tissue).1
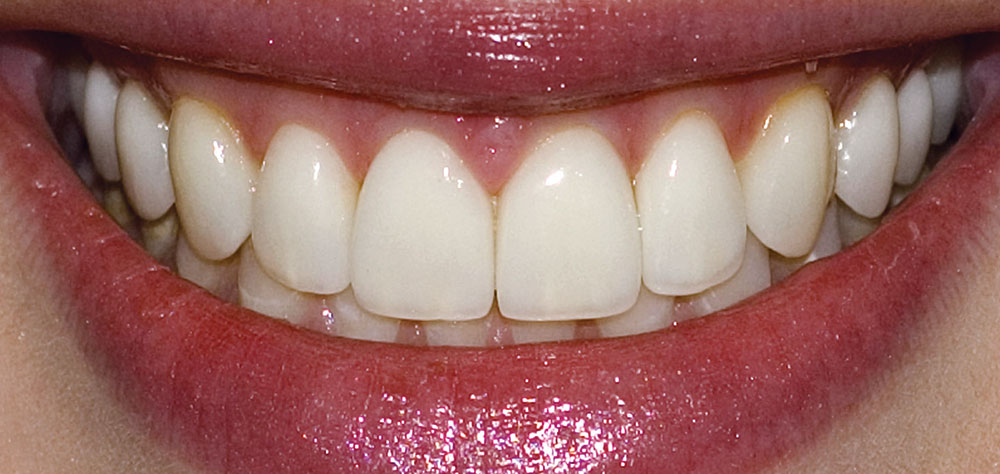
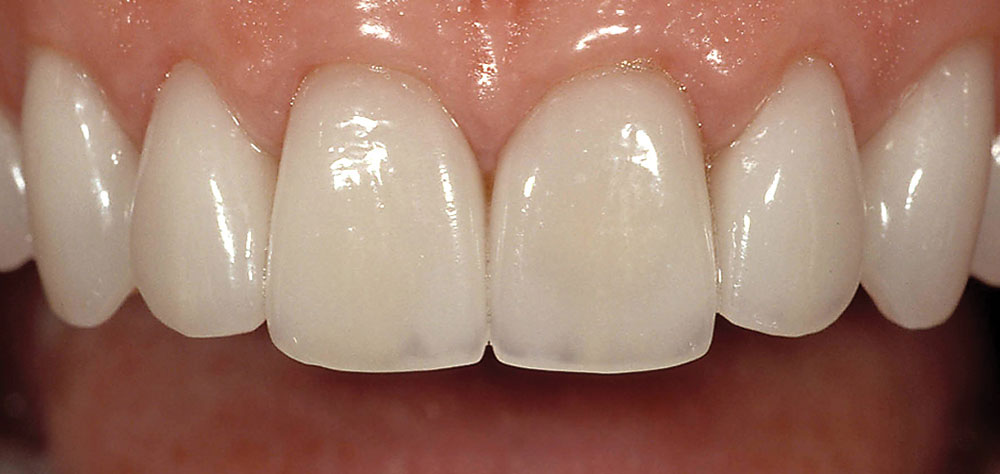
In classic restorative dentistry, dentists placed supragingival margins only in areas in which esthetics was not a concern. The stark contrast in color and opacity between the restorations and the natural teeth announced their presence loudly and created an undesirable situation in the esthetic zone. Much has changed in the past 30 years. The advent of adhesive procedures coupled with highly translucent restorative materials made it possible to place supragingival margins, even in areas in which the margins are completely visible (Fig. 1). Equigingival margins traditionally were not preferable because they were thought to retain more plaque than supragingival or subgingival margins and therefore resulted in increased gingival inflammation. Today’s reality is that patients tolerate both supragingival and equigingival margins very well; the greatest biological risk occurs with subgingival margins.2
Determining Margin Placement
SUPRAGINGIVAL AND EQUIGINGIVAL MARGINS. The primary requirement for a material placed supragingivally or equigingivally is that it exhibit a high level of cervical translucence. Materials such as feldspathic porcelain and pressable ceramics meet this requirement nicely. Consequently, whenever it is possible, dentists should choose supragingival and equigingival margins for their esthetic advantages and their favorable periodontal impact. However, because it is not always possible or appropriate for esthetic reasons to do so, the clinician must be prepared to place the margin subgingivally, in a predictable fashion, when necessary.
SUBGINGIVAL MARGINS. The clinician may need to extend the margin subgingivally for a variety of reasons. He or she should not leave the margin supragingival or equigingival in cases involving:
- Caries that extends below tissue;
- Old restorations that were extended into the sulcus;
- The need for adequate preparation length for retention and resistance;
- The need to create significant contour alterations with the restorations;
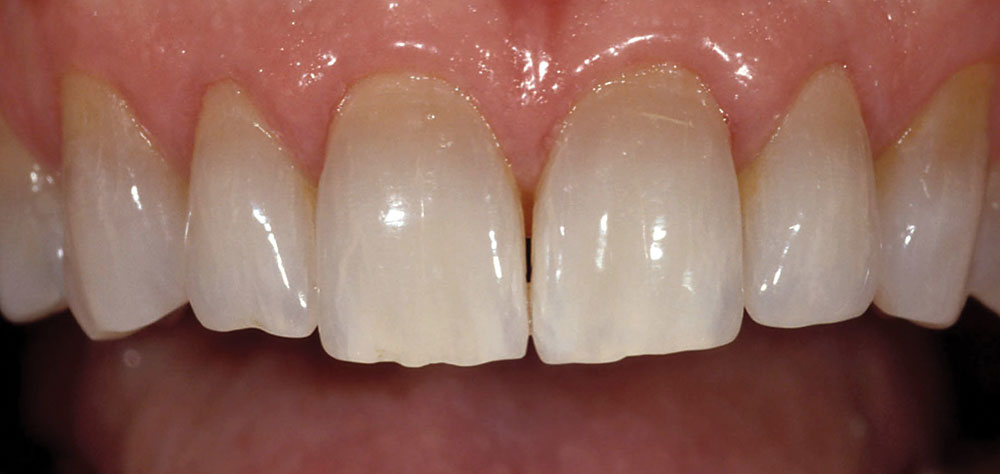
- The need to hide the margin to mask discoloration (Fig. 2);
- The need to hide the margin because the restorative material required has optical properties different from those of the natural tooth.
Regardless of the reason for choosing a subgingival margin, two negative periodontal responses may occur: inflammation and recession. Inflammation of the gingival tissue most likely results from a violation of biological width, which occurs if the clinician intrudes too deeply into the sulcus with the preparation, unless bone loss also occurs, thereby recreating the appropriate biological width for the tooth. Many clinicians falsely assume that a violation of biological width results in recession; however, tissue will not recede unless the bone recedes first, as the body always will maintain a certain height of tissue above bone. The most likely reason for recession after completion of a restorative preparation is placement of a margin in unstable tissue.
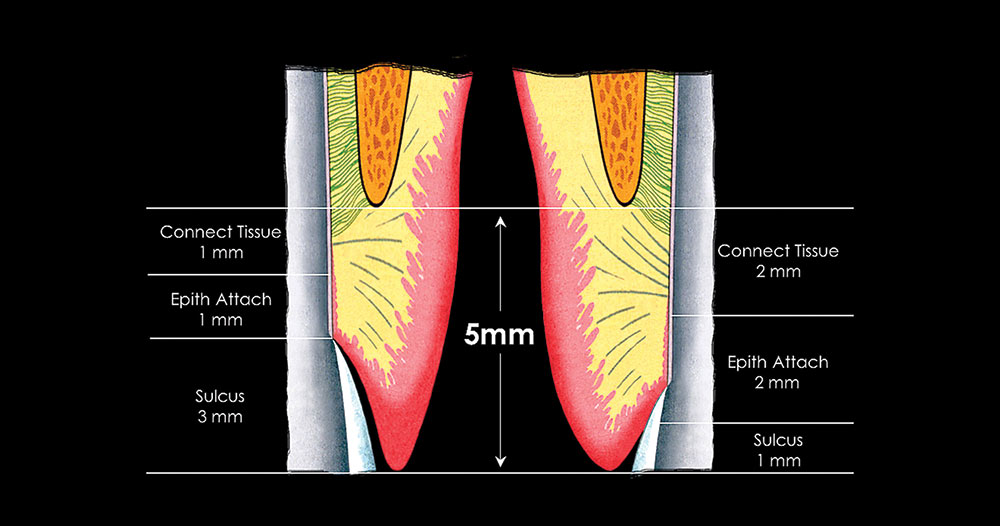
PERIODONTAL INSTABILITY. To understand this instability, we must consider the eruption patterns of typical teeth.3 Active eruption occurs when root development moves the crown into the mouth and the cementoenamel junction (CEJ) is, on average, 2.0 mm coronal to the osseous crest. Next, passive recession occurs, causing the gingiva to move to its normal position 1.0 to 2.0 mm above the CEJ, thus creating a facial sulcus depth of 1.0 to 2.0 mm. If normal passive recession has not occurred and several millimeters of excess tissue still cover the crown of the tooth, the tissue margin is several millimeters coronal to the top of the epithelial attachment and a deep sulcus is present. Disturbance of this sulcular tissue has the potential to trigger the recessive process and change the gingival margin.
In addition to sulcus depth, other variables have been described in the literature as affecting the likelihood of recession. Thick, fibrotic gingival is more resistant to recession than is thin, fragile gingiva, and a scalloped gingival form is more prone to recession than is a flat gingival form.4
Basing Margin Placement on the Periodontium
CREST CLASSIFICATION. One method of dealing predictably with the problem of margin placement is to use total tissue height above bone as a reference for evaluating the periodontium. This concept came out of work evaluating and classifying three types of periodontal heights: average crest, high crest and low crest.5
AVERAGE CREST. In a patient with an average crest, sounding the periodontium on the facial aspect generally reveals 3.0 mm of tissue above the bone. If we assume that this patient’s periodontium has a 2.0 mm biological width and that the clinician will place the margin 2.5 mm from bone, the margin will not violate the attachment and will remain covered by gingiva.
HIGH CREST. With a patient who has a high crest, sounding the peridontium on the facial aspect generally reveals less than 3.0 mm of gingival above bone. In this situation, placing the margin below tissue most likely would violate the attachment and result in an inflammatory response. Therefore, a supragingival margin is indicated unless the bone level is altered.
LOW CREST. In a patient with a low crest, there generally is more than 3.0 mm of tissue above bone on the facial aspect. Extending the margin into the sulcus 0.5 mm creates the potential for the recessive process described above to expose the margin. Three options exist for dealing with this dilemma. The first option is to place the margin supragingivally so as not to traumatize the unstable tissue. The second option is to place the margin 2.5 mm from bone. If the patient has 2.0 mm of attachment, the margin will remain hidden even if the tissue recedes to create a 1.0 mm sulcus. The third option is to perform a gingivectomy, thus converting the low crest into an average crest and then proceeding with treatment accordingly.
A concern in using this classification system routinely relates to patients with low crests and the variations in biological width reported by Vacek and colleagues.6 For example, if a patient has 5.0 mm of gingival above bone, he or she would be considered to have a low crest according to this classification system and, thereby, would be prone to developing recession. But if the patient has an attachment apparatus 3.0 or 4.0 mm in height, he or she would have a facial sulcus of only 1.0 to 2.0 mm and would not necessarily be prone to developing any greater recession than would a patient with an average crest. Additionally, if the clinician placed the margin 2.5 mm from bone in a patient with an attachment 3.0 or 4.0 mm high, that margin would be within the attachment. The same violation of the attachment would occur if the clinician surgically placed the gingival margin 3.0 mm above bone via a gingivectomy in an attempt to modify the low crest into an average crest. The gingivectomy would leave no sulcus and could remove some of the attachment. This would be followed by tissue regrowth to re-create the patient’s attachment height and sulcus depth (Fig. 3).
SULCUS DEPTH: AN ALTERNATIVE PERIODONTAL CLASSIFICATION. Using sulcus depth is an alternative method of determining placement of the margin relative to the attachment when subgingival placement is necessary. The base of the sulcus also can be considered to be the top of the attachment. The clinician accounts for variations in attachment height by ensuring that he or she places the margin in the sulcus and not in the attachment.7-10 Variations in probing depth can predict how deeply below tissue the clinician can place the margin predictably. If the sulcus depth on the facial aspect is shallow — 1.0 to 1.5 mm — placement of the margin more than 0.5 to 0.7 mm below the tissue will risk violating the attachment. This assumes an average probe penetration into the epithelial attachment in healthy gingiva of 0.5 mm. This shallow 1.0 to 1.5 mm probing depth indicates that recession is unlikely, because the free gingival margin is located close to the top of the attachment. If the sulcus is 2.5 mm deep or greater, violating the attachment would require placement of the margin 2.0 mm or more below the tissue. This tissue is much more prone to recession than that with a shallower probing depth because the free gingival margin is not supported as closely by the attachment. That is not to say that all 3.0 mm facial sulci will recede; however, in most circumstances, the deeper the sulcus, the greater the risk of recession.
The first step in using sulcus depth for margin placement is managing the patient’s gingival health. With healthy gingival tissues, the following three rules can be applied when placing subgingival margins.
Rule 1: Shallow Sulcus. If probing shows the sulcus to be 1.5 mm deep or less, the clinician should place the margin 0.5 to 0.7 mm below tissue on the facial aspect. This minimizes the risk of biological-width violation and subsequent inflammation. These patients are at low risk of experiencing recession, but at high risk of experiencing inflammation if the periodontium is invaded.
Rule 2: Average Sulcus. If the sulcus probes, as above, at a depth of more than 1.5 mm but not more than 2.0 mm, the dentist should place the margin one-half the depth of the sulcus below tissue. If recession occurs, the margin most likely will remain far enough below tissue that it will not be exposed. Patients in such situations are at high risk of experiencing recession. As might be expected, they are at low risk of experiencing inflammation because there is no biological-width violation with margins placed in the sulcus.
Rule 3: Deep Sulcus. If the sulcus probes more than 2.0 mm, the clinician should evaluate the teeth esthetically to determine whether he or she should perform a gingivectomy to expose more of the tooth and create a 1.5 mm sulcus. After the gingivectomy, the clinician should continue treatment according to Rule 1.
It is much more difficult to place a margin at one-half the depth of a deep sulcus than to place it 0.5 to 0.7 mm below tissue. In addition, the stability of the free gingival margin is less predictable with a deep sulcus than with a shallow sulcus. If the clinician can perform the gingivectomy and leave a 1.5 mm sulcus, he or she will be much more capable of placing a subgingival margin predictably. This does not ensure that the tissue will stay at the level at which it is placed, as patients who have undergone gingivectomies frequently experience some regrowth in their gingival tissues.
The difficulty in evaluating sulcus depth in terms of margin placement is the penetration of the periodontal probe into epithelial attachment during probing. For this reason, it is absolutely essential that the clinician use this technique only in healthy tissue.
Clinical Procedures for Margin Placement
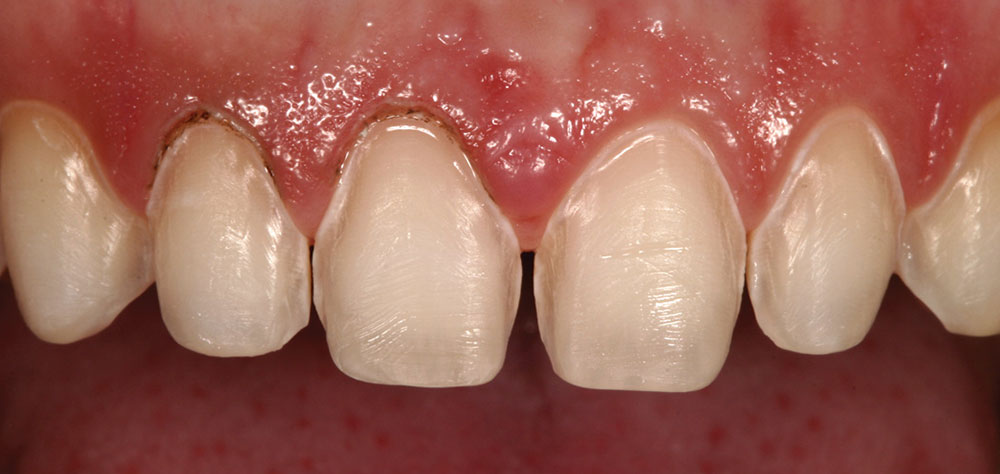
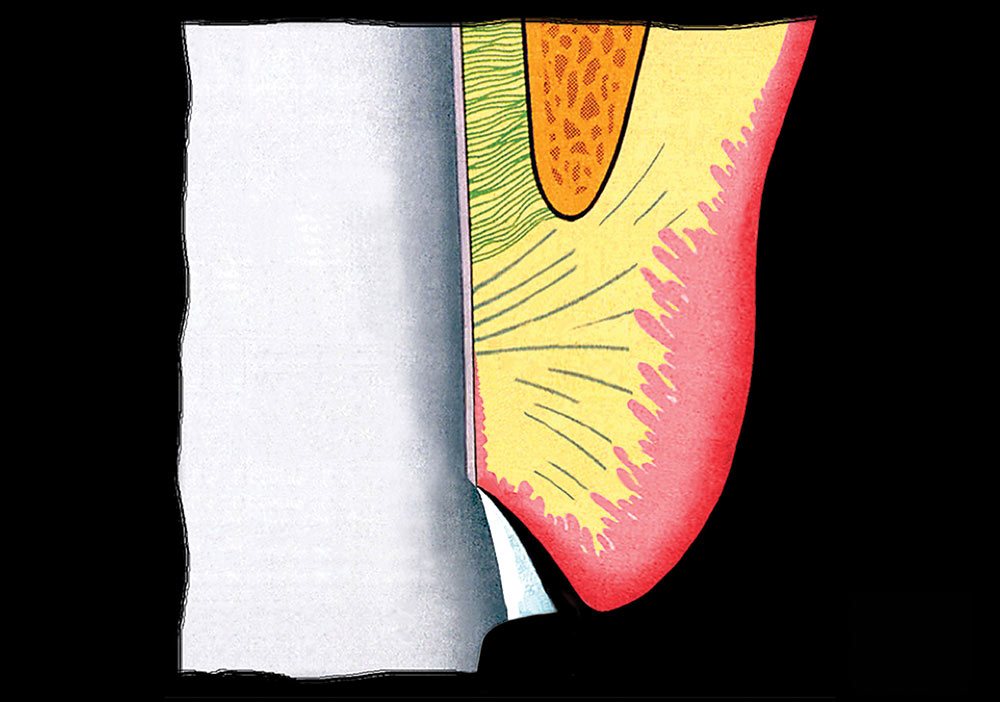
The placement of supragingival or equigingival margins is simple, as these margins require no tissue manipulation. The amount of tooth reduced incisally or occlusally, as well as facially, lingually and interproximally, will be dictated by the choice of restorative materials. Before extending the preparation subgingivally, the clinician should extend the preparation to the free gingival margin facially and interproximally (Fig. 4). This creates a reference for the gingival margin that the dentist can use for subgingival extension once the tissue is retracted.
TISSUE RETRACTION FOR SHALLOW-SULCUS MARGIN PLACEMENT. After extending the preparation to the height of the gingival margin, the clinician should extend the preparation margin below tissue.11,12 He or she must achieve three goals through his process:
- Extension of the margin to the correct depth within the sulcus;
- Protection of the tissue so that it does not become abraded, a condition that can cause hemorrhage;
- Creating access to the margin so that the clinician can make the impression in a clean, fluid controlled environment.
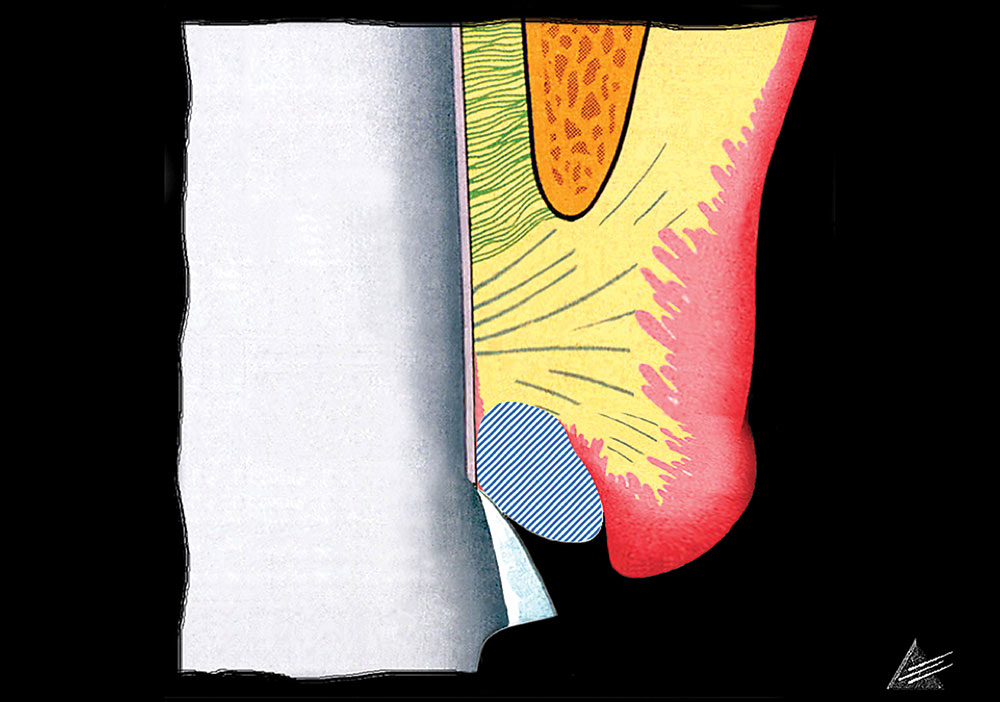
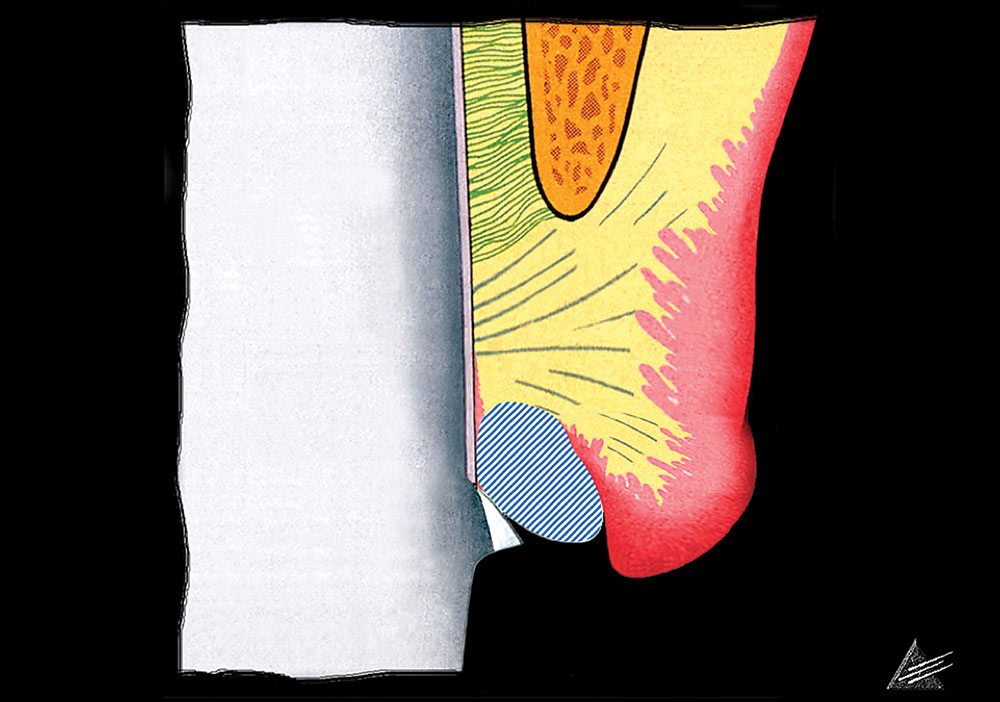
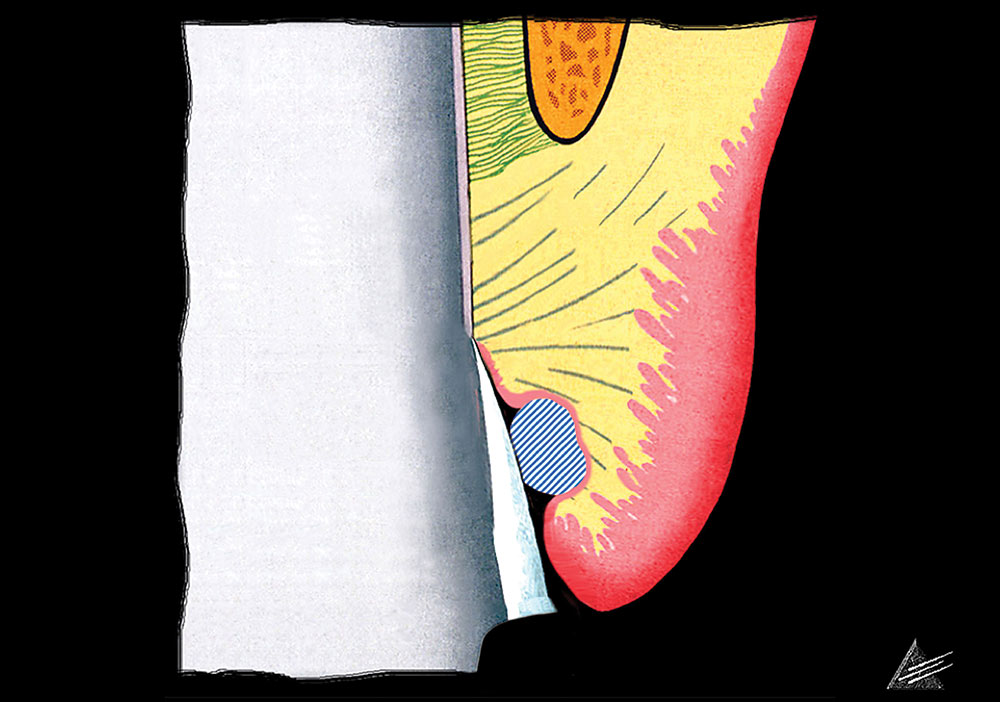
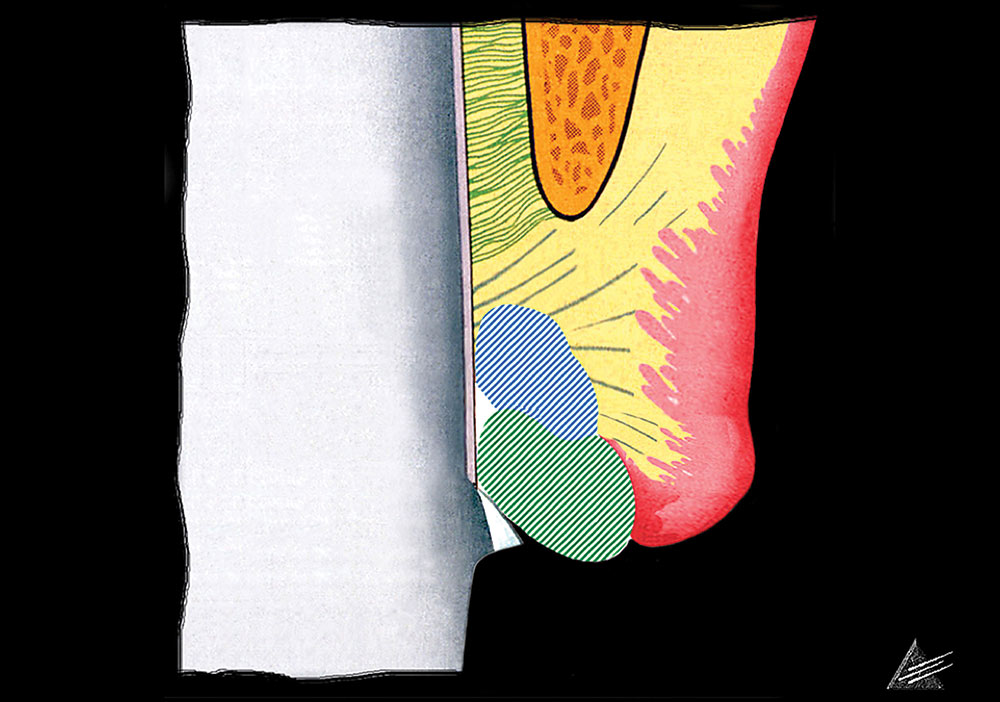
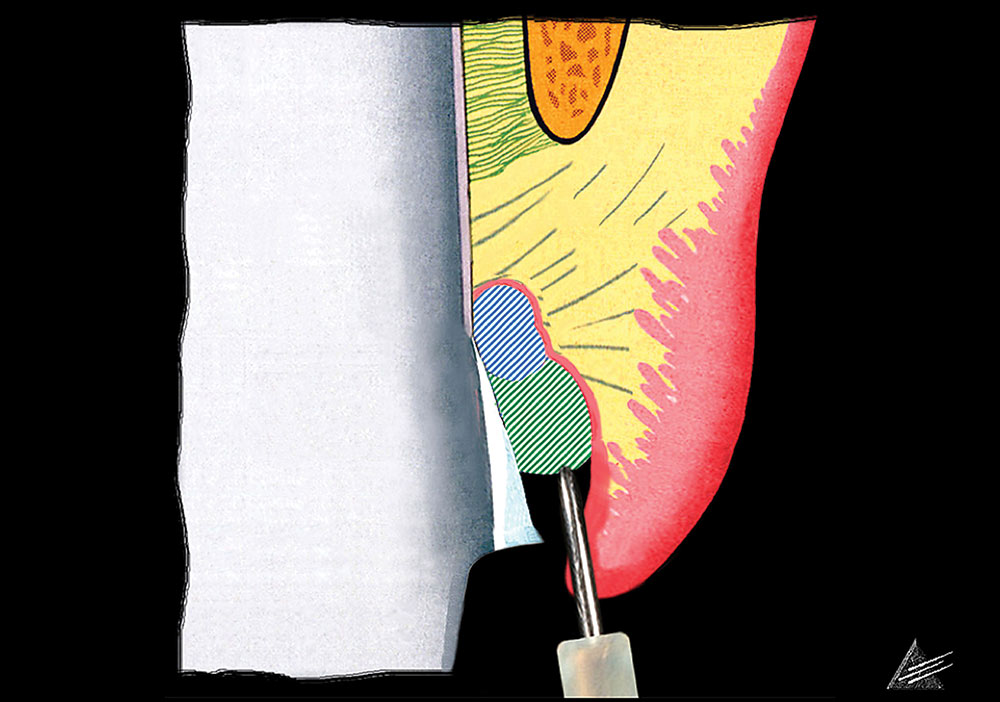
To achieve these goals, the clinician places a layer of appropriately sized “preparation” retraction cord into the sulcus. Too small a cord will not provide adequate retraction. When placing the cord, the clinician should push it into the sulcus the same distance to which the margin is to be placed below tissue. In a shallow-sulcus margin, this means the clinician should place the cord 0.5 to 0.7 mm below the previously prepared margin (Fig. 5). That margin references the unretracted free gingival margin and guides the dentist in appropriate extension of the margin into the sulcus. Once the preparation cord is in place, the top of it represents the margin’s final location. Because the interproximal sulcus routinely is 2.5 to 3.0 mm in depth, the dentist should push the preparation cord 1.0 to 1.5 mm below tissue. The dentist then should extend the preparation to the top of the cord, taking care to hold the bur into the tooth so that it does not abrade the tissue (Fig. 6). This protects the tissue and creates the correct axial reduction.
When completed, the margin will be at the correct level below tissue. As the margin and the cord now will be at the same level, the clinician will not be able to make an impression without using additional retraction cord.
An appropriately placed impression cord will displace the first cord apically and sit between the margin and the tissue. When properly packed, the impression cord is visible around the preparation when viewed from the occlusal aspect.
PLACING IMPRESSION CORD.
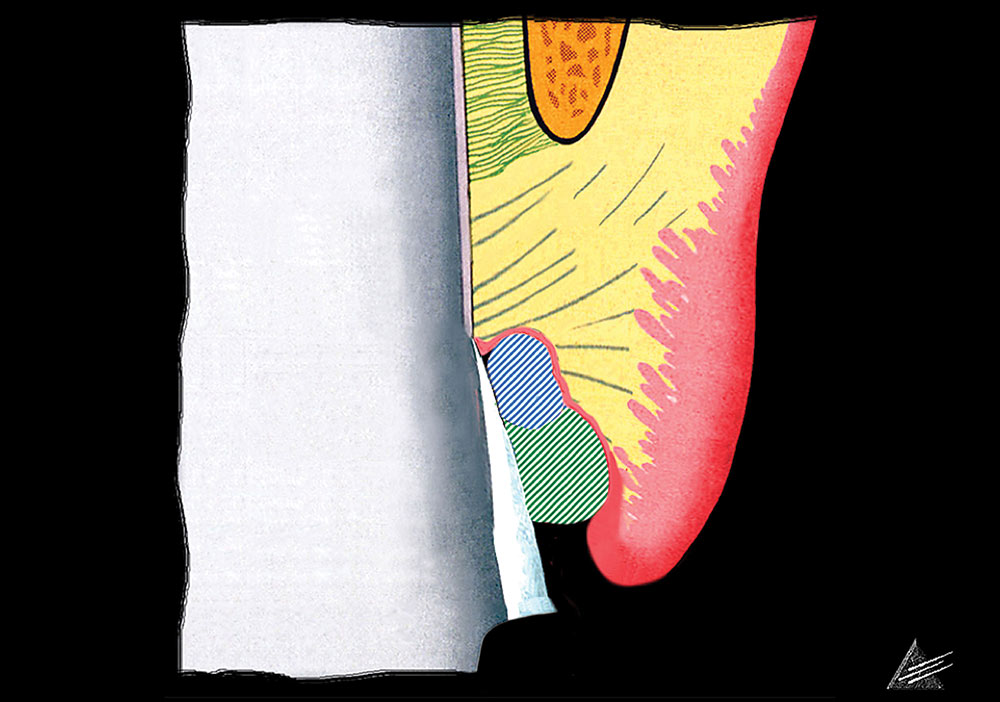
To create space and allow access for a final impression, the clinician must pack a second “impression” cord. Many dentists pack impression cord too deeply, placing it apical to the margin, allowing the tissue at the level of the preparation margin to fall back against the tooth. An appropriately placed impression cord will displace the first cord apically and sit between the margin and the tissue (Fig. 7). When properly packed, the impression cord is visible around the preparation when viewed from the occlusal aspect. The clinician should remove the impression cord before completing the impression, leaving the preparation cord in place while the impression is created. After taking the impression, the dentist should remove the preparation cord.
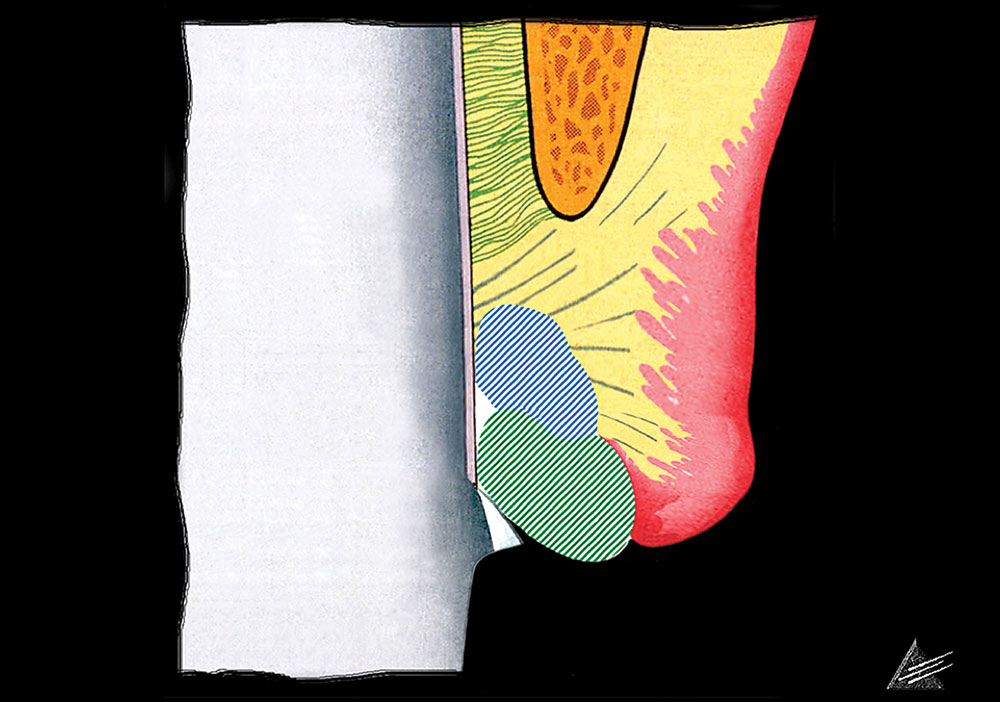
TISSUE RETRACTION FOR AVERAGE-SULCUS MARGIN PLACEMENT. The protocol for treating the patient with an average sulcus differs in one way from that for the shallow-sulcus retraction described above. The clinician should use two layers of preparation cord, instead of one, to deflect the tissue adequately before extending the margin apically (Figs. 8, 9). Using two preparation cord layers will open up the sulcus so that the clinician can carry the preparation below tissue easily. The clinician should place the top of the second preparation cord into the sulcus at the distance below the previously prepared margin that identifies the final margin placement. After extending the margin to the top of the second preparation cord, the dentist should place a third layer of cord, the impression cord that will be removed before making the impression while the preparation cords are left in place (Fig. 10). The subsequent steps remain the same as described for the shallow-sulcus preparation, the sole exception being that the clinician will need to remove two layers of preparation cord after he or she makes a successful impression. In a patient with a deep sulcus, in whom the margin may be 1.5 to 2.0 mm below tissue, it is not uncommon for electrosurgery or laser surgery to be required to trim overhanging tissue.
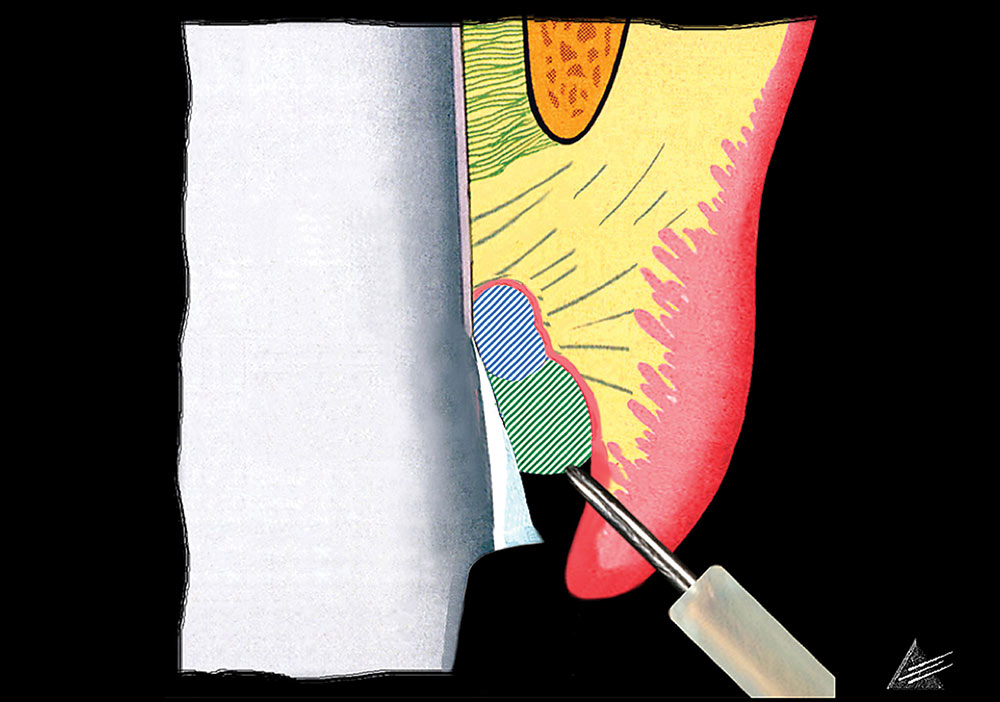
The goal of the tissue surgery is only to open up access to the margin, not to position the gingiva apically. It is important that the clinician hold the electrosurgical or laser tip parallel to the preparation. Directing the tip away from the preparation will alter the gingival height (Fig. 11).
TISSUE REDUCTION OR RETRACTION FOR DEEP-SULCUS MARGIN PLACEMENT. When the patient with a deep sulcus has tooth length that makes gingivectomy appropriate, the clinician can manage the surgery in one of two ways. In one option, he or she can perform the gingivectomy first, allow time for tissue healing, and then proceed as he or she would in the case of a patient with shallow sulci. The second option is to combine the procedures, perform the gingivectomy to leave a 1.0 to 1.5 mm sulcus, and proceed to prepare the teeth on the same day. If hiding the margin is critical, it is preferable that the clinician allows the tissue to heal before finalizing the preparation and making the impression. If gingivectomy is not appropriate, the dentist should apply the rules for average margin placement, extending the margin to one-half the depth of the sulcus. Reduction of the sulcus in patients with deep sulci always is preferable and infinitely more predictable than an attempt to apply the average sulcus guidelines. As noted above, it is difficult to extend margins one-half the depth of a deep sulcus, and the tissue is much more likely to recede following treatment.
MARGIN PLACEMENT FOR ULTRATHIN TISSUE. The sulcus depth rules discussed in this article apply to typical tissue types. When the tissue is so thin that it is transparent, there is no reason to extend the preparation below tissue to hide the margin; it still will be visible. In this situation, a supragingival or an equigingival margin is the only alternative. If the tissue is not so thin as to be transparent but is thinner than normal, the clinician should use finer diameter cords, use greater care with preparation and cord placement, and follow the previous rules.
Conclusion
The esthetic demands of patients seeking alterations to their anterior teeth have necessitated changes in how dentists evaluate and provide treatment to achieve these alterations. The use of the periodontium to determine appropriate margin placement is an extremely valuable evaluation tool for understanding the biological basis of stability. Using sulcus depth refines that understanding to account for variations in biological width, thereby improving predictability. For dentists who can predict the outcome of a procedure with a high degree of accuracy, treating patients who have extremely high esthetic expectations is a rewarding experience; for those who cannot, it can be a devastating one.
Dr. Frank Spear is founder and director of Spear Education. He is also an affiliate professor in the Graduate Prosthodontics program at the University of Washington and maintains a private practice limited to esthetics and fixed prosthodontics in Seattle. To learn more about Dr. Spear or Spear Education, visit speareducation.com or call 866-781-0072.
References
- ^ Tylman SD. Theory and practice of crown and bridge prosthodontics. 5th ed. St. Louis: Mosby; 1965.
- ^ Marcum JS. The effect of crown margin depth upon gingival tissue. J Prosthet Dent. 1967 May;17(5):479-87.
- ^ Coslet JG, Vanarsdall R, Weisgold A. Diagnosis and classification of delayed passive eruption of the dentogingival junction in the adult. Alpha Omegan. 1977 Dec;70(3):24-8.
- ^ Olsson M, Lindhe S. Periodontal characteristics in individuals with varying forms of the upper central incisors. J Clin Periodontol. 1991 Jan;18(1):78-82.
- ^ Ingber JS, Rose LF, Coslet JG. The “biologic width” – a concept in periodontics and restorative dentistry. Alpha Omegan. 1977 Dec;70(3):62-5.
- ^ Vacek JS, Gher ME, Assad DA, Richardson AC, Giambarresi LI. The dimensions of the human dentogingival junction. Int J Periodontics Restorative Dent. 1994 Apr;14(2):154-65.
- ^ Listgarten MA, Mao R, Robinson PJ. Periodontal probing and the relationship of the probe tip to periodontal tissues. J Periodontol. 1976 Sep;47(9):511-3.
- ^ Listgarten MA. Periodontal probing: what does it mean? J Clin Periodontol. 1980 Jun;7(3):165-76.
- ^ Armitage GC, Svanberg GK, Löe H. Microscopic evaluation of clinical measurements of connective tissue attachment levels. J Clin Periodontol. 1977 Aug;4(3):173-90.
- ^ Robinson PJ, Vitek RM. The relationship between gingival inflammation and resistance to probe penetration. J Periodontal Res. 1979 May;14(3):239-43.
- ^ Hansen PA, Tira DE, Barlow J. Current methods of finish-line exposure by practicing prosthodontists. J Prosthodont. 1999 Sep;8(3):163-70.
- ^ Benson BW, Bomberg TJ, Hatch RA, Hoffman W Jr. Tissue displacement methods in fixed prosthodontics. J Prosthet Dent. 1986 Feb;55(2):175-81.
Reprinted with permission from the American Dental Association (ADA): Spear FS. Using margin placement to achieve the best anterior restorative esthetics. J Am Dent Assoc. 2009;140(7):920-6. Copyright ©2009 American Dental Association. The American Dental Association makes no representation and accepts no responsibility for the accuracy, timeliness or comprehensiveness of the cover image.

