In this issue:
Prevention of Orofacial Trauma with Modern Mouthguards
Author
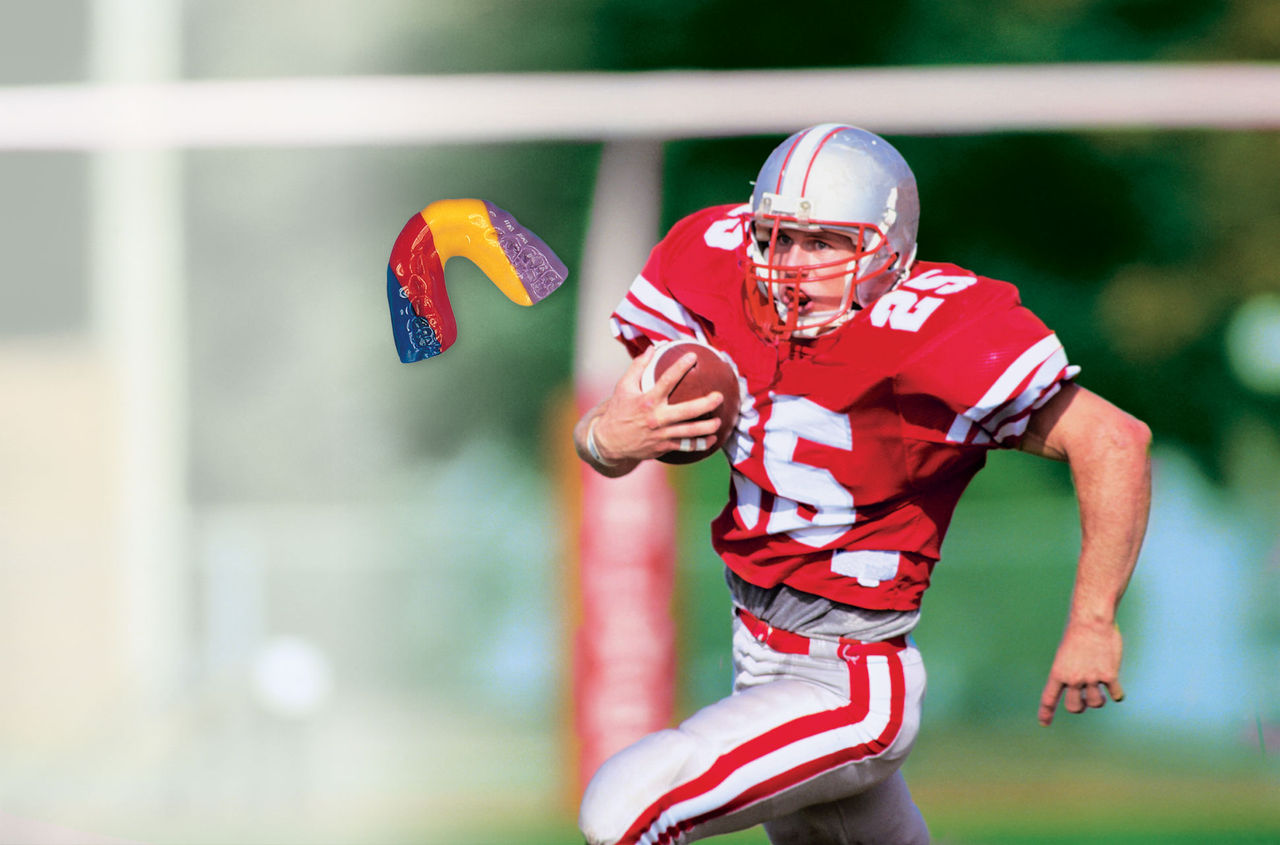
The prevention and treatment of orofacial trauma is a very important part of the general practice. Children and adults are participating more often in events where the probability of trauma is apparent. Attendance at health clubs and gymnasiums is on the rise. Along with the increase in sports participation comes an increase in orofacial injuries. This only raises the possibility that our patients will present in our offices with the need for trauma treatment and ask our opinions on methods of preventing such trauma.
The field of sports and trauma dentistry has come a long way. Dentistry is now represented on various medical commissions and organizations as a viable component of the total package of prevention and treatment of orofacial injuries. Internationally, dentistry is represented on the International Olympic Committee’s (IOC) Medical Commission and the International Ice Hockey Federation (IIHF) Medical Commission. In 1998, the International Society for Dentistry, Sport and Trauma was introduced. In the United States, the Academy for Sports Dentistry was continuing to grow and provide insight on trauma treatment and prevention.
General dentists are now being asked their opinions on prevention of athletic injuries. In the past, our patients would feel comfortable going to local sporting goods stores to get their dentistry. This is no longer the case. As the population becomes more educated on injury prevention and the availability of proven methods of prevention, the general dentist will be called on to provide a more viable, responsible solution for orofacial trauma prevention. The medical/dental literature now provides many references for the probability and treatment of trauma.
The incidences and severance of trauma lead us to contemplate ways of preventing such injuries. The use and acceptance of preventive mouthguards is gaining on the general dentist’s list of priorities. More general dentists are now providing custom mouthguards. However, there is still a significant number of dentists who do not provide this service. Parental perceptions of mouthguards is an important issue that dentists need to identify and manage. Overcoming objections of cost, custom made vs. store bought, vacuum vs. pressure, and availability is critical to the education of dentists, staff and patients. Patient education is essential to the success of trauma prevention. The dental hygienist may play a critical role in this education during routine periodontal treatment.
There are basically three types of athletic mouthguards presently available, all significantly different in fit, comfort and acceptance. Type I is the stock mouthguard (Fig. 1) available at sporting goods stores. These are the least desirable and least acceptable. There is no attempt at fit. Remove from package and place in mouth. Type II (Fig. 2) refers to the common boil and bite mouthguard. These are also mostly of the store-bought variety, and some attempt at fit is made by boiling the mouthguard and trying to mold it to the teeth. The instability and uneven distribution of material does not lend itself to proper fit and protection. In a study by Dr. Andrew Greasley on the difference between various types of mouthguards, the custom-made mouthguards all performed better than the “boil and bite” type, which afforded only slightly more protection than no mouthguard at all. Chapman and McNutt reported many occurrences of injuries while wearing the over-the-counter Type I and II variety of mouthguards. In literature reviews by the author, there were no published data or support found for stock and boil & bite mouthguards after 1980. The literature makes it clear that only custom-made mouthguards should be offered to our patients.

The role of the dentist in trauma prevention is patient education, diagnosis and design of custom mouthguard.
The literature cites occurrences of injuries while wearing non-custom mouthguards. Chapman in 1991 reported that as high as 36% of the athletes playing rugby at the Second Rugby World Cup who wore a mouthguard sustained some type of orofacial injury. McNutt in 1989 reported that, of the 1,470 surveyed American football players, 52 athletes were injured wearing mouthguards and 53 injured without a mouthguard. The injury rate was the same for those wearing mouthguards and those who were not wearing mouthguards. They were the same as wearing nothing.

There are two types of Type III custom-made mouthguards presently available (Fig. 3): those made with vacuum machines (Fig. 4), and those made by pressure machines (Fig. 5). The difference between the old conventional vacuum machines and the new vacuum (Fig. 6) and pressure machines is significant and should be addressed. The internal adaptation difference is noteworthy due to the amount of heat and pressure/suction variances in each machine. While contemplating purchasing these machines, the internal adaptation for fit should be the prime focus of attention. A mouthguard will not be as protective if it does not fit properly. When it comes to mouthguards, the better the fit, the better the protection, acceptance and compliance.


Note the difference in internal adaptation when comparing the old conventional vacuum machine (Fig. 7) to the pressure or vacuum machines (Fig. 8). One can easily see the adaptation from their machine by making a mold from a 3 mm sheet of ethylene vinyl acetate (EVA) material. Take out the original model and pour stone into EVA material. The result will show you the adaptation of your machine. From there, decisions can be made on purchasing the newer varieties of vacuum machines or investing in the state-of-the-art pressure machines.
The role of the dentist in trauma prevention is patient education, diagnosis and design of custom mouthguards, and choosing whether to fabricate them in office or send them to qualified laboratories. Minimum thicknesses and extensions are critical for trauma prevention. The suggested minimal thicknesses are labially 3 mm, palatal 2 mm and occlusally 3 mm. The mouthguards are designed according to the sport played, age of the athlete and history of trauma. The material of choice is EVA with a shore hardness of 80.

There are four parts to the fabrication of custom mouthguards.
- Impression (Fig. 9)
- Fabrication (Fig. 10)
- Trimming and polishing (Fig. 14)
- Placement and occlusal equilibration (Fig. 15)
The impression is critical to the end result. Similar to any restorative procedure requiring an impression, the better the impression, the better the appliance. It has been the author’s experience that an excellent method for impressions for mouthguard appliances is the Accu-Dent® System II (Ivoclar Vivadent; Amherst, N.Y.) (Fig. 11). Accu-Dent multi-colloid impression systems eliminate the need for custom impression trays, allowing you to create master casts in a more efficient and profitable manner.


The impression gels are formulated in two viscosities — a light-bodied Syringe Gel that captures soft tissues, and a heavy-body Tray Gel for hard tissue. Ideal for athletic custom-made mouthguards, Accu-Dent System II can also be used for partials, immediate dentures, orthodontics and splints.
The light-bodied Syringe Gel is applied with a special tip to capture detail while eliminating air bubbles (Fig. 12).
Once the impression has been taken, immediate pour-up with a hard die stone is recommended (Fig. 13). Care is taken to capture all vestibular borders. A large base is not necessary, as it will be taken off while trimming the model.
After the model has become hard and set, usually about 45 minutes, mark the highest margins of the vestibular border with pencil for reference during trimming (Fig. 16). Trim the excess stone carefully to these borders (Fig. 17). By including these vestibular borders, the mouthguard will have more retention due to increased surface adaptation, and will also help protect the alveolar bone for further protection from trauma.


Once the model has been properly trimmed and dried, it must be lubricated to allow easy separation after fabrication. The author’s preference is orthodontic model soap (Fig. 18).


Soak the model in the soap for approximately one hour, then dry and polish with a dry towel. The model is now lubricated for the life of the model.
This method of bi-lamination by thermopressure was previously described in 1999. There have been a few changes and additions to the fabrication process.
This process is not (suck-down) vacuum. It’s positive pressure.
There are presently three pressure machines available for this process, and all must be connected to a compressor for air pressure. They are the Drufomat by Dreve (Unna, Germany), the Erkopress by ERKODENT (Pfalzgrafenweiler, Germany) and the Booster® by Scheu Dental (Iserlohn, Germany).
For the purposes of this paper, the Drufomat will be used.
A 3–4 mm mouthguard will be made. Two layers of 3 mm EVA will be laminated together. It is important that this process be done in two separate steps to allow for proper thickness in the incisal and occlusal surfaces. If done in one step, the thickness in these critical areas will be compromised.
There is approximately 30%–40% shrinkage of EVA material during fabrication, so two 3 mm sheets laminated together will form a 3–4 mm mouthguard.
After the heater switch and machine power is turned on, a 3 mm sheet of EVA is placed in the disc positioning ring. The trimmed model with marked extensions is placed on the tray table slightly off center toward the lingual. The clamping ring is then placed over the EVA sheet to lock it into position. The heater is then placed into position over the model, allowing the EVA material to heat and soften to formable consistency.
As the EVA material softens, it will begin to slump until it is touching the model. At this stage, the first layer is ready to be thermoformed by pressure.
The EVA material must now cool for a minimum of 10 minutes. The EVA material should not be manipulated and removed from the pressure chamber until it has completely cooled to prevent any distortion.
Once the time has elapsed, the white button is depressed until the pressure indicator light shuts off, releasing the pressure in the chamber.


Once the EVA material has cooled, excess material may be trimmed off at this time using a hot knife (Fig. 19). Care should be taken not to trim excessively. The lingual borders are trimmed 1 mm from the teeth, and the labial borders follow the penciled mucosal borders. The distal of the first molar is the minimal extension.
The mouthguard is now ready for the second layer, which will be laminated. A clear sheet of EVA of desired thickness (in this case, 3 mm) is placed in the disc positioning ring (Fig. 20). The model with the first trimmed and labeled layer is placed on the positioning tray slightly off center toward the lingual layer.
The pressure chamber is activated, and the model allowed to cool under pressure for 15 minutes. The previous finishing steps are then repeated.
With a Dedeco stone acrylic bur, the excess material is trimmed lingually to the marked extensions. The mouthguard is then placed back on the model and the margins are feather finished for comfort lingually, bucally and labially (Fig. 21). Any interferences with muscle attachments should be removed.
With Essix scotch wheels, the mouthguard is further trimmed and smoothed to desired thickness (Fig. 22).
Final finish and polish is placed with wax remover (Fig. 23).
The 4 mm custom-made pressure-laminated mouthguard is now completed (Fig. 24). It is now important to try the mouthguard in the patient’s mouth and check for fit and comfort. Minimal adjusting may be necessary, just as with any other dental appliance insertion appointment. It is extremely important that a balanced occlusion be present. This is done by slightly warming the posterior occlusal surface of the mouthguard, taking extreme care not to overheat and distort, and placing the mouthguard in the patient’s mouth and asking them to bite down very lightly and carefully until all posterior teeth occlude. Care should be taken not to bite down excessively, as the occlusal separation of 3–4 mm must be maintained to ensure proper absorption of impact energy.
Conclusion
The pressure-laminated mouthguard continues to be the mouthguard of choice and acceptance for athletes of all levels. The precise fit lends to an increased compliance and reduction of injuries. Athletes who in the past have not been able to wear over-the-counter mouthguards because of their poor fit, bulkiness and lack of retention are more prone to wear a mouthguard that is comfortable, non-bulky and tight fitting.