No-Prep vs. Minimal-Prep on the Same Patient
There seems to be a controversy today in the world of esthetic dentistry whether prepped or no-prep veneers are the better restoration. Typically, this discussion takes place between dentists, from the dentist’s point of view and with little or no input from the patient’s point of view. I doubt any article can ever settle that debate. My intent in this article is to simply compare the esthetic results that can be achieved with both types of veneers.
In most articles comparing different restorations, one set is done on one patient and the other set is done on a different patient. Unfortunately, when you compare the two techniques using two different patients, the comparison is not really significant. Each patient will have his/her own hard and soft tissue features such as tooth alignment, dentin shade and gingival architecture. Many times it is these factors that determine which set of restorations look better.
To accurately compare the esthetic potential of two sets of restorations, it is my opinion that both sets of restorations should be fabricated by the same technician and placed on the same patient. We often do this by trying in both sets of restorations and taking digital photographs. While this allows us to see the esthetic differences between the restorations, it does not allow us to evaluate patient feedback about the difference on how the two different sets of restorations look, feel and function.
That’s why I jumped at the opportunity to see the difference between prep and no-prep veneers on the same patient. In this study, we first placed no-prep veneers on the patient and left them on for six months. The patient loved these veneers from the day they were placed and had no functional issues with them, either. His wife, however, who happens to be a dental technician, thought that they looked too bulky. The patient did say that they initially felt “a little thick to his tongue,” but this feeling went away within the first few weeks.
As part of our agreement for receiving the veneers for no charge, I removed the no-prep veneers with my Waterlase® (BIOLASE Technology Inc.; Irvine, Calif.) after six months. After the veneers popped off, a thin layer of resin cement remained on the enamel surface. I removed the cement with rubber wheels to get his teeth as close to their preoperative state as I could. This is not to say that I consider no-prep veneers to be reversible, but if I did ever have to remove a set to return a patient to their pre-op state, I now know that I could come close.
I then sent a study model to the laboratory in order to do minimal-prep veneers. While the term is somewhat unclear, I define a minimal-prep case by two conditions: 1) the amount and location of the reduction is determined by the laboratory technician; and 2) the preparation remains entirely within enamel. By allowing the dental technician to determine the amount and location of reduction based on the diagnostic wax-up, we ensure we only remove enough tooth structure to achieve the esthetic result shown by the diagnostic wax-up. By remaining in enamel, we nearly eliminate the potential for post-operative sensitivity while taking advantage of the highest bond strength in dentistry.
Two weeks later the minimal-prep veneers were bonded into place, and again the patient was very happy with them. This time, however, his wife, the dental technician, was also very pleased with the result. The patient did not see much difference between this set of veneers and the no-prep veneers, and commented that he “didn’t feel there was enough of a difference” between the two sets of veneers to “justify the numbing and drilling.” Please keep in mind that this was not a dental phobic patient. Had he been a dental phobic, the no-prep veneers would have been the only option and he would have been pleased with that esthetic result.
I have presented his final pictures side by side so you can compare the results for yourself. While I expect that many dentists will prefer the minimal-prep set of veneers, I urge you to keep the patient’s response in mind. Is there enough esthetic difference in the final results to justify the anesthesia and preparation? Only you and your patient can decide.
Pre-Operative
Figure 1: Greg’s Pre-Operative Smile
You will notice when he smiles that he does not show the incisal edge of his maxillary anterior teeth. However, you will notice after his teeth are restored that his smile becomes more broad and more authentic, and the incisal edges of the maxillary anterior teeth become apparent.
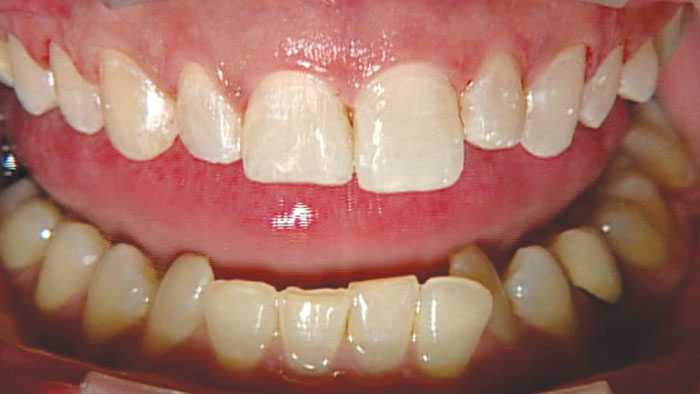
Figure 2: Facial View of Pre-Operative Smile
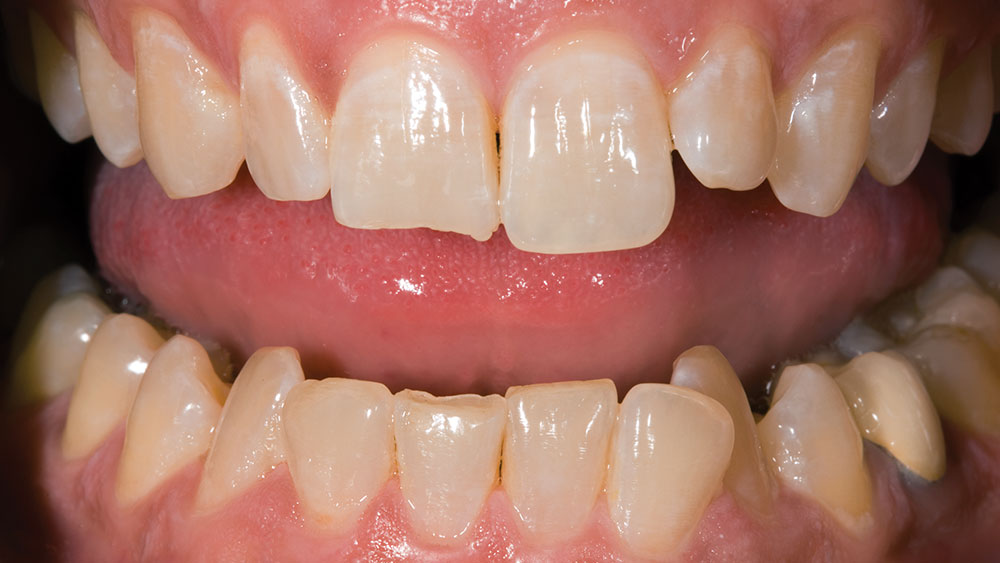
A close-up view of the maxillary anterior teeth shows numerous esthetic issues, some more dramatic than others. A traumatic fracture of the incisal edge of tooth #8 has left it 1 mm shorter than tooth #9. The gingival levels on teeth #6, #8, #9 & #11 are roughly in the correct position, but the gingival levels on tooth #7 and especially #10 are too far apical. Short of a gingival graft, the only way to correct this problem would be to do a gingivectomy on #6, #8, #9 & #11 to match the levels of the lateral incisors, but that would leave these other teeth with clinical crowns that were too long.
Figure 3: Right Lateral View of Pre-Operative Smile
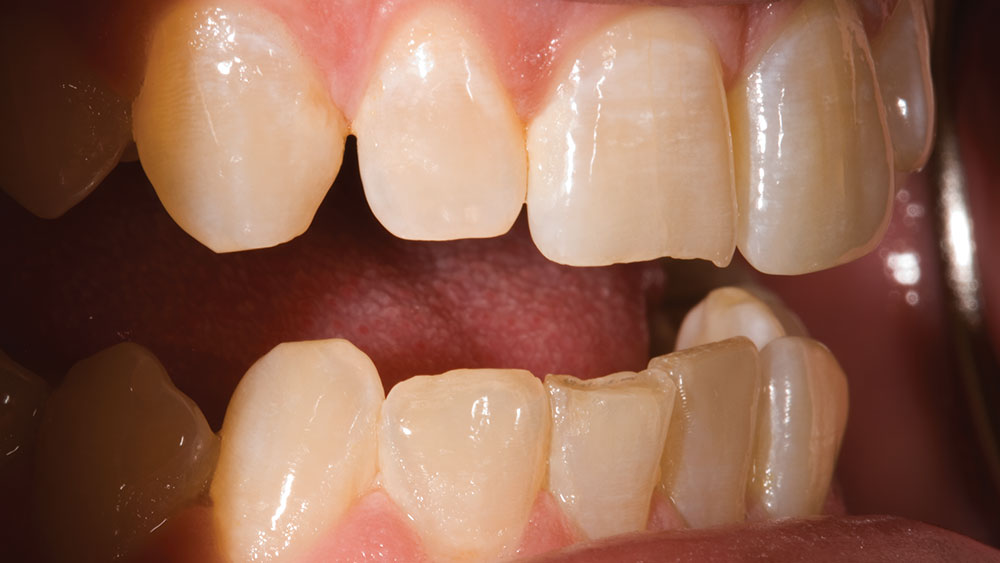
In addition to the broken incisal edge on tooth #8, it is also apparent that tooth #7 is too short incisally. Teeth #6 & #7 also have an excessively large incisal embrasure between them in addition to a small diastema.
Figure 4: Left Lateral View of Pre-Operative Smile
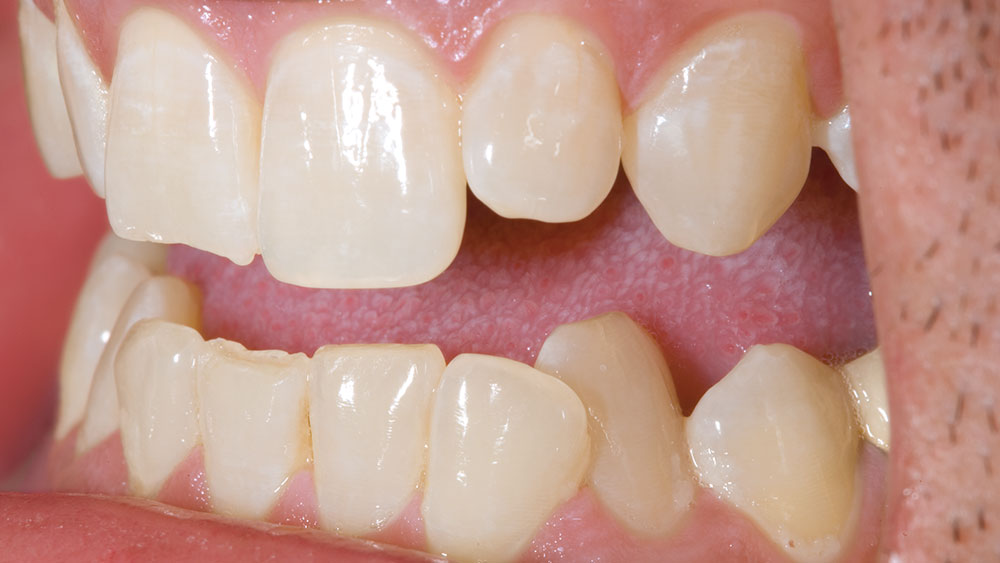
From this view, it is apparent that tooth #10 is angled to the facial, making it too facially prominent. In a no-prep case like this, I refer to this as a Facial Limiting Factor (FLF). Because this is a no-prep case by definition, all the teeth are going to get at least 0.3 mm thicker on the facial. If the FLF is too noticeable, it will change a case from no-prep to minimal-prep.
No-Prep Veneers
Figure 5: Greg’s Smile After No-Prep Veneers
Notice how his smile is now a full smile with his lower lip paralleling the incisal edges of the maxillary anterior teeth. Like many patients, being happy with their anterior teeth leads to more natural smiles.
Figure 6: Facial View of Post-Operative No-Prep Veneer Smile
I think we can all agree there has been a dramatic improvement from Figure 2 to this picture. Essentially, all of the cosmetic objections the patient originally had have been eliminated by the no-prep veneers. Interestingly, even our FLF has been somewhat nullified by the no-prep veneer. Because tooth #10 was so short, the ceramist was able to increase its length while bringing the incisal edge back toward the lingual. This has created an illusion that #10 is not as facially prominent as it actually is. The only time I see this happen is when the FLF tooth is lengthened by the ceramist.
Figure 7: Right Lateral View of Post-Operative No-Prep Veneer Smile
Compare this picture with Figure 3 and note the multiple esthetic improvements. For example, the incisal embrasure between teeth #6 & #7 that was too far open in Figure 3 has been closed in Figure 7. The deficient distal-marginal ridge on tooth #6 has been corrected in Figure 7, giving tooth #6 a more pleasing overall shape and appearance. The broken incisal edge on tooth #8 has also been corrected.
Figure 8: Left Lateral View of Post-Operative No-Prep Veneer Smile
Compare this photo with Figure 4 and note the multiple esthetic improvements. For example, the insufficient length of tooth #10 has been corrected. Tooth #9 was a concern to me because the tooth was nearly ideal prior to treatment. Placing a no-prep veneer on this tooth would not make it look any better, except that the shade will blend in with the adjacent teeth. In Figure 8, however, tooth #9 does not appear to be too large. We also dodged a bullet on tooth #10, which was facially prominent prior to treatment, as it blends in reasonably well.
No-Prep Veneer Removal
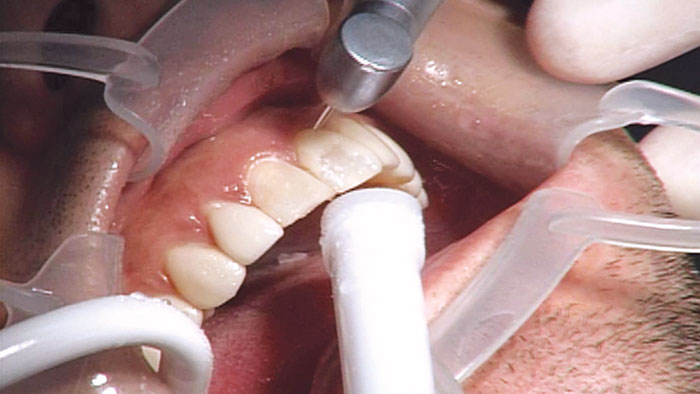
Figure 9: Facial View of No-Prep Veneer Removal
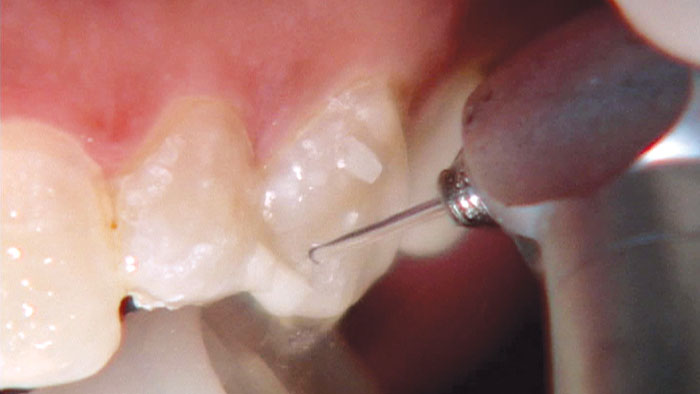
I set the power on my Waterlase YSGG laser to its maximum (6.0 watts) and held it approximately 2 mm away from the surface of the veneers. Because these were no-prep veneers and extremely thin in most areas, the porcelain began to pop off quickly. Through my loupes it appeared as though the ceramic fracture was taking place at the level of the silane. In other words, when the porcelain came off, it left a thin layer of resin cement on the tooth. This was polished off with rubber wheels.
Figure 10: Close-Up View of No-Prep Veneer Removal
The reason I like removing these veneers with the laser is that it pops the porcelain off with much less potential for damaging the underlying enamel. Because these veneers are so thin, it would be difficult to cut through them with a handpiece and bur and not cut into the enamel. In areas where the veneers were slightly thicker, I found I could use a diamond bur to slightly thin the porcelain if the laser was having no effect on it. Once the porcelain was thinned, the laser would pop it right off.
Figure 11: Facial View After Removal of No-Prep Veneers
This is a shot after the no-prep veneers were removed and initial rubber wheel polishing was done. Essentially, we have taken the patient back to his pre-operative virgin teeth. While I would never tell patients that if they don’t like their no-prep veneers we can always pop them off and go back to square one, it is nice to know that I do have a way of removing them if I absolutely had to.
Minimal-Prep Veneers
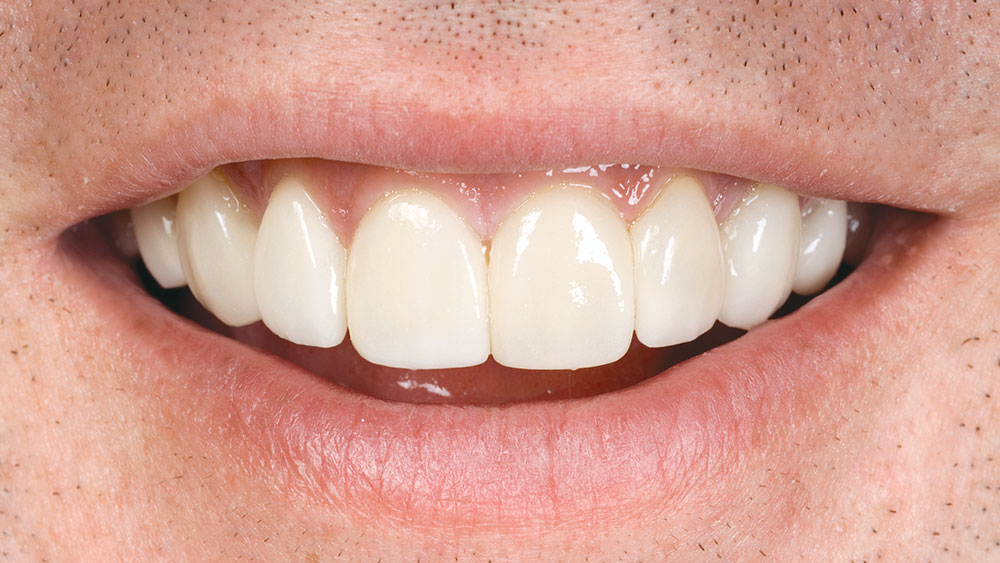
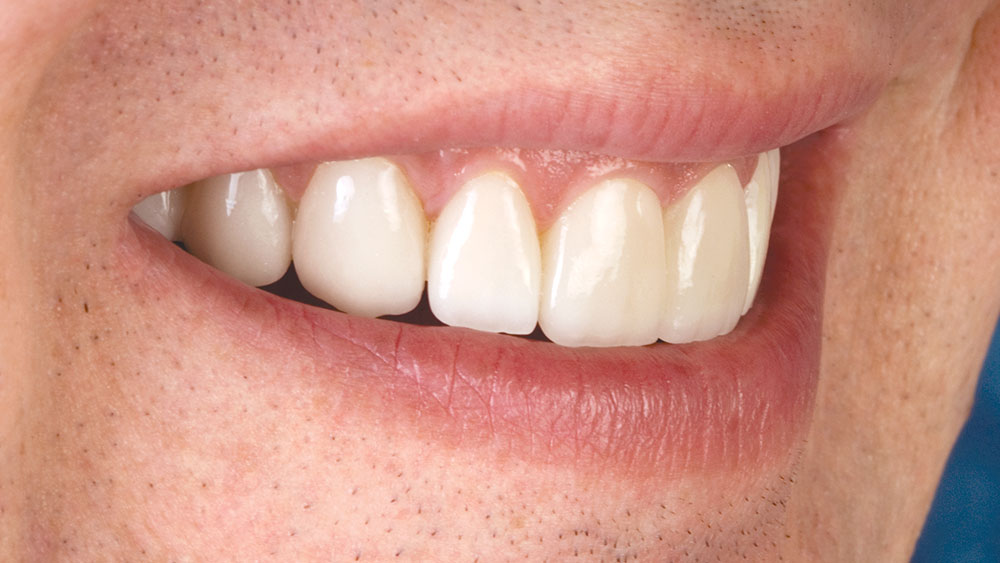
Figure 12: Greg’s Smile After Minimal-Prep Veneers
After the no-prep veneers were removed, a study model was made and sent to the technician. The technician identified the FLFs he would like removed to enhance the esthetic results for this case. The minimal amount of preparation ensured that all of the preparations remained entirely in enamel. The minimal-prep veneers were placed with the exact same steps as with the no-prep veneers. Because the entire preparation is in enamel, we have no fear of post-operative sensitivity or potential loss of tooth vitality.
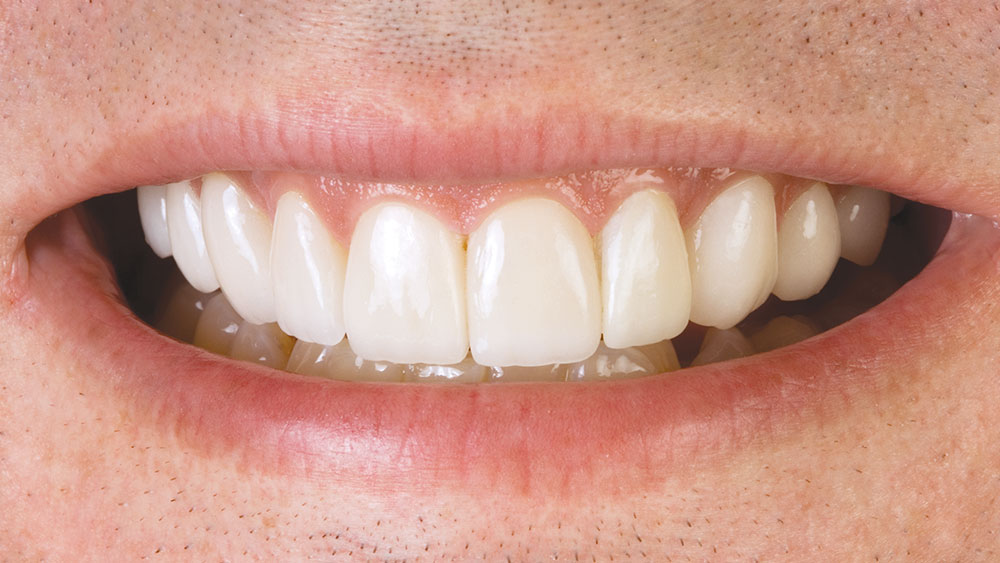
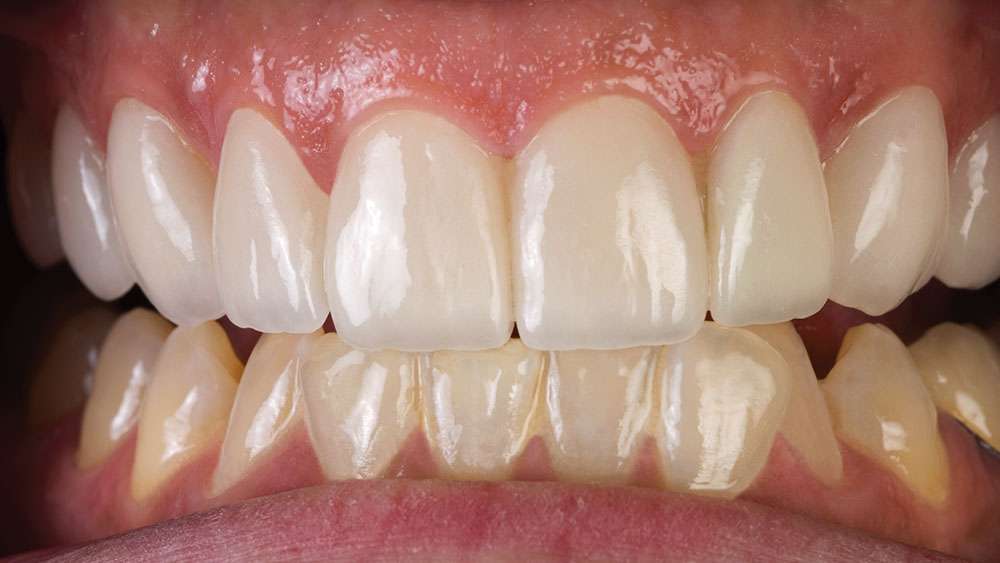
Figure 13: Facial View of Post-Operative Minimal-Prep Veneer Smile
Compare this with Figure 6 and see which set of veneers you prefer. It should be apparent that the shape and contours of the veneers in Figure 13 are more pleasing and anatomically correct than those in Figure 6. The teeth do not appear as bulbous and the “negative space” in the various embrasures add a depth and vitality to these restorations.
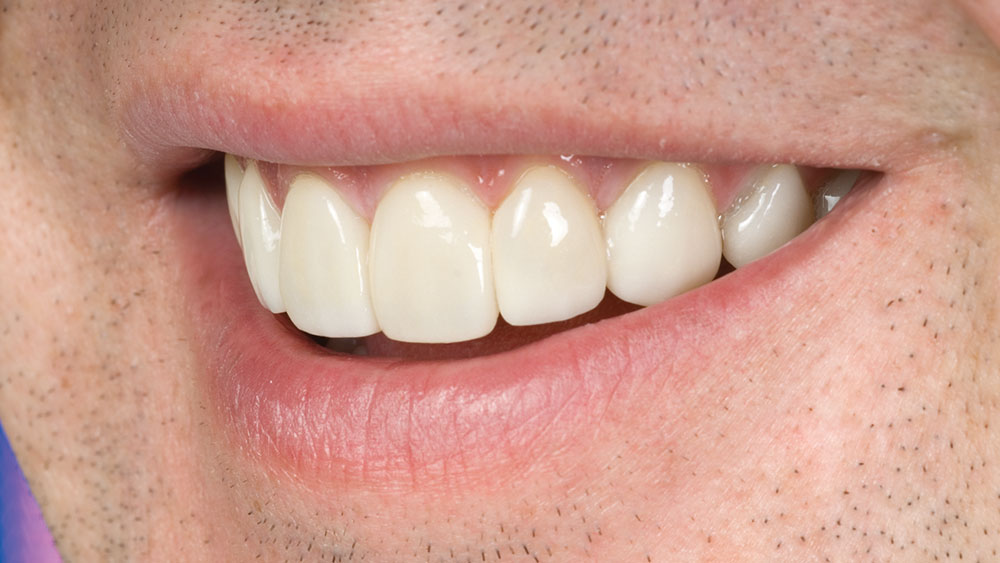
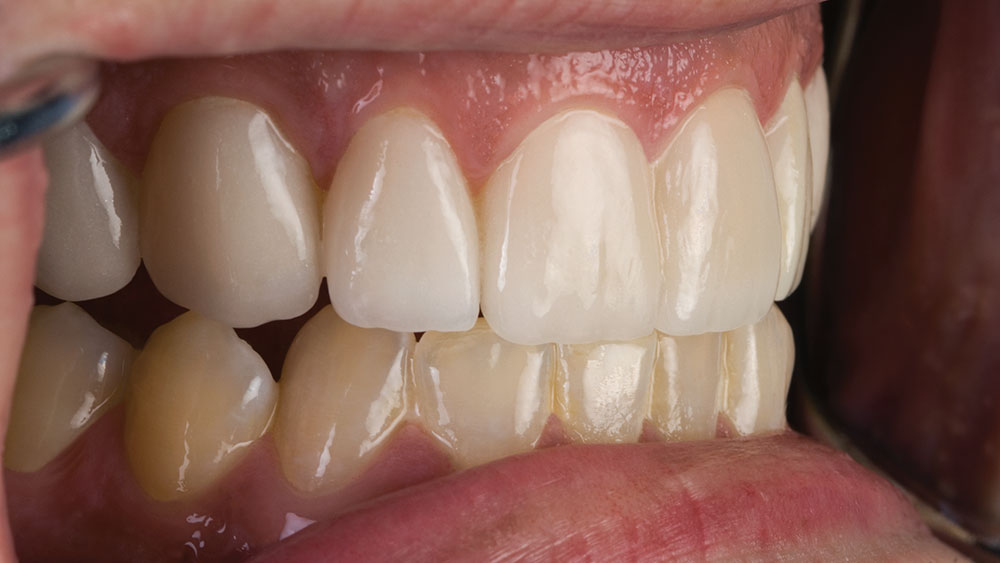
Figure 14: Left Lateral View of Post-Operative Minimal-Prep Veneer Smile
Compare this to Figure 8 and see which set of veneers you prefer. Again, the first thing I notice is the lateral incisor, tooth #10. In the no-prep case in Figure 8, the tooth looks bulbous, especially in the cervical third. Note how with the minimal-prep veneers in Figure 13 the cervical third appears much more natural, and the “negative space” surrounding the gingival embrasure makes it appear more like a tooth and less like a restoration.
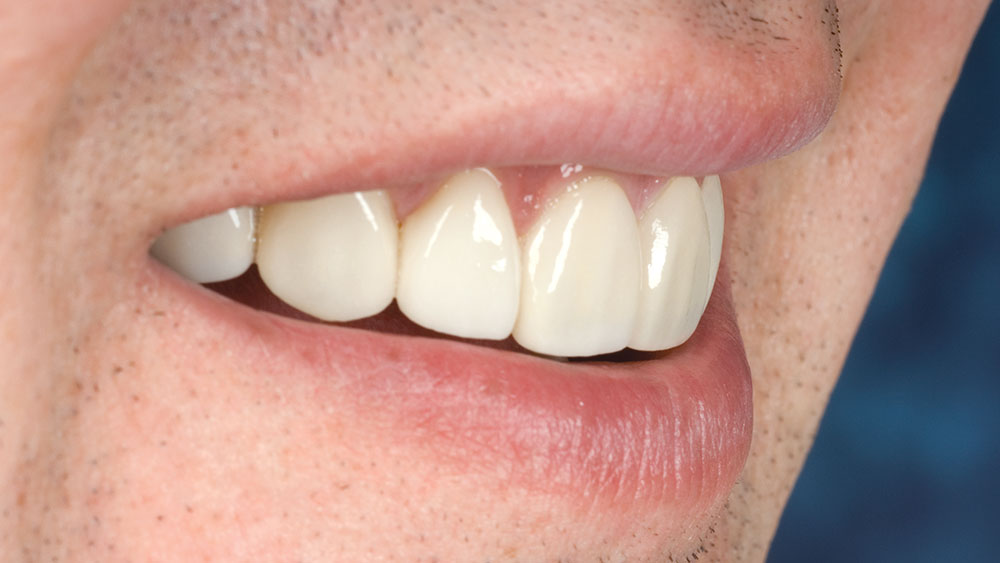
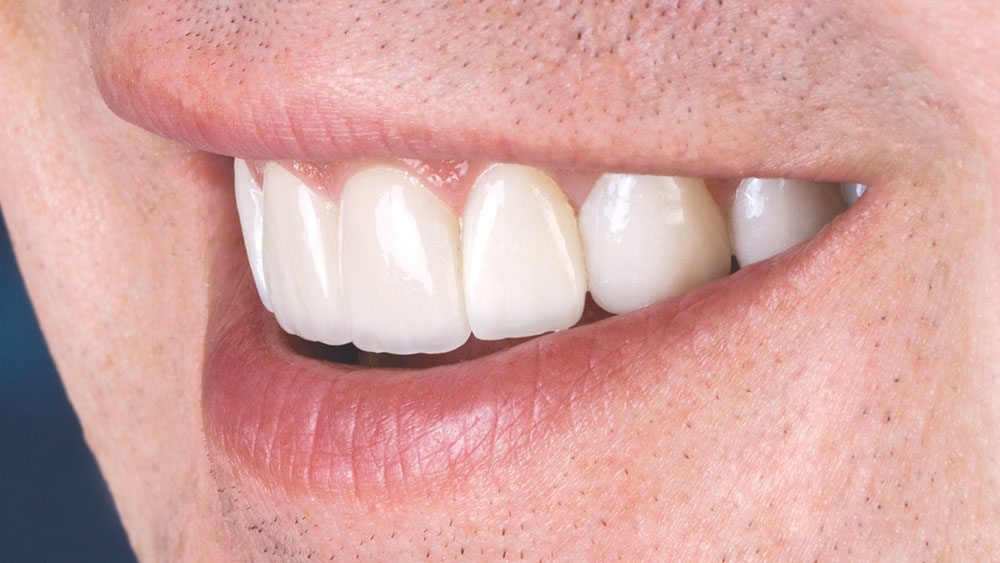
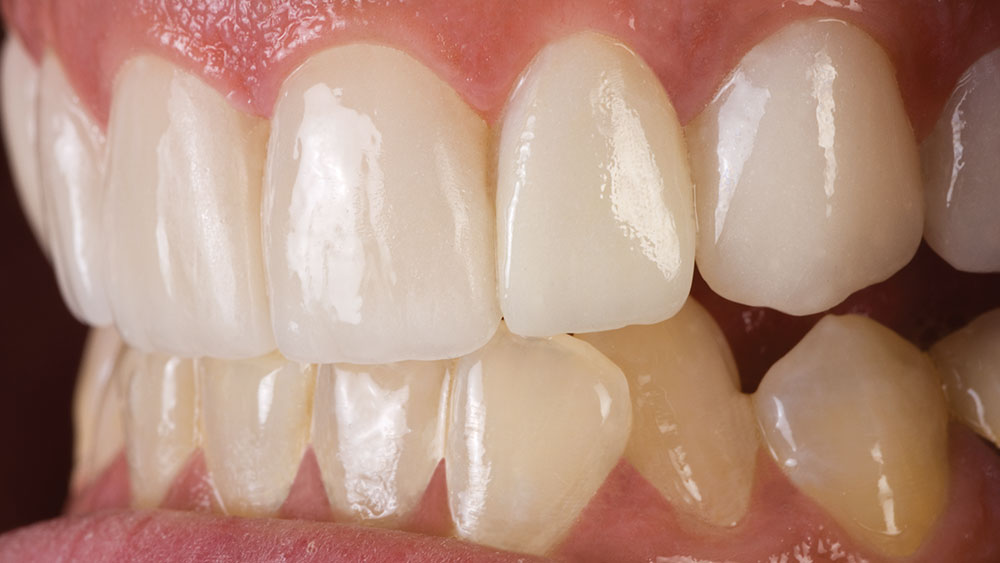
Figure 15: Right Lateral View of Post-Operative Minimal-Prep Veneer Smile
Compare this to Figure 7 to see which set of veneers you prefer. The first thing that jumps out at me is how natural tooth #7 looks in the minimal-prep case versus the no-prep case. Teeth #6 & #8 also appear more natural, especially the way the incisal third of tooth #8 is positioned more lingually in the minimal-prep case than in the no-prep case.
Post-Operative Minimal-Prep Veneers
Figures 16, 17, 18: Retracted Left, Facial and Right Views of Post-Operative Minimal-Prep Veneers
These close-up views of the completed minimal-prep veneers highlight the esthetic features that are not possible with no-prep veneers. Every dentist who has looked at this case prefers the look of the minimal-prep veneers. However, every patient I have shown this to, including the one the treatment was performed on, had no preference between the two sets of restorations. They did have a preference for the no-prep procedure over any preparation.
No-prep veneers can solve a lot of esthetic issues in one appointment, without a drill and without anesthetic. For a lot of patients that is a major benefit, even if the veneers don’t look as nice as if we did a minimal-prep or full-prep procedure. For them, the main criteria are no drilling, no shots and no removal of tooth structure. These patients are much less concerned about the fact that their veneers will be slightly bulbous, as they inevitably will be with the no-prep method.
For patients who are insisting on perfection in the shape of their veneers, we need to go to a minimal-prep or full-prep procedure. It’s important to explain to the patient the advantages and disadvantages of the different kinds of veneers available to them and then help them to make their own decision.
Case Studies: Comparative Study of No-Prep, Laser Removal, and Minimal-Prep Veneers on the same patient.

