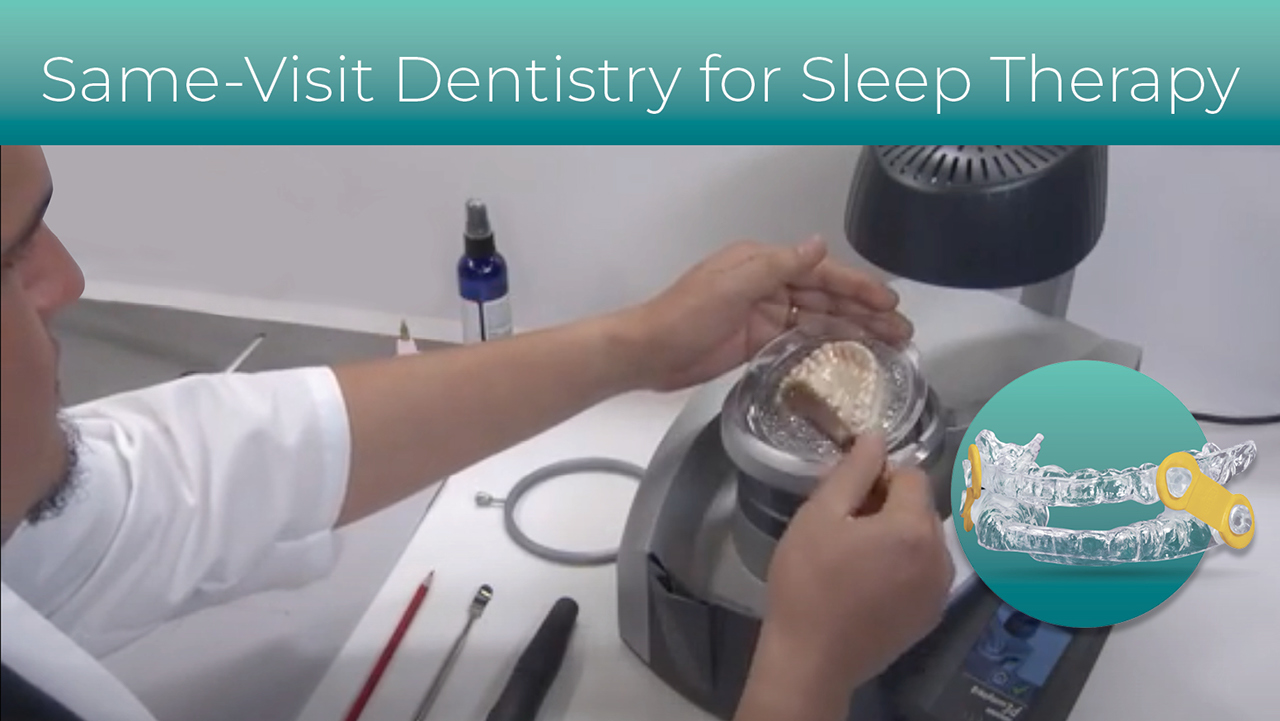
Benefiting from the convenience of same-visit dentistry, clinicians and staff can fabricate an EMA sleep appliance chairside using the Erkoform-3dmotion, which features a fully automated four-step process. This in-office solution is available at glidewelldirect.com.
How to Make an EMA® Appliance In-Office
Provide patients with immediate relief by fabricating an EMA sleep appliance chairside.
Author

It’s estimated that one in four patients suffers from sleep-disordered breathing (SDB), a condition that includes snoring and obstructive sleep apnea, which is linked to serious health consequences. Patients typically seek care due to bed partner disturbance and excessive daytime sleepiness, which can lead to traffic accidents and workplace safety issues. The EMA® (Elastic Mandibular Advancement) oral appliance is FDA-cleared for the treatment of both snoring and sleep apnea, and is customized to a patient’s dentition by a trained dentist. Its affordable price allows dentists to provide this appliance, either lab-fabricated or made in the dental practice for same-visit delivery, as part of a provisional treatment strategy. In-office fabrication is also ideal for patients who are already being treated for SDB, but need a second appliance quickly due to loss or damage of their existing appliance (dogs love them).
 The EMA appliance is FDA-cleared for the treatment of snoring and sleep apnea.
Provisional Treatment
The American Dental Association (ADA) encourages dentists to screen for SDB as part of a comprehensive medical history. If patients are found to be at risk, they should be referred to a physician for a diagnosis. Many dentists have found that their patients cannot easily access sleep diagnostic services and may go untreated. For individuals at risk for SDB, provisional mandibular advancement device (PMAD) therapy is a strategy that any general dentist can use to treat their patients, who are then referred to a physician for definitive diagnosis and medical management. Central to this strategy is the use of an informed consent document that records the patient’s understanding of the provisional nature of the treatment and the importance of the referral to a physician.
To begin immediate treatment with the EMA appliance, the dentist makes an impression of the patient’s teeth and takes a bite registration, indicating where the mandible shall be positioned on initial delivery of the appliance. In most cases, this is determined as an edge-to-edge or a comfortable protrusive bite position.
The EMA appliance can be made in the dental office for immediate delivery. If the dentist is not yet set up for same-visit sleep therapy services, bite records may be sent to Glidewell — either as a physical impression or digitally — for the lab to fabricate the final EMA appliance. Allow five days in the lab for the final appliance to be shipped back to the dental office.
EMA Appliance Design
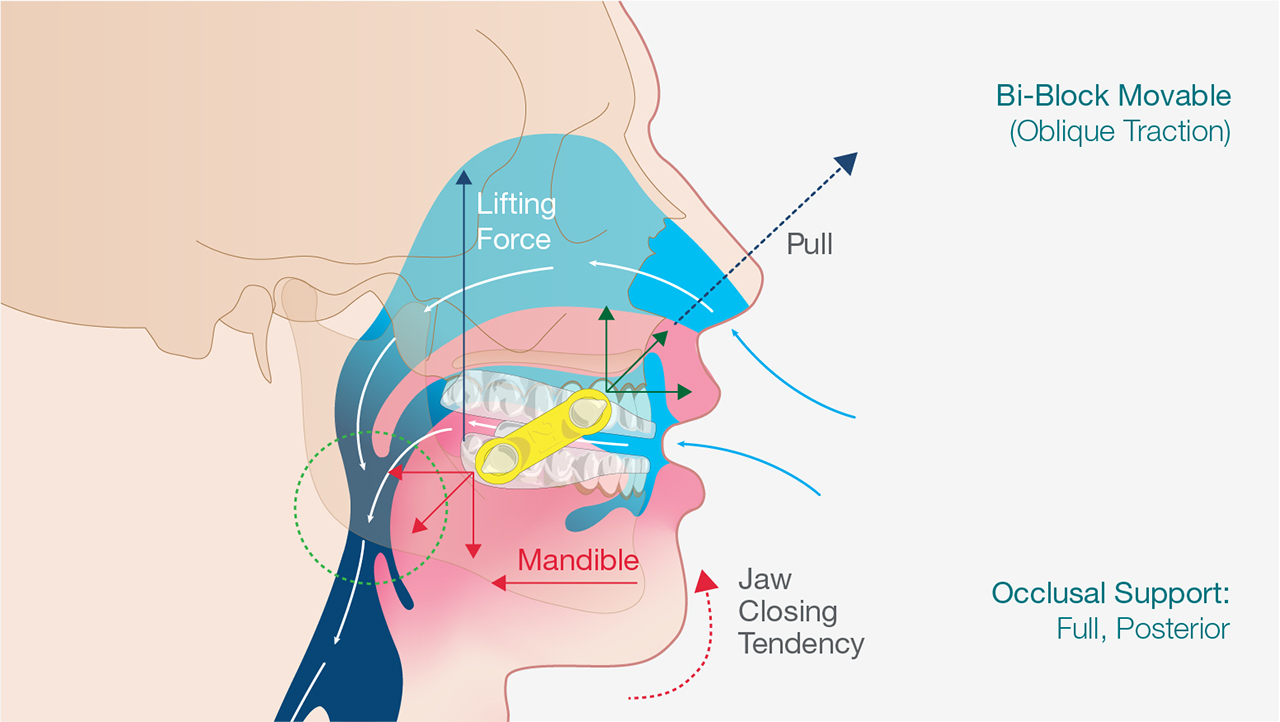
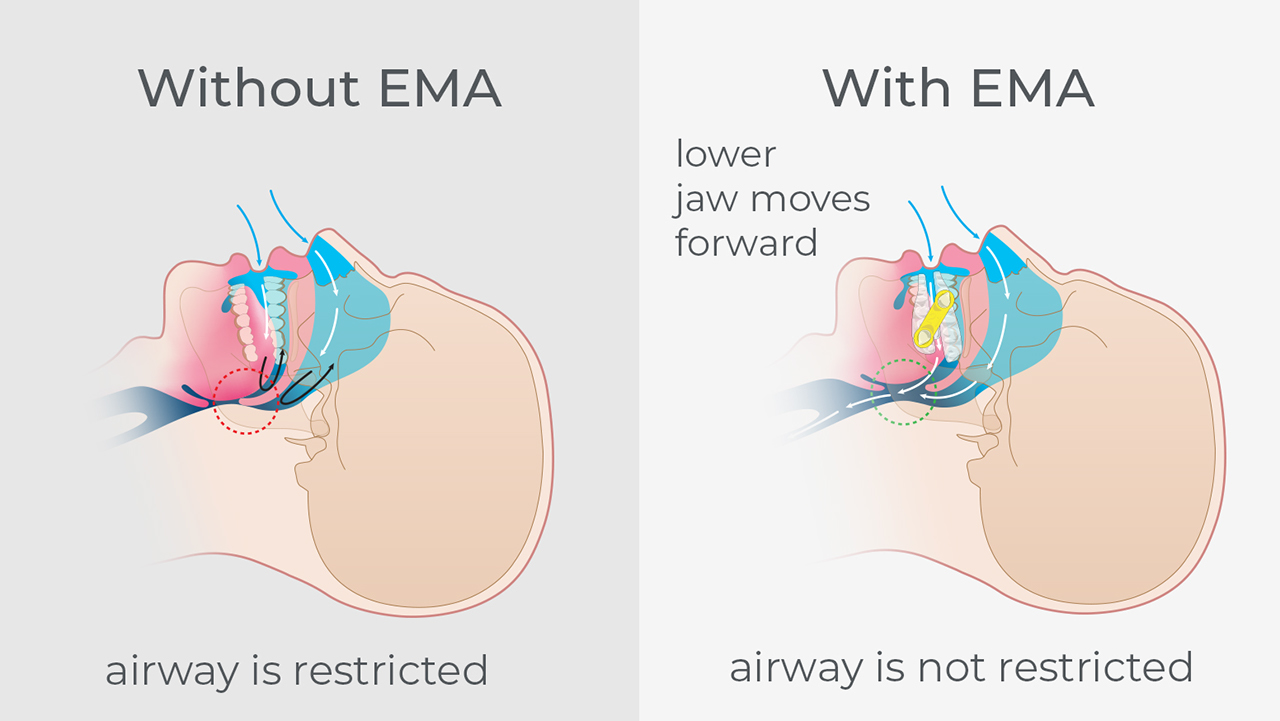 The EMA appliance is designed to both advance the mandible and open the bite to allow for less restricted airflow during sleep.
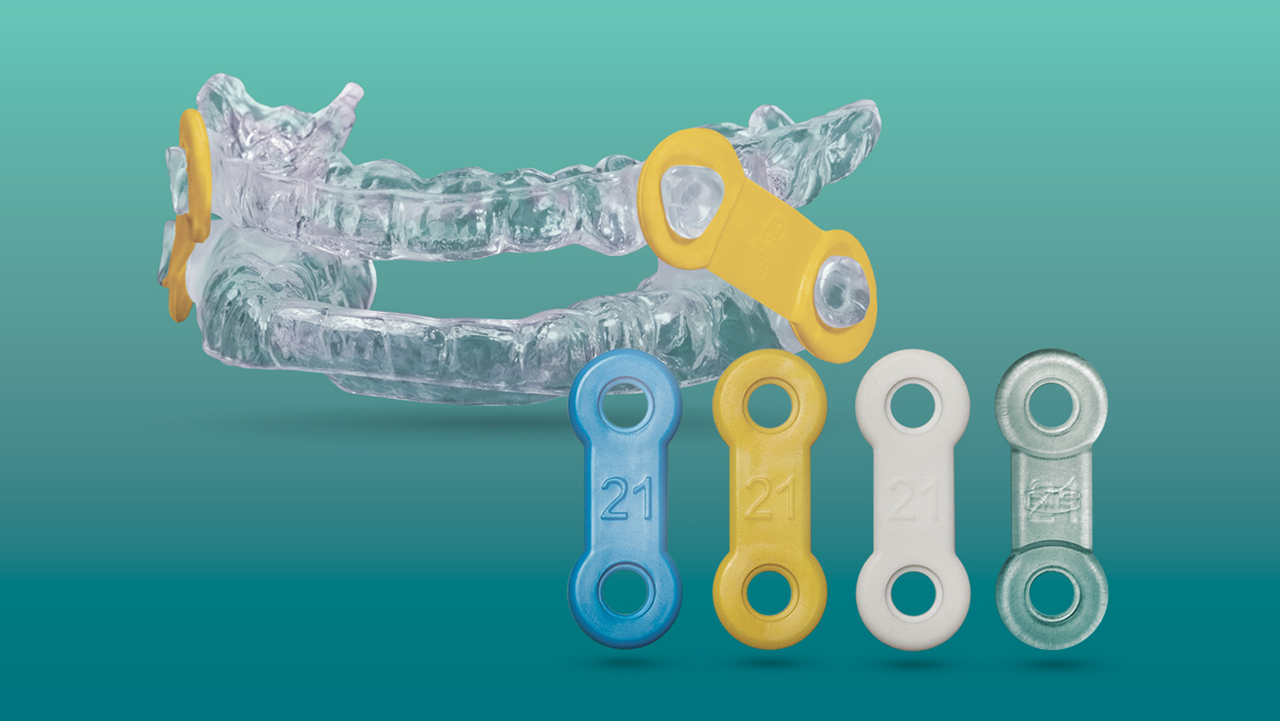
The EMA appliance consists of two hard trays that are slightly flexible. The bite trays are held together with purpose-built elastic straps that serve to keep the mandible from falling back during sleep, which would push the tongue into the airway. The appliance is very small with plenty of room for the tongue.
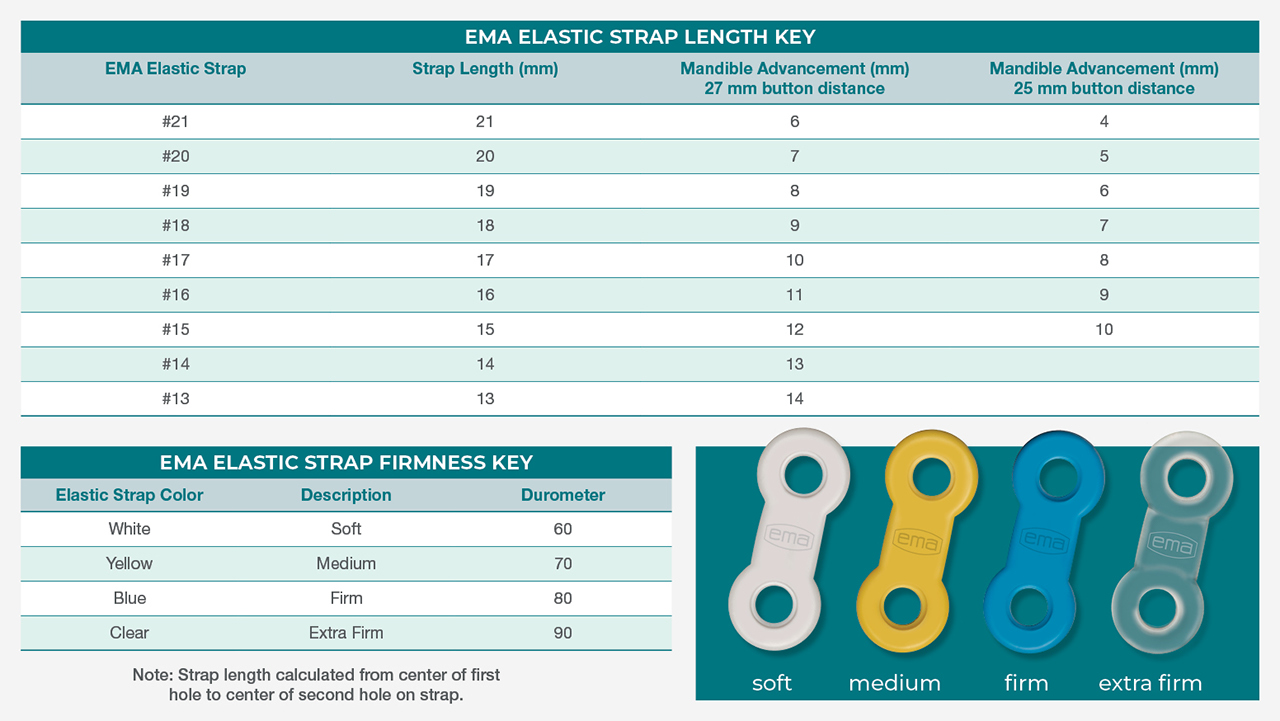 The EMA appliance features 36 strap combinations designed to create the perfect fit.
The appliance uses different lengths of elastic straps to gradually and incrementally advance the mandible. The strap length is indicated on the strap itself, and firmness is indicated by color. The shorter the strap, the more forward (or advanced) the mandible position; the longer the strap, the more relaxed the jaw position. Therefore, the mandible may be adjusted forward by using a shorter set of straps versus longer straps.
 For clinicians, the EMA appliance involves simple adjustment options.
Appliance Care
The EMA appliance is worn at night, and it is important to brush and floss before using the device in order to keep the appliance clean and to protect patient dentition. After a full night of wear, run the EMA appliance under clean, cold water and brush the appliance with a clean, dry toothbrush. Place the appliance in the case provided to dry throughout the day.
The elastic straps should be removed about once a week in order to clean the elastic hook components. When replacing the straps, it is easier to hook the elastics on the lower arch first and then the upper arch. Orientation of the elastic straps is shown with the printed numerals on the outside.
Care should be taken when adjusting and removing the straps not to put lateral pressure on the posterior area of the appliance. This can cause cracking or crazing of the appliance on the midline. Elastics by their nature stretch over time. EMA elastic straps should be replaced with straps of the same length and color on a monthly basis to ensure a therapeutic jaw position is maintained.
It is very important for patients to keep their appliance stored in a temperature-controlled environment (not too cold, not too hot). Be aware that we weren’t joking. Dogs love to chew on unattended sleep appliances that are stored on the bedside table and not kept in their case.
In-Office Fabrication of EMA Appliance with Erkoform-3dmotion
Provisional treatment is well suited for immediate, same-day care. Same-visit dentistry is possible with the EMA appliance because it is a thermoformed device, with a straightforward fabrication process. A trained assistant can take a patient from impressions to a completed appliance in a single visit using the ERKODENT® Erkoform-3dmotion vacuum-forming machine (Table 1). Note that a trained technician at Glidewell can fabricate an EMA appliance in about 30 minutes.
When asked about the process of chairside fabrication, Dr. Jamison Spencer, director of the Center for Sleep Apnea and TMJ in Boise, Idaho, said the following:
“For an office that is doing one or more appliances per week, there are some really great advantages of in-office fabrication of sleep appliances:
- Speed of treatment. The patient can be fit the same day they have been qualified for care. This is particularly useful for patients who travel long distances to come into the dental practice.
- Positive feedback loop. For most dentists who make the EMA appliances in-house, they will have the same assistant fabricate and fit the appliance. This assistant rapidly learns better block-out technique, improved fitting, and how to avoid patients returning for fit- and comfort-related issues.”
The Erkoform-3dmotion unit features an automated thermoforming process. It is designed to fabricate various dental appliances, such as snoring and sleep appliances, bite splints, nightguards, retainers, fluoride and bleaching trays, sports mouthguards, and orthodontic appliances. It uses a vacuum technique to thermoform and imprint the opposing bite for optimum fit.
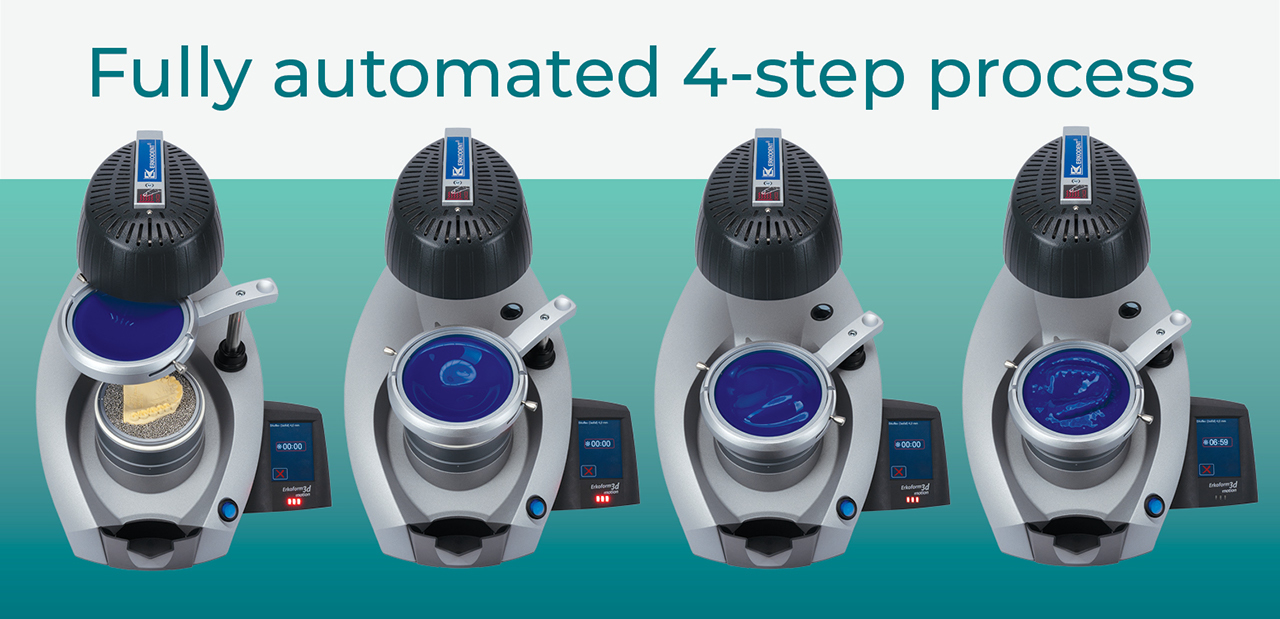
Table 1: How to Make the EMA Sleep Appliance Chairside
For a full demonstration, watch the video below.
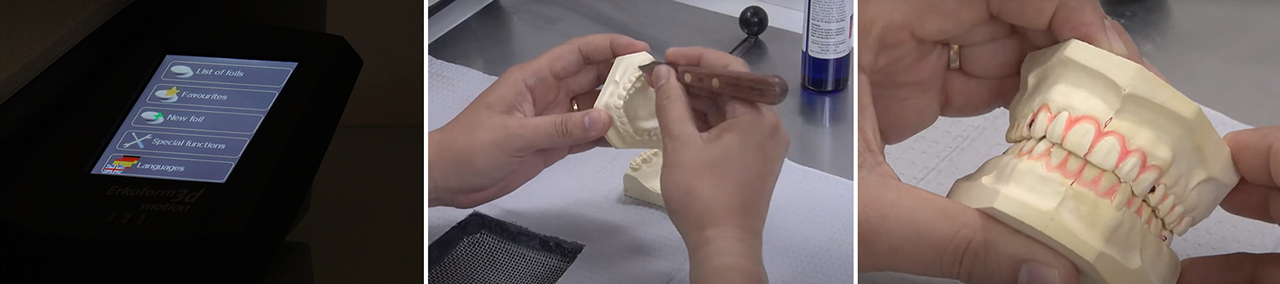
When preparing the Erkoform-3dmotion to fabricate an EMA device, program the device to recognize the EMA foil:
- Tap the “New Foil” button.
- Enter the name of the material: “Myerson EMA.”
- Enter the thickness of the foil: “2.5.”
- Enter the final heat temperature: “160.”
- Enter the cooldown time: “2:30.”
- Verify by selecting “Favorites” on the main menu.
Take a moment to examine your duplicate models, carefully looking for distortions or bubbles. A plaster knife can be used to clear inclusions or bubbles that may have been introduced in the duplication process.
For the EMA device, it is a requirement to block out deep undercuts in the embrasures and interproximal areas. Once block-out is complete, mark the center line on the upper and lower models.
Place the 25 mm EMA template on the model. Mark the first button location on the interproximal between the cuspid and first bicuspid. Line the template on the models using your first mark as a reference to mark the lower model.
Repeat on the opposite side of the arch.
- Tech Tip: Use a black permanent marker to highlight the location of these marks so that they are easier to see through the foil material.
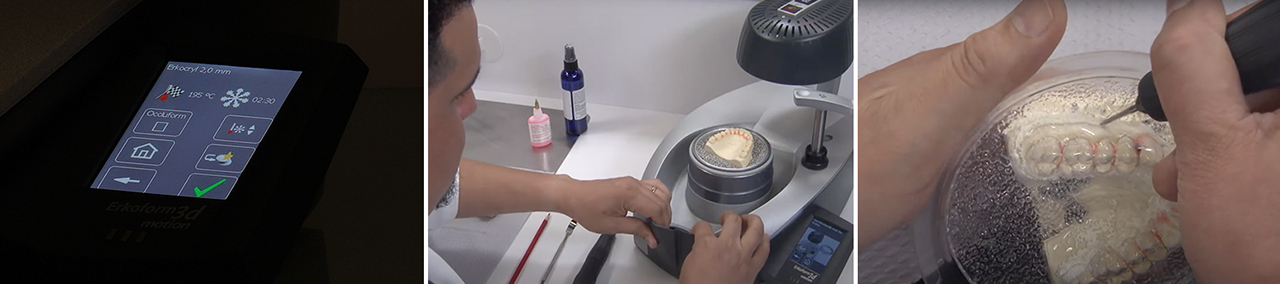
Select the Myerson® 2.5 material in the “Favorites” menu and tap the green arrow. The Erkoform-3dmotion will play a video that demonstrates the next steps.
- Bury the base of the model in the granules.
Fill any low areas in the palate areas with extra granules.
- Tech Tip: Make sure there are no granules on the rim of the pressure pot or on the teeth of the model.
- Remove the EMA foil from the packaging and remove the label.
- Remove the locking ring from the Erkodent foil holder, then place the EMA foil with the label side up into the foil holder and replace the locking ring.
Turn the locking ring under the heating element.
- Tech Tip: Turning the foil ring under the heating element automatically begins the heating cycle and vacuum forms the material over your model.
Remove locking ring and remove the model.
- Tech Tip: Tap the model before removing it from the pressure pot to release granules into the pressure pot. Replace the locking ring, then lift the foil holder and turn it to the right to prepare for your next appliance.
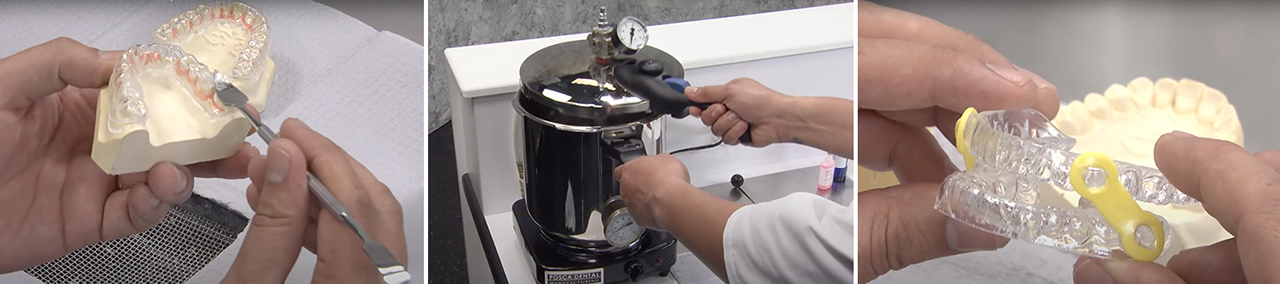
- Use a Brasseler® H219 cutting bur on a slow-speed handpiece. Starting on the lingual, cut along the teeth about 3 mm from the gingival edge.
On the facial of the model, cut the material in a straight line 5 mm above the teeth.
- Tech Tip: When the appliance is cut out, completely extend the cut from the back molar to the edge of the foil.

- Remove the splint from the model.
- Using a brown ERKODENT Lisko polishing disc, perform bulk reshaping along the tissue edge of the device.
- Using the blue ERKODENT Lisko-S polishing disc, round and refine the edges of the appliance.
- Remove the inner spacer with a knife.
The finished lines on the upper arch should appear as follows:
- Posterior buccal: 1–3 mm from gingival
- Anterior facial: at the gingival line
- Lingual: 1 mm scalloped from gingival line
- Repeat these steps on the opposing arch
The finished lines on the lower arch should appear as follows:
- Posterior buccal: 3–5 mm from gingival
- Anterior facial: at the gingival line
- Lingual: 5 mm flat from the gingival
- Use a brown Lisko disk to roughen the buccal areas marked on the lower model
- Also, roughen the occlusal area above the first molar
- Next, roughen the buccal area marked on the upper model
- Add acrylic to the roughened areas.
- Place the guide pads on occlusal areas above the molars.
Place the strap hooks on the buccal areas.
- Tech Tip: On the lower model, hooks face distally and downward. On the upper model, hooks face mesially and upward.
- Tech Tip: Care must be taken with the bite pads to assure that they are on a flat plane.
- Place appliance in a pressure pot to cure the acrylic. Air pressure should be between 13 and 23 PSI. Water temperature should be 85 degrees Fahrenheit. Time, under pressure, is two minutes.
- Clean and dry the finished appliance and attach yellow, 21 mm EMA straps.
- Your EMA mandibular advancement device is now ready to deliver to the patient.
Summary
FDA-cleared for the treatment of snoring and sleep apnea, the EMA appliance is an affordable option for patients, and its custom design is intended to be comfortable for patients to wear all night, every night.
The adoption of the EMA device by dentists who treat snoring and sleep apnea has been excellent, and has made the EMA a successful sleep appliance. For many patients and clinicians, a laboratory-fabricated appliance — available from Glidewell in just five in-lab working days — is a viable solution. However, some patients need an option that is delivered right away, either because their appliance is broken or lost, or because they need to be treated provisionally while a sleep study is booked and a definitive medical diagnosis is obtained. With the Erkoform-3dmotion vacuum-forming machine, dentists can quickly fabricate an EMA appliance chairside so patients can be fitted the same day they have been qualified for care.
To learn more about the in-office thermoforming equipment and accessories to make an EMA appliance chairside, call 888-303-3975 or visit glidewelldirect.com.
Watch the Video
How to Make an EMA Appliance Chairside with the Erkoform-3dmotion
More to Know
Related Dental Articles
- “Interview with Donald E. Frantz, DDS: Inventor of the EMA Appliance”
- “Snoring During Pregnancy: How Dentists Can Help Patients” by Randy Clare, Glidewell
All third-party trademarks are the property of their respective owners.
Send blog-related questions and suggestions to hello@glidewell.com.