In this issue:
Success Factors for Immediate Implant Placement in the Anterior
Author

Note: The Hahn Tapered Implant System is now known as the Glidewell HT Implant System
Immediate implant placement into an extraction socket is a highly predictable means of tooth replacement. Studies have shown that, when established protocols are followed, immediate implantation results in survival rates that are comparable to those achieved by implants placed following a delayed protocol.1 Further, the immediate placement protocol has been shown to excel in preserving bone and soft tissue at the implant site, consistently producing functional, esthetic outcomes.2,3,4 This approach to tooth replacement is appealing to patients because fewer surgical procedures are required and overall treatment time is substantially reduced.
Immediate implant placement ... is appealing to patients because fewer surgical procedures are required and overall treatment time is substantially reduced.
Gingival biotype and the condition of the anterior extraction socket are the most important factors to consider when determining whether immediate implantation is indicated or the procedure should be delayed. The socket condition substantially affects the predictability of osseointegration, while the gingival biotype influences the healing of the hard and soft tissue as well as the final esthetics. For evaluation and treatment planning purposes, both the extraction socket condition and the gingival biotype can be placed in a few basic categories.
EXTRACTION SOCKET CONDITION

GINGIVAL BIOTYPE
Soft-Tissue Type I: Attached gingiva is thicker than 1.5 mm.
Soft-Tissue Type II: Attached gingiva is thinner than 1.5 mm.
WHEN TO PROCEED WITH IMMEDIATE IMPLANTATION
Following tooth extraction, the clinician should probe the socket with an endodontic or periodontal probe to determine whether the buccal plate is intact. The thickness of the buccal plate is measured at the crestal region using a periodontal probe or the practitioner’s method of choice. The gingival biotype is identified by direct measurement or periodontal probing. After assessing the patient’s socket condition and soft-tissue type, the parameters for determining whether to follow an immediate or delayed implant placement protocol are straightforward (Table 1). Essentially, immediate implantation in the anterior should be attempted only for Socket Type I and is most predictable when Soft-Tissue Type I is also exhibited.
If the patient’s buccal plate is fractured or less than 1.5 mm thick, the esthetic predictability of the immediate placement procedure is compromised, necessitating a conservative approach in which the socket is grafted and a delayed protocol is followed. In these circumstances, the implant is typically placed four months or more following the extraction and bone regeneration procedure.
When the buccal plate is thick and intact, the patient’s soft-tissue type determines which protocol is indicated. If the patient exhibits thin or nonkeratinized soft tissue and the gingival margin is within the esthetic zone, practitioners should consider delayed implant placement because there is an elevated risk of facial soft-tissue recession.5,6 Note that a soft-tissue augmentation procedure such as a connective-tissue graft can help produce a more predictable, esthetic outcome in many such cases. If the attached gingiva is thicker than 1.5 mm, immediate implantation will predictably produce an excellent result.
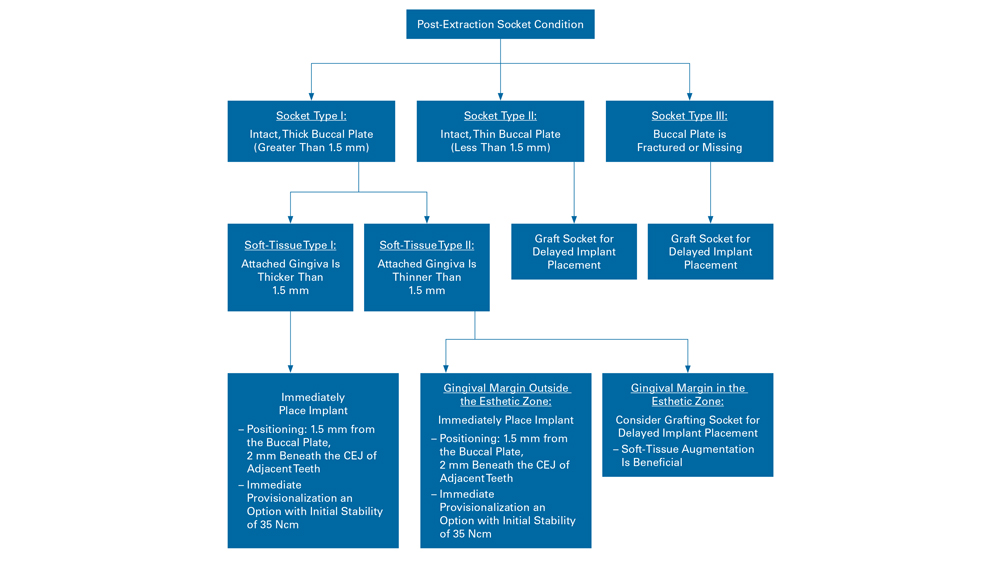
Table 1: Flowchart illustrates how to determine whether immediate implant placement is indicated according to socket condition and soft-tissue type.
It is important to position the immediately placed implant a minimum of 1.5 mm from the buccal plate, with the platform positioned 2 mm beneath the cementoenamel junction (CEJ) of the adjacent teeth. This helps prevent implant thread exposure in the event of buccal plate resorption, leaves space to add grafting material for bone regeneration, and helps ensure an esthetic, functional implant restoration.
The following case reports demonstrate how to determine if immediate implantation is indicated for the individual patient. In the first case, the patient’s socket condition calls for a more conservative, delayed implant placement protocol, while in the second, circumstances allow for immediate implantation into the extraction site. Each case will illustrate proper atraumatic extraction and bone grafting techniques, as well as the basic treatment protocol needed to achieve an optimal outcome.
CASE REPORT NO. 1: EXTRACT, GRAFT AND WAIT
After suffering a workplace accident, a 37-year-old male presented for treatment with a broken right central incisor (Fig. 1). Intraoral evaluation revealed a thick gingival biotype, favorable ridge width and generally good dental health. However, the buccal plate in the area of the central incisor had fractured with the tooth during the trauma of the accident, leaving a substantial defect. Initial radiography confirmed a deep vertical fracture (Fig. 2).
When presented with his options for replacing the non-restorable tooth, the patient opted for implant treatment. Because the buccal plate was not intact, the treatment protocol called for removing the fractured tooth, grafting the extraction socket, and allowing the site to heal and bone to regenerate before placing the implant.
The patient was in significant discomfort, so the tooth was extracted on the same day as the initial consultation. To minimize the loss of native bone structure, the tooth was removed as atraumatically as possible using the technique described in detail in Case Report #2 (Fig. 3).

Figure 1: The patient presented with a severely fractured right central incisor.
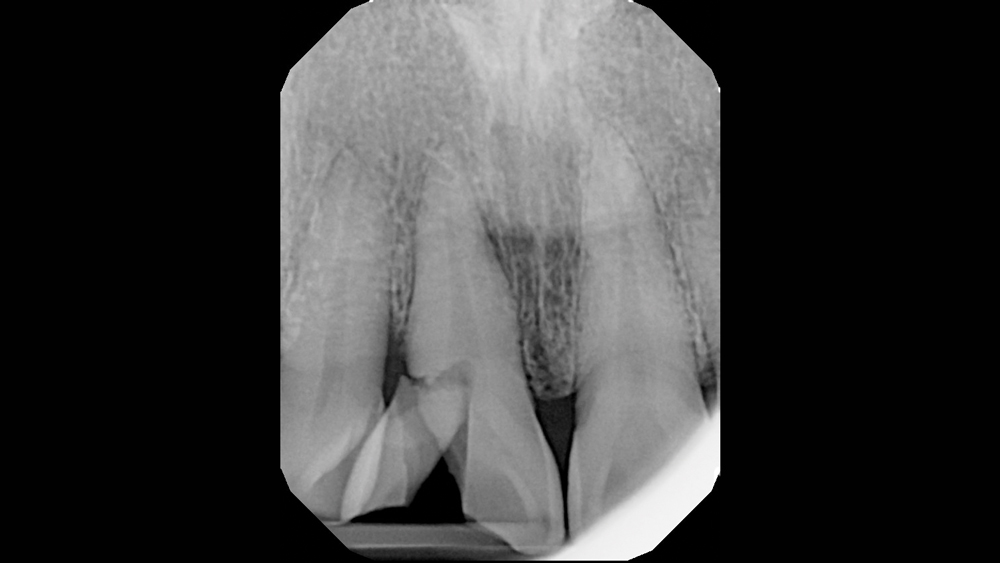
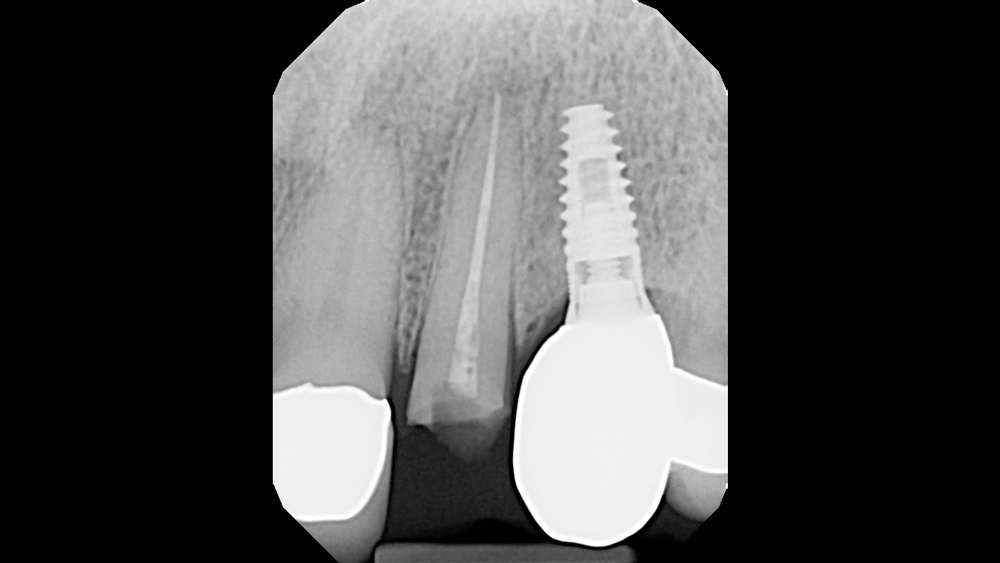
Figure 2: The initial radiograph illustrates the deep vertical fracture that had rendered the tooth untreatable.

Figure 3: The central incisor was extracted as atraumatically as possible to avoid further damage to the facial plate.


Figures 4a, 4b: A Newport Biologics Resorbable Collagen Membrane 4-6 was situated on the facial aspect of the extraction site, serving as a barrier in the area of the buccal defect.

Figure 5: The socket, defect and surrounding areas were filled with Newport Biologics Mineralized Cortico/Cancellous Allograft Blend.

Figure 6: The collagen membrane was folded across the grafted socket site to engage the palatal aspect. By holding the grafting material in place, the barrier helps form a scaffold for bone regeneration.

Figure 7: The site was sutured, and six months were allocated for healing prior to implantation.
After extraction, a surgical flap was reflected to expose the defect, and a Newport Biologics™ Resorbable Collagen Membrane 4-6 (Glidewell Direct; Irvine, Calif.) was positioned 2 mm beyond the facial defect (Figs. 4a, 4b). The socket was filled with Newport Biologics Mineralized Cortico/Cancellous Allograft Blend to facilitate bone augmentation at the extraction site (Fig. 5). The collagen membrane was folded over the occlusal aspect to hold the grafting material in place during healing and form a matrix for cell ingrowth and bone regeneration (Fig. 6). The site was then sutured (Fig. 7).
The socket was filled with Newport Biologics Mineralized Cortico/Cancellous Allograft Blend to facilitate bone augmentation at the extraction site.
To allow adequate time for healing of the extraction site and bone regeneration, we will wait a minimum of six months before the implant will be placed. With the high predictability of the bone grafting methods and materials utilized in this case, the prognosis for the patient’s planned implant restoration is excellent.
CASE REPORT NO. 2: EXTRACTION WITH IMMEDIATE IMPLANT PLACEMENT
A male patient in his early forties presented with a fractured endodontically treated tooth #10 (Figs. 1a, 1b). The patient was referred to an endodontist, who confirmed that there was a vertical fracture that contraindicated further endodontic treatment. Abundant soft tissue was evident to the facial of the lateral incisor, and the buccal plate appeared to be thick. With plenty of bone and an existing implant restoration in the area of tooth #11, the patient was an excellent candidate for implant treatment.
The patient agreed to a treatment plan in which his left lateral incisor would be extracted and, if possible, immediately replaced with an implant. Because the patient exhibited thick, keratinized soft tissue, the condition of the buccal plate following tooth removal would determine whether an immediate or delayed protocol would be followed.
Because the patient exhibited thick, keratinized soft tissue, the condition of the buccal plate following tooth removal would determine whether an immediate or delayed protocol would be followed.
Two weeks later, the patient returned for the removal of his untreatable tooth. To begin the atraumatic extraction procedure, a long, narrow diamond bur was used to delicately trace a path around the circumference of the tooth root (Figs. 2a, 2b). Next, periotomes were inserted into the small space created between the root and the bone, acting as a wedge to separate the tooth from the socket (Figs. 3a–3c). This atraumatic technique allowed for removal of the tooth in one piece (Fig. 4). The extraction was completed without compromising the socket, leaving a completely intact buccal plate, which exhibited 2 mm of width (Fig. 5).
A 4.3-mm–diameter Hahn™ Tapered Implant (Glidewell Direct) was selected for the procedure, allowing for a minimum of 1.5 mm of distance from the buccal plate, 1.5 mm from the adjacent tooth, and 3 mm from the adjacent implant. To create the osteotomy for immediate implant placement, the initial 1.5 mm twist drill was inserted into the apex of the extraction socket, and then moved 2 mm up the palatal slope before cutting into the bone (Figs. 6a, 6b). Angling the drill slightly toward the palatal when initiating the osteotomy creates a purchase point into the bone and avoids the drill sliding toward the apex of the socket; the osteotomy is then redirected in the proper axial orientation with subsequent drills (Figs. 7a–7c). This helps maintain the appropriate amount of space between the implant and buccal plate (Fig. 8).
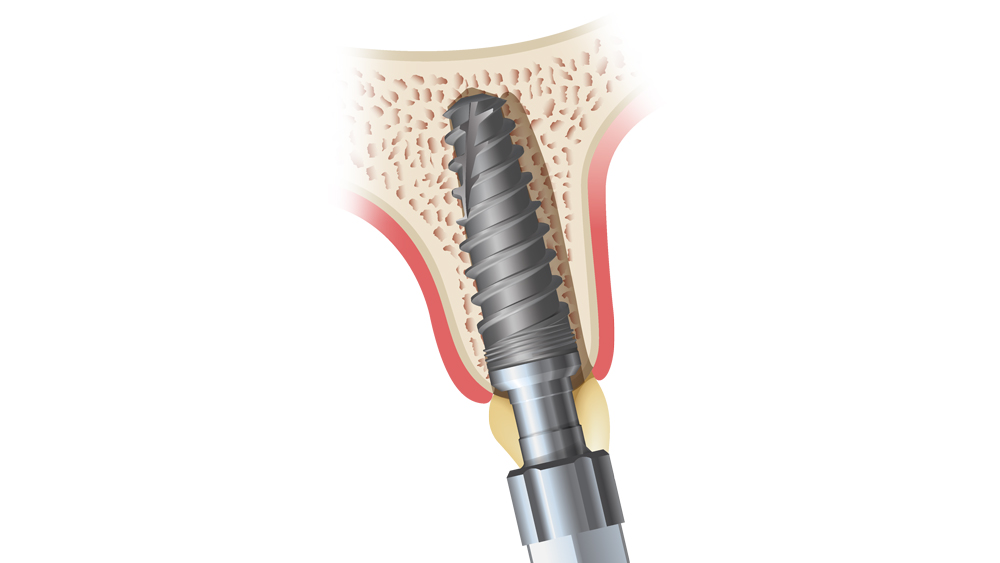
The implant was inserted at a slight angle and then redirected in the correct axial orientation (Figs. 9a–9c). The deep, sharp threads of the Hahn Tapered Implant engaged the palatal bone during insertion, helping to maintain the proper distance from the buccal plate. The 4.3 mm x 13 mm implant was positioned 2 mm from the facial aspect of the socket, providing more than enough space to protect the buccal plate during the healing phase (Figs. 10a, 10b). A cover screw was then inserted into the implant so the site could be grafted and covered. Note that the implant was not provisionalized following placement because receiving an immediate temporary restoration was not a priority for the patient.
The deep, sharp threads of the Hahn Tapered Implant engaged the palatal bone during insertion, helping to maintain the proper distance from the buccal plate.

Figures 1a, 1b: Preoperative condition of the patient, who presented with a fractured left lateral incisor. Further endodontic treatment was not indicated for the tooth.


Figures 2a, 2b: To minimize trauma, a Brasseler No. 859 fine needle diamond bur (Brasseler USA; Savannah, Ga.) was used to delicately create a small space between the root of the tooth and the bone.
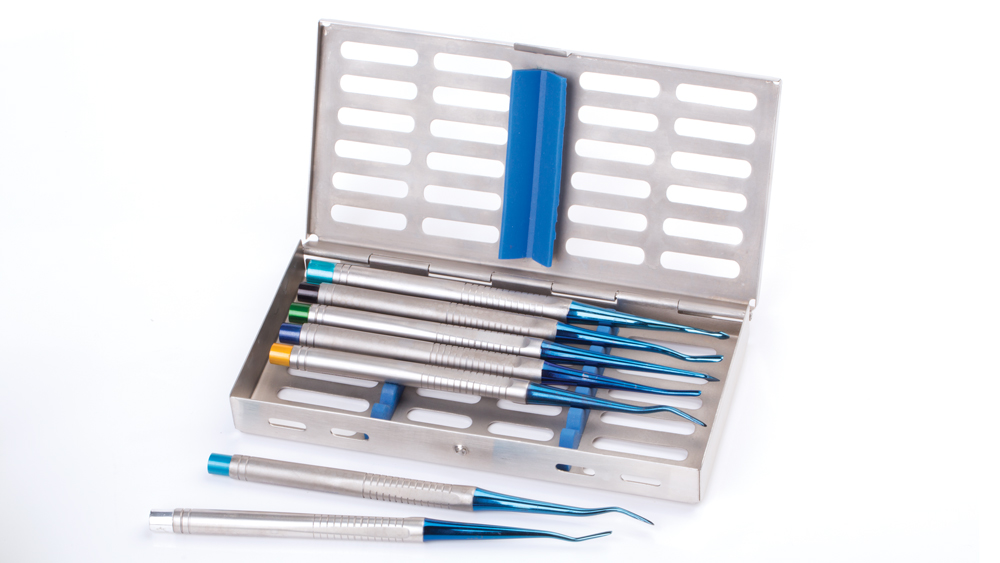


Figures 3a–3c: The tooth root was carefully separated from the socket using a set of Medco periotomes (Medco Instruments; Hickory Hills, Ill.), which includes an assortment of designs that allow for proper angulation into the mesial, distal and palatal recesses of the extraction site.

Figure 4: The tooth root was removed intact from the socket using forceps, completing the atraumatic extraction procedure.
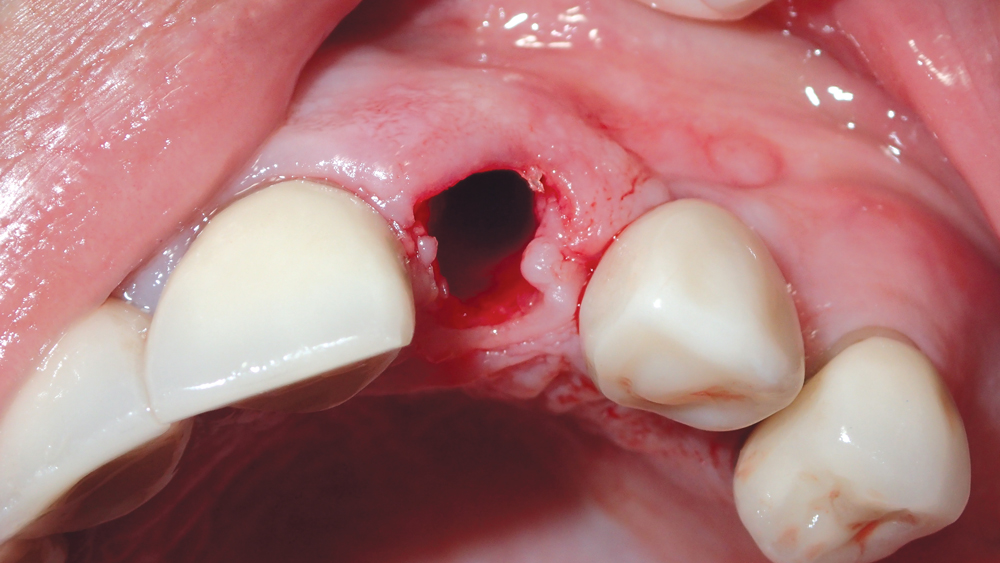
Figure 5: Postoperative extraction socket condition, with thick, intact buccal plate.


Figures 6a, 6b: The 1.5 mm twist drill was used to create the initial osteotomy palatal to the extraction socket.

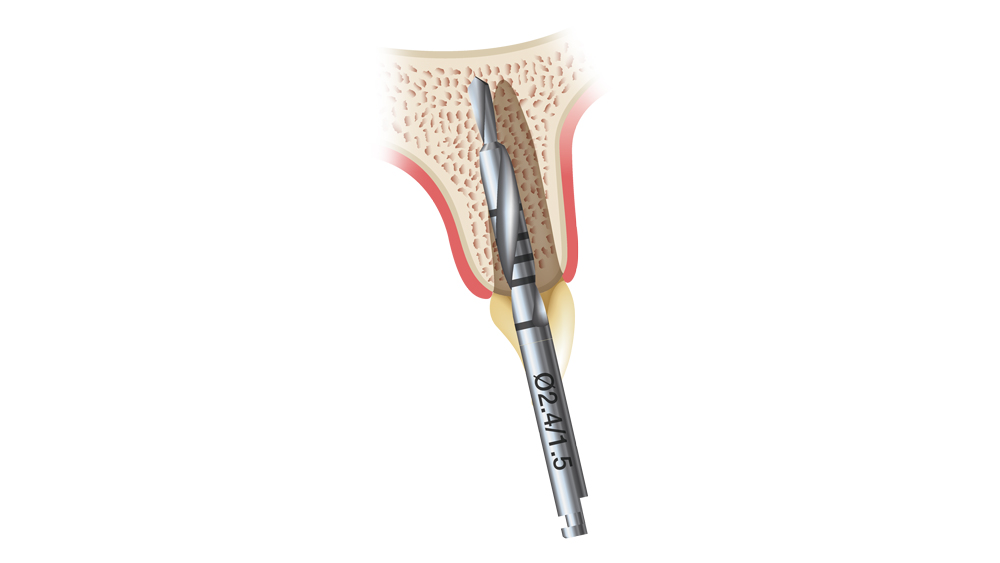
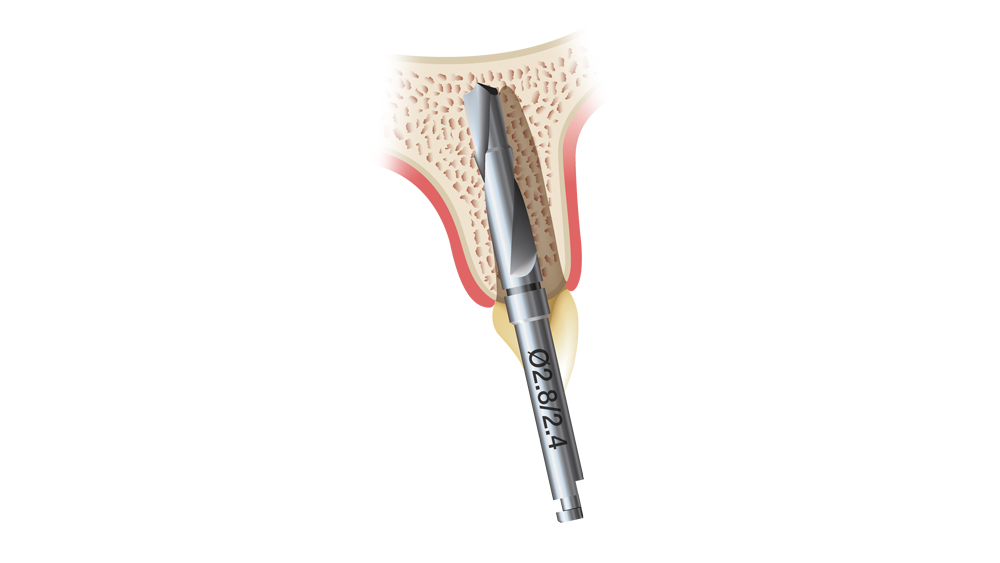
Figures 7a–7c: The initial osteotomy for immediate implant placement is created with the drill angled slightly toward the palatal. The initial 1.5 mm twist drill first enters the bone 2 mm to the palatal of the extraction socket’s apex, and the angle of the osteotomy is corrected with subsequent drills.

Figure 8: Final shaping drill illustrates proper positioning of the osteotomy.
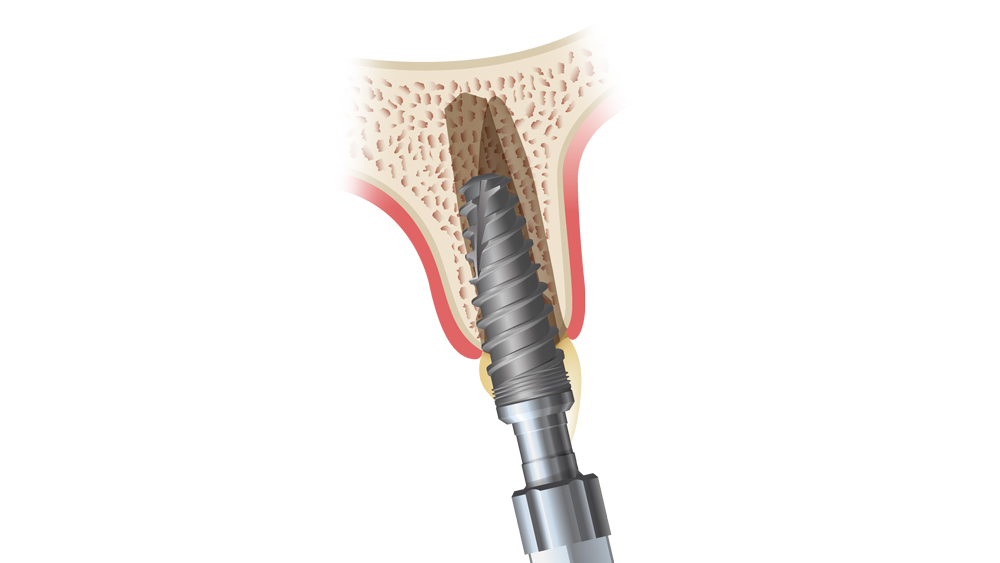
Figures 9a–9c: The immediately placed implant is inserted at an angle and then redirected against the palatal wall of the extraction socket. This helps maintain the minimum 1.5 mm gap between the implant and the buccal plate, which is later filled with bone particulate and, ultimately, new bone.

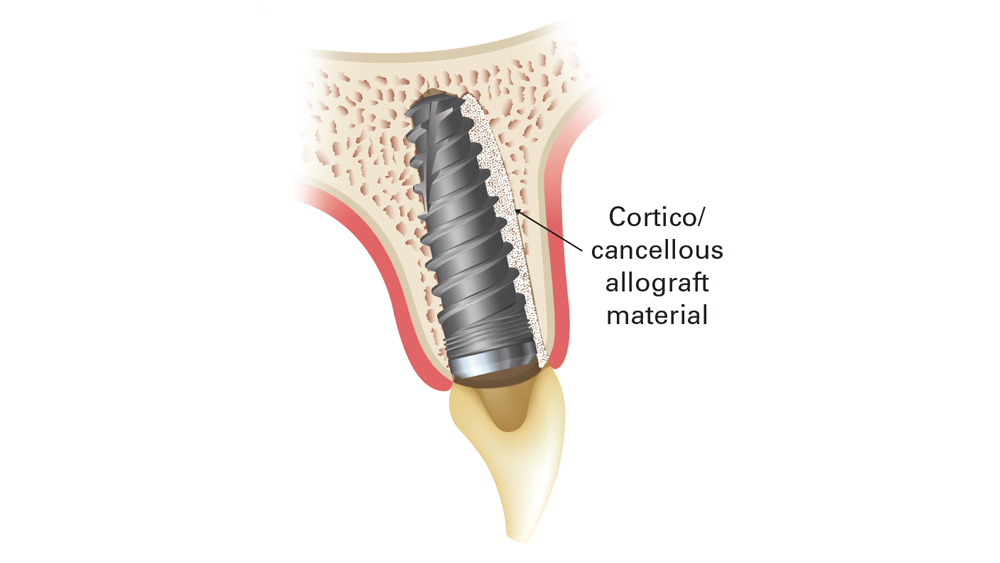
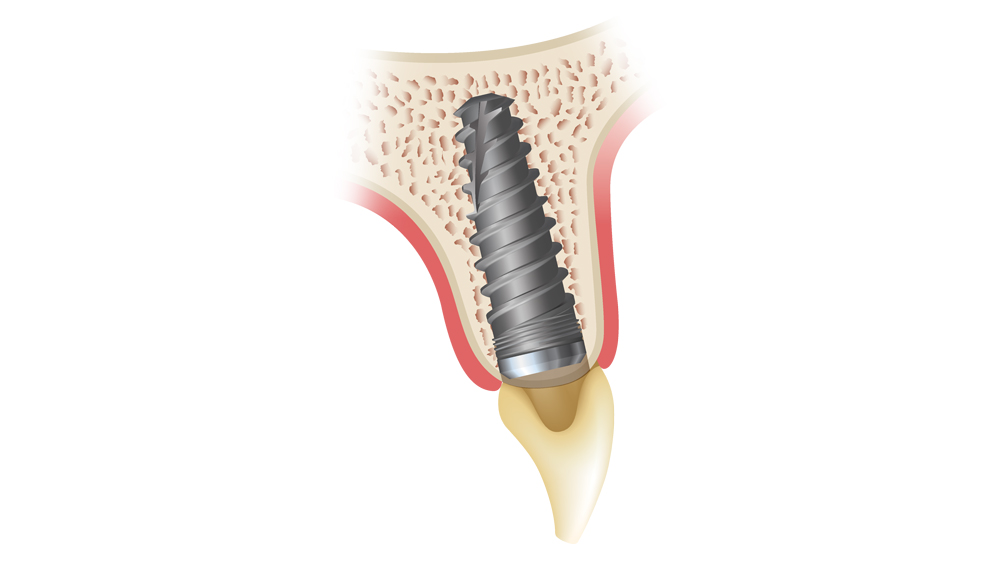
Figures 10a, 10b: Postoperative view illustrates properly positioned, immediately placed implant, more than 1.5 mm from the buccal bone. Filling this gap with cortico/cancellous allograft material helps ensure a predictable outcome.


Figures 11a, 11b: Newport Biologics Cortico/Cancellous Allograft Blend was hydrated in a dappen dish and used to fill the gaps between the implant and the extraction socket.

Figure 12: After positioning a resorbable collage membrane over the allograft material, the site was closed with a PTFE suture.


Figures 13a, 13b: One month after implant placement, the suture was removed.

Figure 14: Excellent tissue health was evident after four weeks with a transmucosal healing abutment in place.

Figure 15: A closed-tray VPS impression was taken using a Hahn Tapered Implant System Impression Coping.
Figures 16a, 16b: Dental CAD software was used to design the custom abutment and final crown.

Figure 17: The custom abutment was delivered and aligned perfectly with the soft-tissue anatomy of the implant site.
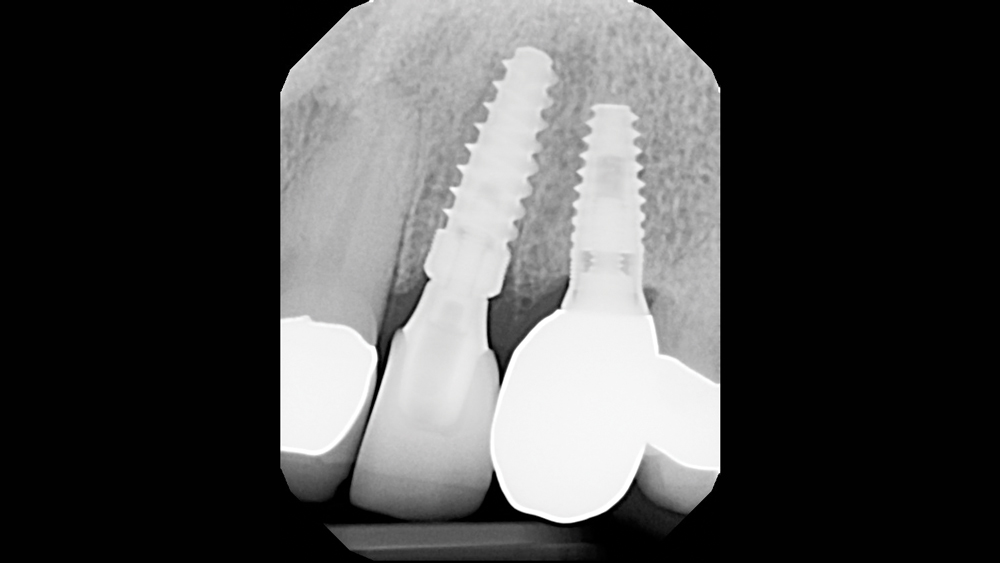
Figures 18a, 18b: The final Obsidian restoration was delivered, proper occlusion was verified, and final radiography confirmed proper fit of the custom abutment and crown.

Figure 19: The final restoration blended well with the surrounding teeth and soft tissue. Note the esthetic interdental papillae and emergence profile.
In the apico-coronal dimension, the implant platform was situated 2 mm beneath the CEJ of the adjacent canine and central incisor, which provided the lab with the running room needed to create a smooth transition between the implant and crown for a lifelike emergence profile. Note that the Hahn Tapered Implant provides a degree of flexibility in apico-coronal positioning, as its 1 mm machined cervical collar allows for subcrestal or supracrestal positioning without increasing the risk of bacterial attachment.7
For a properly positioned immediately placed implant, bone grafting is required to fill the gap between the surface of the implant and the buccal plate, as well as any other spaces where the implant is not touching bone. This preserves the width of the ridge while supporting and preventing collapse of the buccal plate during the period of osseointegration. In this case, the gaps between the implant and the bone of the socket site were filled with Newport Biologics Mineralized Cortico/Cancellous Allograft Blend, which has a universal particulate range that excels in extraction socket bone regeneration (Figs. 11a, 11b). A Newport Biologics Resorbable Collagen Membrane 3-4 was draped over the allograft material to contain and protect the graft during healing, and the site was closed with an X-pattern suture (Fig. 12).
One month after implant placement, the suture was removed (Figs. 13a, 13b). After an additional three months, the site was uncovered by making a small horizontal incision, and a transmucosal healing abutment was delivered, which helped develop an esthetic emergence profile for the planned restoration. The patient returned four weeks later for final impressions (Fig. 14). A closed-tray Hahn Tapered Implant System Impression Coping was connected to the implant, which is contoured identically to the healing abutment to support the soft tissue and ensure a precise final impression (Fig. 15).
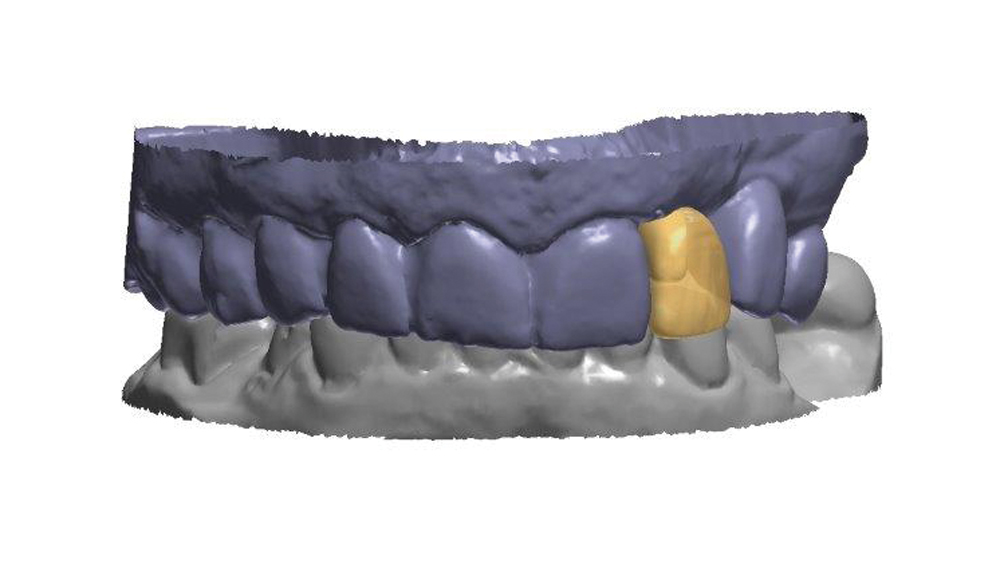
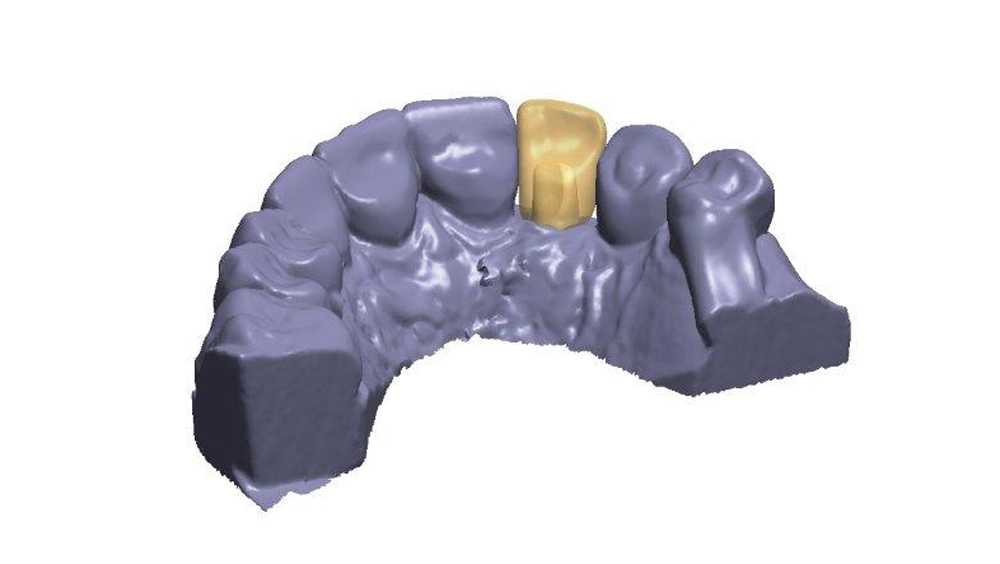
Based on the final impression, the dental lab digitally designed the restoration (Figs. 16a, 16b). A custom abutment was created to control the margins and establish a correct emergence profile. The final crown was milled from Obsidian® lithium silicate (Glidewell Laboratories; Newport Beach, Calif.), which exhibits translucency ideal for the esthetic zone.
A custom abutment was created to control the margins and establish a correct emergence profile.
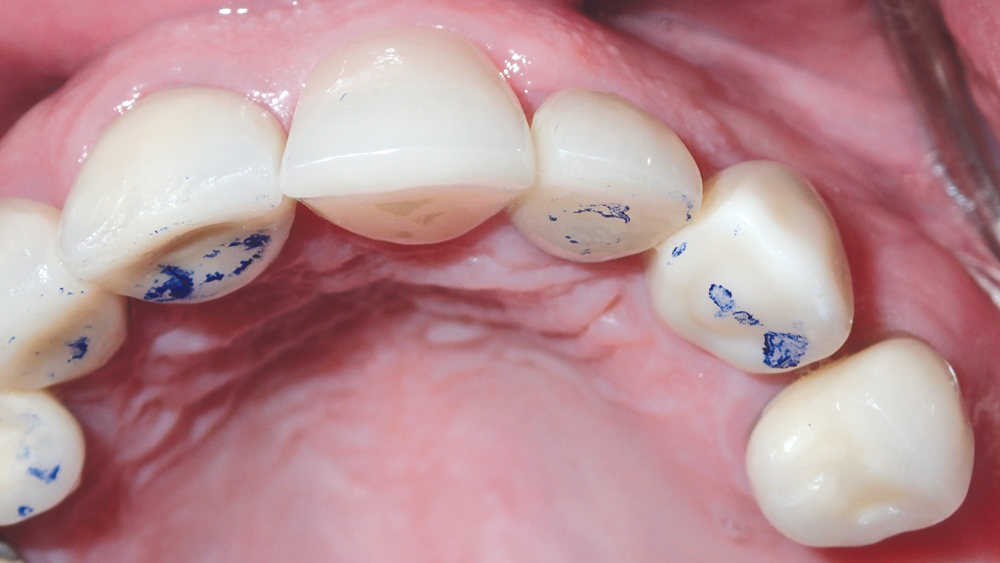
The custom abutment was seated using the lab-provided acrylic delivery jig and established the precise margins needed for a natural emergence profile (Fig. 17). The final crown was cemented over the custom abutment without the need for adjustment (Figs. 18a, 18b). The combination of the Inclusive® Gold-Tone Titanium Custom Abutment and the Obsidian crown produced a lifelike restoration that blended well with the surrounding dentition (Fig. 19).
CONCLUSION
A straightforward assessment of the socket condition and gingival biotype can determine whether immediate implantation is indicated for an extraction site. When circumstances allow for this approach, the reduction in surgical trauma and overall treatment time is appealing to many patients. With proper surgical, bone grafting and prosthetic techniques, immediate implant placement leads to outcomes that are every bit as predictable, functional and esthetic as those produced by delayed implantation.
References
- ^ Lang NP, Pun L, Lau KY, Li KY, Wong MC. A systematic review on survival and success rates of implants placed immediately into fresh extraction sockets after at least 1 year. Clin Oral Implants Res. 2012 Feb;23 Suppl 5:39-66.
- ^ Noelken R, Neffe BA, Kunkel M, Wagner W. Maintenance of marginal bone support and soft tissue esthetics at immediately provisionalized OsseoSpeed implants placed into extraction sites: 2-year results. Clin Oral Implants Res. 2014 Feb;25(2):214-20.
- ^ Valentini P, Abensur D, Albertini JF, Rocchesani M. Immediate provisionalization of single extraction-site implants in the esthetic zone: a clinical evaluation. Int J Periodontics Restorative Dent. 2010 Feb;30(1):41-51.
- ^ Covani U, Cornelini R, Calvo JL, Tonelli P, Barone A. Bone remodeling around implants placed in fresh extraction sockets. Int J Periodontics Restorative Dent. 2010 Dec;30(6):601-7.
- ^ Kan JY, Rungcharassaeng K, Lozada JL, Zimmerman G. Facial gingival tissue stability following immediate placement and provisionalization of maxillary anterior single implants: a 2- to 8-year follow-up. Int J Oral Maxillofac Implants. 2011 Jan-Feb;26(1):179-87.
- ^ Chen ST, Buser D. Clinical and esthetic outcomes of implants placed in postextraction sites. Int J Oral Maxillofac Implants. 2009;24 Suppl:186-217.
- ^ Park N. Implant Cervical Collars: Preserving Crestal Bone. Inclusive. 2017;7(4):91-2.