Photo Essay: Anterior BruxZir® Solid Zirconia Crown

April 28, 2011
 image
Michael DiTolla, DDS, FAGD
BruxZir Solid Zirconia 6-unit bridge

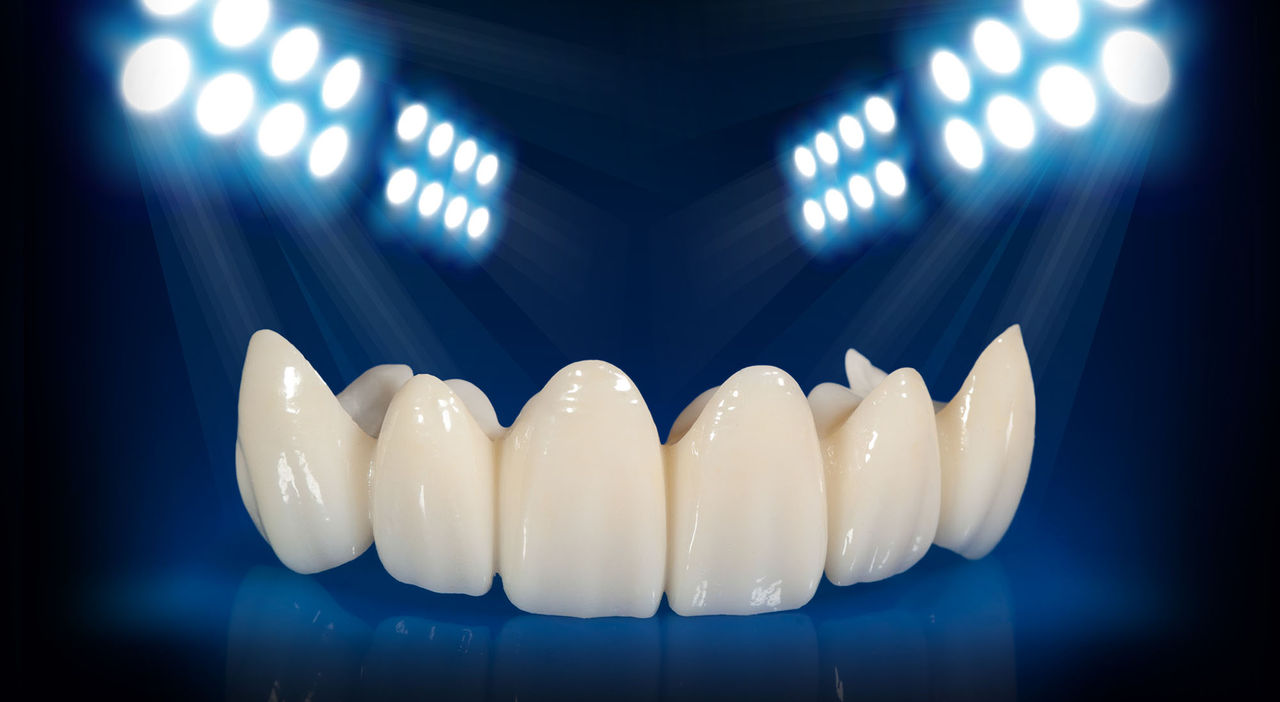
BruxZir® Solid Zirconia crowns & bridges were originally designed by Glidewell Laboratories as a replacement for posterior cast gold or metal occlusals, when the patient did not want any metal showing in his or her mouth. As dentists began placing BruxZir restorations and were repeatedly satisfied with the results, they started to prescribe BruxZir for bicuspids, as well. The lab realized that if dentists wanted to prescribe BruxZir in the anterior, the translucency of this material needed to increase. Our R&D team worked on this quietly and finally told me when they were ready to test it. They asked me for an esthetic challenge, so I decided to give them the tough one we all face: the single-unit central incisor crown adjacent to a natural tooth. This photo essay shows the clinical steps for placing an anterior BruxZir crown. For a crown that is 100% zirconia with no ceramic facing, the lab pretty much nailed it.

Figure 1

Figure 1: Tooth #9 is going to be prepped for a BruxZir crown. I chose this case for a couple of reasons. First, tooth #8 is a natural tooth, and it will be a good test of how the light interacts with the BruxZir restoration versus the natural tooth. Second, tooth #7 is an all-ceramic crown, which will be replaced later, and teeth #10 and #11 are a PFM cantilever bridge. So we will be able to compare the BruxZir crown to those two restorations, as well.

Figure 2

Figure 2: I place PFG topical anesthetic gel (Steven’s Pharmacy; Costa Mesa, Calif.) into the sulcus using an Ultradent syringe. I used to use a cotton-tipped applicator, but this made it difficult to get PFG into the sulcus. Because I am using single-tooth anesthesia for this case, the needle is going into the sulcus, so that’s where the topical needs to go. The tufted tip on the syringe makes it easy to place the topical subgingivally.

Figure 3

Figure 3: The 30-gauge extra short needle of the STA® System (Milestone Scientific; Livingston, N.J.) is placed in the sulcus. I prefer using the Rapid Anesthesia Technique for injections, and a few drops of anesthetic are given as I penetrate the base of the sulcus and contact bone. (An in-depth look at this technique can be found here.) I started using this technique for single mandibular molars to avoid blocks, until I realized patients hate anterior infiltrations just as much. So I began using single-tooth anesthesia here, as well.

Figure 4

Figure 4: I use the Reverse Preparation Technique to prep the tooth. (View a step-by-step clinical technique video here.) The first step of this technique is to break the proximal contacts. Because we are only preparing tooth #9, we are going to do this with a thin #56 carbide bur on both the mesial and distal. The goal is to break contact with the adjacent teeth just enough to place our first retraction cord.

Figure 5

Figure 5: The first retraction cord is an Ultrapak® #00 cord (Ultradent; South Jordan, Utah). It is a hollow, braided cord that has no EPI and has not been soaked in any medicament. The cord is flossed into place on the mesial and distal, and the two loose ends are grabbed on the lingual and pulled until the cord rests against the facial surface of the tooth. A non-serrated cord packer is used to pack the cord on the facial, and the two ends are cut on the lingual to be flush in the lingual sulcus.

Figure 6

Figure 6: Now that the first cord has retracted the tissue approximately 0.5 mm, it’s time to prep the gingival margin. I call this technique the Reverse Preparation Technique because we prep the gingival margin first, not last (as I was taught in dental school). We use an 801-021 bur to trace around the gingival margin, taking this bur to nearly half its depth, about 1 mm. It cuts a perfect half circle into the gingival third.

Figure 7

Figure 7: Crowns often look fake in the gingival third, but this gingival depth cut ensures that we will deliver an esthetic crown. Because the depth cut is a perfect half circle, we will be left with a perfect quarter circle — which is a precision deep chamfer or shallow shoulder — after we do our axial reduction. There is no easier way to prep a perfect margin.

Figure 8

Figure 8: I prepare a 2 mm depth cut in the incisal edge because we are restoring the tooth to its original length. I typically place two of these cuts, which help me quickly reduce the incisal edge while keeping it level. Under-reduction of incisal edges leads to crowns that are facially prominent in the incisal third, which gives them a bulky look.

Figure 9

Figure 9: With the depth cut bur perpendicular to the facial surface of the tooth, at the junction of the incisal third and the middle, we make a 1.5 mm depth cut. This depth cut should be just apical to the incisal edge depth cuts. Depth cuts ensure that we get enough facial reduction to have an esthetically pleasing crown that is the same size as the adjacent natural tooth. This is difficult to achieve.

Figure 10

Figure 10: At this point, all depth cuts are finished. This allows me to fly through the rest of the prep because the gingival is essentially done. The incisal edge takes about 15 seconds, and the facial reduction is marked with a depth cut. There is no guessing about how much to reduce.

Figure 11

Figure 11: The 856-025 bur is the workhorse of the Reverse Preparation Technique. I find this bur extremely easy to cut with because of its coarse grit and wide surface area. As I move the bur mesiodistally, I am doing the facial reduction to the bottom of the depth cut. I am really not doing any reduction in the gingival third. The tip of the bur almost floats in space as I make the facial depth cut and blend it with the gingival.

Figure 12

Figure 12: I turn the 856-025 bur perpendicular to the incisal edge and connect the two 2 mm depth cuts I made in Figure 8. As the bur moves mesiodistally, it is pretty easy to make quick work of incisal edge reduction. Because the tip of the bur is pointed at the lingual, I roll the tip of the bur about 20 degrees toward the lingual margin.

Figure 13

Figure 13: I now do the lingual reduction using a 379-023 football bur. This bur is convex and cuts a concave surface, which is the shape of the lingual surface of a natural tooth. You don’t really need to place a lingual depth cut because you have the opposing tooth to use as reference, but you could certainly place a 1 mm depth cut here, if you wished.

Figure 14

Figure 14: This image explains why I will never switch from an electric handpiece. I am able to turn down the handpiece speed to 5000 rpm, which allows me to turn off the water. Even with the water turned off, I will not generate excessive heat because the bur is only spinning at 5000 rpm. This is the only way I can really dial in and smooth the margins. With the water turned off, it is easy to see what I am doing.

Figure 15

Figure 15: The prep is essentially done. I now place the top cord, an Ultradent Ultrapak #2E cord. The first cord (#00) retracts the tissue for the prep and also helps ensure we get a slightly subgingival margin. This means we never have to take a bur subgingival, which often causes bleeding.

Figure 16

Figure 16: The top cord (#2E) is now placed. This cord is responsible for displacing the tissue laterally, to make room for the impression material. The #2E cord can’t be used in all clinical situations because it is simply too big for many lower anteriors or upper bicuspids with minimal attached tissue. For those cases, a smaller top cord, such as Ultrapak #1 cord, can be used to achieve similar results.

Figure 17

Figure 17: With the top cord in place, you have one final opportunity to get a great look at the prep. Typically, I spend about 45 seconds polishing the prep, especially the gingival margin. I again turn the handpiece down to 5000 rpm and the water off, and I use a red-striped fine grit 856-025 bur to give the prep a mirror-like finish.

Figure 18

Figure 18: Here is an incisal view of the finished prep. The top cord is in place with just a small tail protruding on the lingual for easy removal. The gingival margin is smooth and uniform all the way around the preparation. This is due to the use of the round bur early in the procedure, when the hard tissue landmarks were still in place.

Figure 19

Figure 19: The last step of the preparation sequence is to place a ROEKO Comprecap anatomic (Coltène/Whaledent; Cuyahoga Falls, Ohio) on the prep. Slightly wet the inside of the Comprecap before placing it to keep the tooth moist and to prevent the cotton from sticking to the prep. Comprecap compression caps help keep the retraction cord in place and prevent the patient’s tongue from dislodging the cord.

Figure 20

Figure 20: The patient bites down on the ROEKO Comprecap anatomic for 8–10 minutes. This ensures you have plenty of retraction. The other day, I pulled the Comprecap after just two minutes to take the impression. I did not have a wide-open sulcus. It is important to leave the Comprecap in place for 8–10 minutes.

Figure 21

Figure 21: The result of waiting 8–10 minutes is a sulcus that cannot be missed with an intraoral tip. I could fling alginate into the sulcus from the other side of the operatory and still get a good impression. When your assistant pulls the top cord, look down from the incisal with a mirror to see what I mean. The impression material will flow into the sulcus.

Figure 22

Figure 22: Blood or other gingival fluids have not contaminated the impression because the bottom cord (#00) was left in place. As a result, you will also get an impression of the 1 mm of tooth structure apical to the gingival margin. This allows the dental technician to precisely see the exact gingival margin and enables him or her to build a proper emergence profile into the restoration — an important determining characteristic for whether the crown will have a natural and lifelike appearance.

Figure 23

Figure 23: I try in the BruxZir crown on tooth #9 and find the fit to be acceptable. The patient has approved the esthetics, so we clean it out prior to cementation. I decide to cement the restoration rather than bond it into place because I have sufficient prep length and it is not overtapered. I use RelyX™ Luting Plus Cement (3M™ ESPE™; St. Paul, Minn.) because of its natural bond to dentin and simple cleanup. An orange pinewood stick is used to provide pressure while the cement sets.

Figure 24

Figure 24: Here is the final BruxZir restoration on tooth #9, on the day of cementation. It probably won’t be mistaken for a natural tooth, but it blends well with the adjacent natural tooth, tooth #8. When I compare it to the existing all-ceramic and PFM crowns in the anterior segment, I think it looks better, although those other crowns are a few years old. While I don’t recommend that you jump into prescribing BruxZir for single-unit central incisors, I think BruxZir is one step closer to being a material that is as well suited for anterior restorations as it is for posterior restorations.