Shrink-to-Fit: A Study of Clinical Accuracy in Zirconia Bridges
It’s a game of extreme precision; one in which the most minuscule of inaccuracies can, over the course of a standard workflow, be compounded to produce that most shunned of dental laboratory fabrications: the poorly fitting restoration. To mount a winning defense against this looming specter, a great deal of control and careful consideration is required at each step in the process. For monolithic dental prostheses made from zirconia, digital model scanning and CAD/CAM software have allowed levels of exactness to be measured down to micron scales; and with the growing popularity of intraoral scanning, surface errors introduced through the physical malleability of conventional impression materials may one day be removed entirely from the playbook. Still, any effort to improve consistency in the clinical accuracy of a final restoration needs to continually target points in the workflow that may introduce even slight errors. To that end, engineers at Glidewell Laboratories recently set their sights on the sintering of BruxZir® Solid Zirconia.
Sintering is a particularly difficult stage to manage effectively because the macroscopic results are wholly governed by microscopic processes. Prior to sintering, the microstructure of BruxZir material is porous, similar to a sponge. Sintering occurs by using heat energy to diffuse atoms throughout this microstructure. Caused by a gradient of chemical potential, atoms are transported from the body of the material to the surfaces of pores, resulting in a densifying effect and, therefore, shrinkage. The accuracy with which we can predict this shrinkage is one of the most significant factors in the final fit of the restoration.
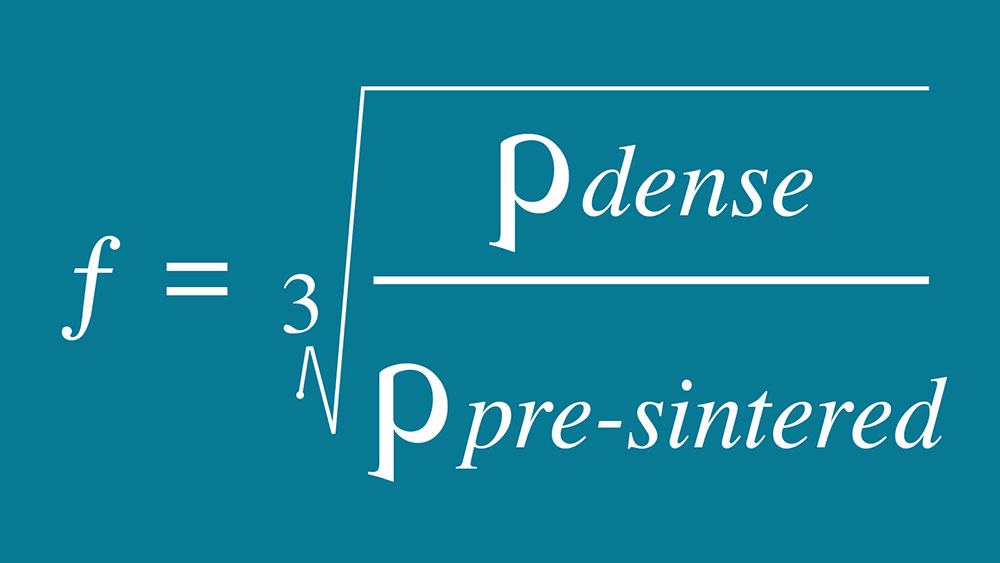
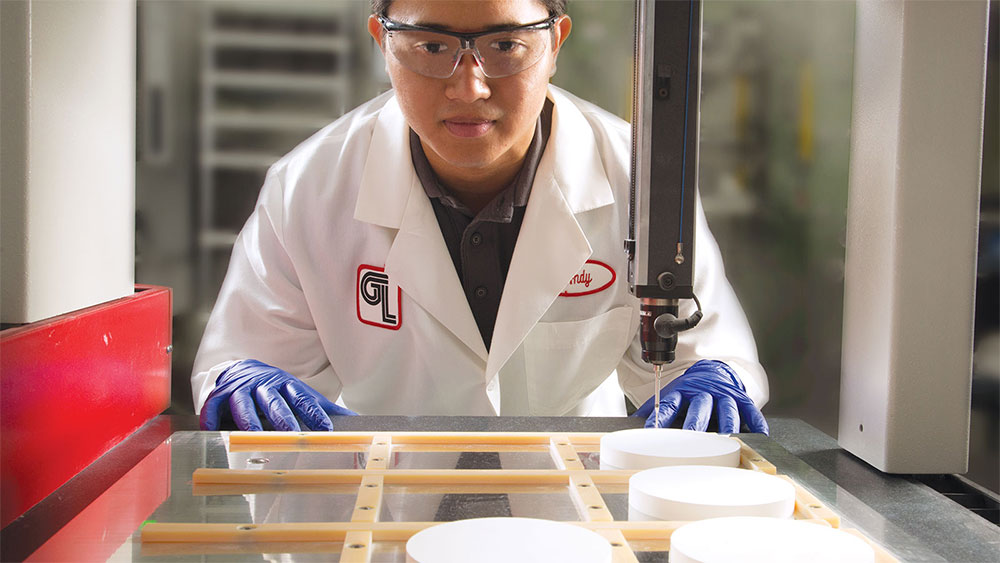
Fortunately, because the target density of the sintered zirconia prosthesis is a consistent and well-known quantity, we actually can predict the amount of shrinkage with a great deal of accuracy. For every BruxZir milling blank that is produced at Glidewell Laboratories, a coordinate measuring machine (CMM) is used to make detailed measurements of the size — and therefore volume — of the blank; likewise, every blank is precisely weighed to determine the amount of zirconia material contained within this volume. With the amount of material and the exact volume it occupies in hand, we can ascertain the pre-sintering density of the BruxZir blank. From there, it is a simple calculation comparing the pre-sintered density of the blank with the known post-sintered density of the restoration to determine the ratio of shrinkage we can expect (Fig. 1). This measurement determines the enlargement factor (EF), a unique factor located on the label of every BruxZir blank that tells the CAD/CAM software exactly how much larger the restoration should be milled in order to compensate for material shrinkage during the sintering phase.
This process of individually characterizing each block is a key differentiator between the BruxZir product and other brands of zirconia, whose manufacturers commonly measure only a single sample from each batch and trust that the resulting discrepancy between the sample and the rest of the batch will not be large enough to cause an issue. This is a reasonable assumption for single crowns, and even smaller bridges; however, as a dental lab, as opposed to a material provider isolated from the end use of its product, our experience has taught us this is inadequate to achieve the accuracy required for larger bridges.
With an individually measured value to four decimal places, the EF may seem well adequate to cross sintering contraction off the list of potential pitfalls to the final fit of the prosthesis; indeed, the extremely low remake percentage and limited number of necessary intraoral adjustments for milled zirconia restorations defend this assumption. But any nonzero remake rate is short of perfection, so what stone hadn’t been overturned? The answer that the Glidewell Laboratories R&D engineering team came to was uniformity and distortion.
A simple method to check for isotropic behavior, employed by material manufacturers including Glidewell, is to sinter a cube (or other simple geometry) and measure its dimensions pre- and post-sintering.
A simple method to check for isotropic behavior, employed by material manufacturers including Glidewell, is to sinter a cube (or other simple geometry) and measure its dimensions pre- and post-sintering. Of course, nature doesn’t create cube teeth; and in the pursuit of the ideal fit, we can’t afford to assume that organic shapes with dramatically varying cross-sections — and therefore heating and cooling rates — should behave in the same way. However, despite this seemingly obvious chasm between theory and practice, very little data exist in published works with respect to the true 3D accuracy achievable with zirconia bridges in modern CAD/CAM processes.
In an effort to hone the fit of zirconia prostheses, then, a series of experiments was designed … to look at the dimensional error that accumulates in the process between CAD fabrication and the finished restoration.
In an effort to hone the fit of zirconia prostheses, then, a series of experiments was designed to answer this question of accuracy in a complex milled structure; specifically, to look at the dimensional error that accumulates in the process between CAD fabrication and the finished restoration. This test method could then be used to isolate the influence of the following variables:
- The brand of zirconia being used.
- Orientation in the sintering oven.
- Different supporting structures used during sintering.
- Dimensional error derived from milling.
The following brands of clinical zirconia were included for evaluation:
- BruxZir Solid Zirconia (Glidewell Laboratories; Newport Beach, Calif.)
- BruxZir Shaded 16 (Glidewell Laboratories)
- KATANA™ zirconia (Kuraray Noritake Dental Inc.; Tokyo, Japan)
- NexxZr® zirconia (Sagemax Bioceramics, Inc.; Federal Way, Wash.)
- TD Dental zirconia (TD Dental Supply, Inc.; Arcadia, Calif.)
- Zenostar® Full Contour zirconia (Wieland Dental; Pforzheim, Germany
The difficulty in determining the shrinkage of a complex prosthesis lies in the struggle to isolate points of measurement in a pre-sintered structure that can be located once more post-sintering, thus establishing movement. In a test cube, these points abound: each vertex, for instance, provides a precise point on the form that can be as easily identified after the sintering cycle as before. In the case of a bridge, on the other hand, nature denies us any geometrically simple shape that can be reliably traced twice. To overcome this problem, eight short cylinders with spherical tips were added to genuine 8-unit bridges at distinct points along the occlusal surface. The prosthesis would then be milled, and 3D scans taken using an IScan D104i scanner from Imetric (Courgenay, Switzerland), which has accuracy approaching that of a coordinate measuring machine. In combination with Geomagic® Qualify software (Geomagic, Inc.; Cary, N.C.), the exact positions of the labial-buccal projections would be pinpointed in space at every point in the process.
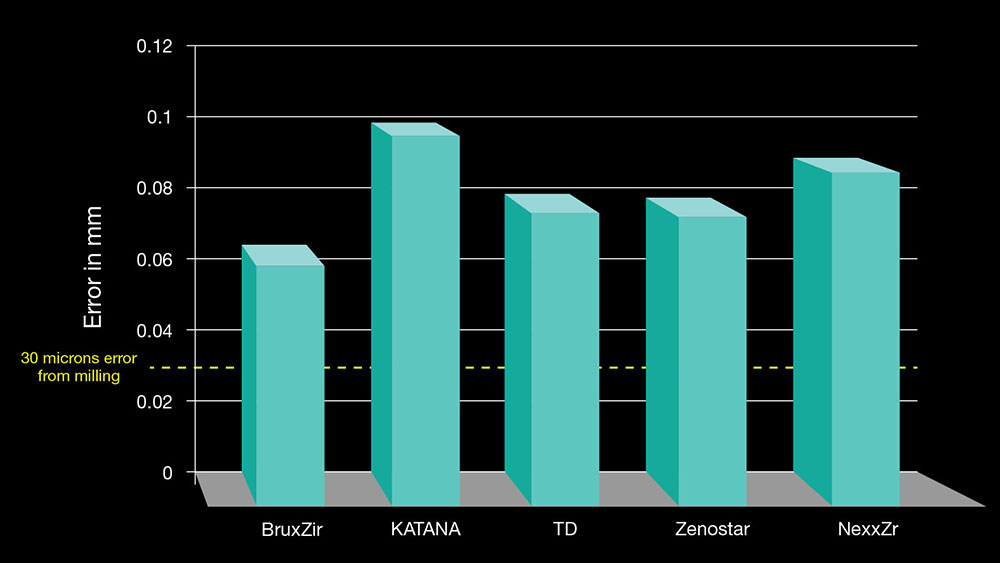
Next, to obtain only the change brought on by the sintering process, the physical milled prosthesis would be rescanned and compared to the original computer design to determine the error introduced by the milling itself. The results showed that independent of the zirconia brand, the amount of error introduced in the CAD-to-CAM progression was found to be a standard 30 microns. With this imprecision accounted for, the prosthesis would then be sintered, and the post-sintered prosthesis scanned again. Using Geomagic Qualify, the post-sinter scan could be compared to both the pre-sintered scan and the original design data to reveal the mean deviation of the cylindrical protrusions across the arch, giving a reliably accurate measurement of shrinkage experienced by the various zirconia brands.
The results showed that independent of the zirconia brand, the amount of error introduced in the CAD-to-CAM progression was found to be a standard 30 microns.
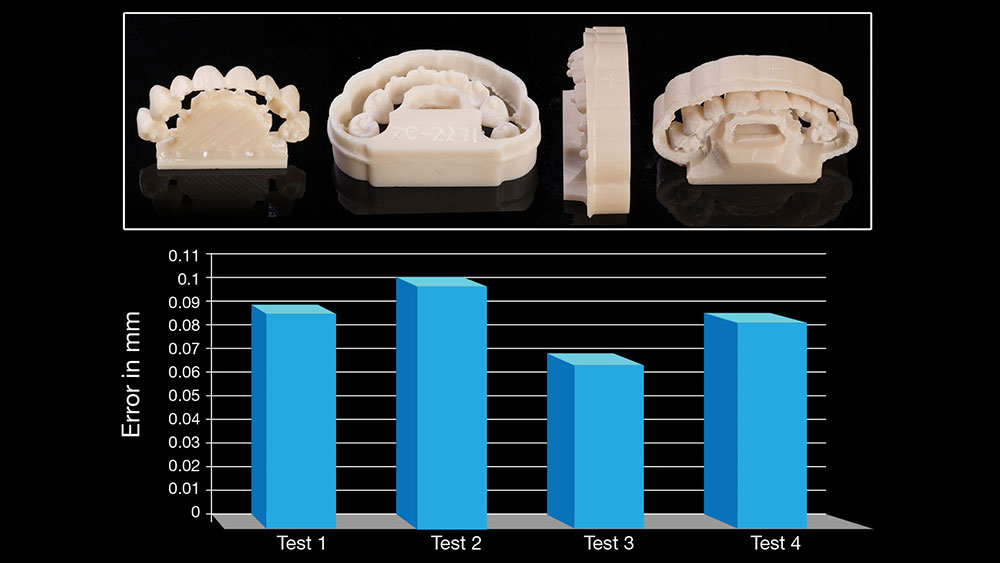
Before proceeding with the shrinkage testing across zirconia brands, the same workflow was used with various sintering preparation layouts to find the structure and inter-oven placement position that resulted in the lowest mean deviation. Assuming the oven’s heating source to be south of the image, Figure 2 shows the structures and orientations tested — bridge on a foundation with solid base, bridge with a circumferential frame lying prone, bridge with a hollow foundation and large base oriented to the heat source, and bridge with a hollow foundation and large base tangential to the heat source — as well as the findings for each. The structure and orientation were found to make a meaningful contribution to the overall bridge accuracy rating; using these results, therefore, these variables were standardized for the next phase of the experiment using the “hollow foundation and large base oriented to the heat source” design.
Once the design preparation and oven positioning had been decided upon, the same virtual prosthesis was milled in the aforementioned six zirconia brands, scanned, compared, sintered, scanned and compared again. Figure 3 displays the mean quantity of dimensional error experienced by each material during the sintering process, with the 30 µm of milling-introduced error accounted for. Any nonzero value represents a deviation from the EF-predicted final locations of the cylindrical protrusions; thus, the higher the number, the greater the discrepancy between the original design specifications and the finished prosthesis.
With this technique, the accuracy of bridges and bridge-manufacturing methods can finally be rated on a quantitative scale, rather than a highly subjective fit-and-feel gauge. The results of the experiment show that bridge sintering design, oven placement and orientation, and variety of material are all factors that make a relevant contribution to the precision, and thus the intraoral fit, of a zirconia prosthesis. The measurements found demonstrate the extreme level of exactness that CAD/CAM zirconia bridge restorations can provide across the board; but in a game of microns, even the most minor of imperfections can quickly cascade into substantial errors. Care should be taken to observe design specifications and sintering techniques that promote the lowest level of deviation from predicted EF ratings. Similarly, a material’s proclivity to shrink in a predictable manner should be well examined. Considering the results of this study, which took into account these contributing error sources, it is fair to conclude that employing BruxZir material is the factor most significant in preventing deviation between design and the final restoration. The homogeneity yielded by the unique colloidal process imparts isotropic properties that make significant improvements to the fit of large bridges.

