Photo Essay: Post-and-Core Technique for Endodontically Treated Teeth

November 27, 2012
 image
Michael DiTolla, DDS, FAGD
Photo Essay: Post-and-Core Technique for Endodontically Treated Teeth

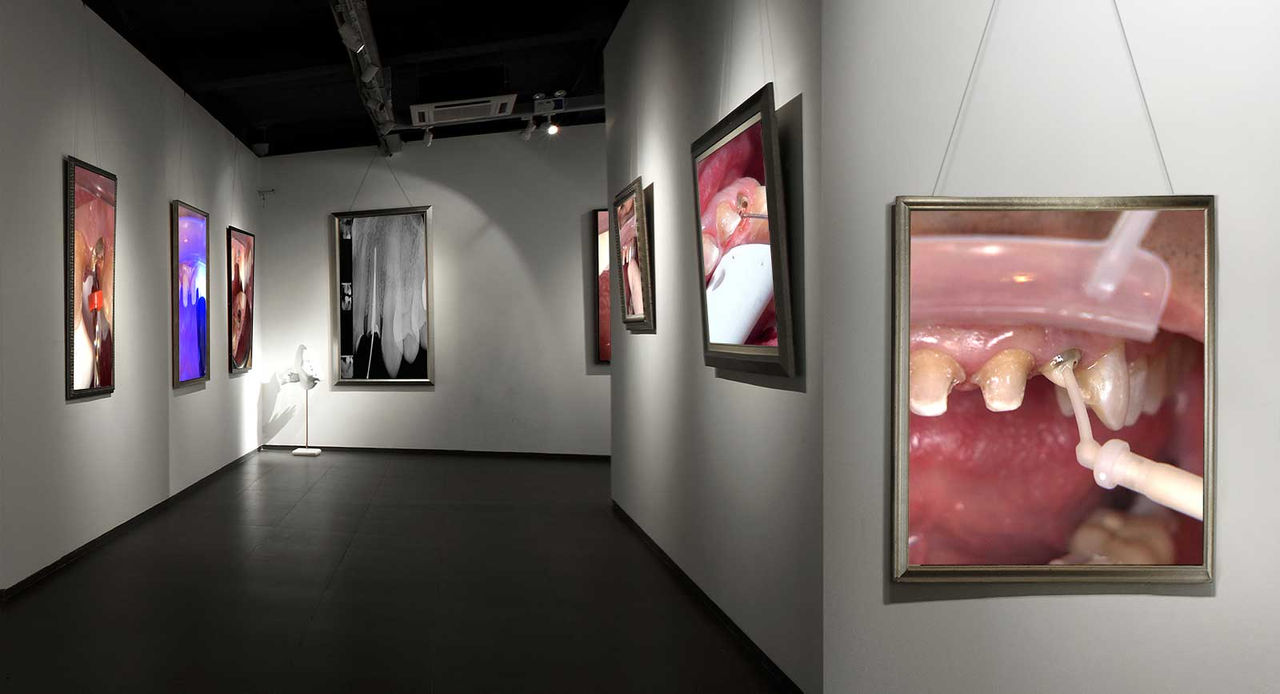
Placing post and cores is not an everyday procedure for most dentists, yet I get a surprising number of emails from dentists asking which post-and-core system I prefer. Rather than limit myself to one system, I like to try out the various systems in the lab’s operatory. For the case that follows, I used the Rebilda® Post System (VOCO America Inc.; Briarcliff Manor, N.Y.) to restore an endodontically treated tooth #10 with severe decay. In addition to radiopaque, translucent fiberglass posts and corresponding burs, the system includes a dual-purpose cement/core buildup material and dual-cured, self-etch bonding agent. I was pleasantly surprised by the system’s completeness and ease of use.

Figure 1

Figure 1: After reviewing the radiograph to assess the condition of the endodontic treatment and the condition of the canal, we can begin removal of the gutta percha. My goal is to extend the post two-thirds of the way into the root, while leaving a minimum of 4 mm of gutta percha in the apical third of the tooth. Although the gutta percha in this tooth is short of the radiographic apex, there is no apparent pathology and the patient is asymptomatic, so I am comfortable placing a post.

Figure 2

Figure 2: We begin the process of removing the gutta percha using the 0.7 mm reamer. The safe-end tip on the reamer and the use of minimal vertical pressure helps to prevent ditching or perforating the walls of the canal. Tilting your head can help to visualize the faciolingual orientation of the reamer.

Figure 3

Figure 3: Take a look from the facial as well to ensure that the angulation of the reamer is along the long axis in a mesiodistal orientation. Glance again at the radiograph to help you picture where the reamer should be going. Seeing pieces of gutta percha jumping out of the coronal portion of the root is a good sign. Position the reamer into the gutta percha along the path of least resistance.

Figure 4

Figure 4: As the reamer progresses into the canal, place an endo stopper on the reamer if you haven’t already. When the reamer begins to bottom out, hitting tooth structure and the gutta percha in the apical third of the root, it is time to stop and take a radiograph to verify your position.

Figure 5

Figure 5: This is one of those times when digital radiography really comes in handy, making you more efficient than if you were to run a film through a developer. I can see on the radiograph that the reamer has indeed begun to engage the tooth structure and is right at my desired depth of two-thirds the length of the canal. I take the reamer out of the canal and measure the length. The goal is to have two-thirds of the post in the root and one-third of the post in the buildup.

Figure 6

Figure 6: It is now time to replace the reamer with the first Rebilda Post drill. The goal here is to remove more of the coronal gutta percha to create the post space without removing too much structure internally in the apical third of the root. All of the root fractures I have seen in the past 20 years have originated in the apical third of the root at the base of the post. I have always attributed these fractures to over-preparation. I am using the 1.2 mm Rebilda Post drill, which goes to the same depth as the reamer.

Figure 7

Figure 7: Next, we move up to the 1.5 mm Rebilda Post drill, the middle size of the three post burs supplied in the kit. It seems to fit many maxillary lateral incisors and is fluted to remove a significant amount of gutta percha. Progressing apically, I feel it stop 1.5 mm short as it bottoms out in the tooth. Resist the urge to shove it down the last bit of the way to match the length of the reamer — that’s how roots get fractured!

Figure 8

Figure 8: A glance into the coronal portion of the root reveals that the coronal gutta percha has been removed completely. Residual gutta percha in the coronal portion of the root can make it difficult to seat the post correctly. If you have difficulty removing it, you can move up to the largest drill, the 2.0 mm Rebilda Post drill, but take care to advance it slowly until it just begins to bind in the canal and no further. All of the drilling you are seeing here was done at 2,000 rpm with my KaVo ELECTROtorque plus handpiece (KaVo Dental; Charlotte, N.C.).

Figure 9

Figure 9: The fiber posts in the Rebilda Post System kit are color coded to match the drills, so I use a 1.5 mm post to match the size of the last drill we took to length. Mark the post at that length to verify that it is seating completely when you try it in the tooth. It’s OK if there is some side-to-side movement of the post; in fact, I prefer a passive fit to ensure we are not setting up stress in the brittle, endodontically treated root.

Figure 10

Figure 10: Using a permanent marker, I make a length mark on the post slightly longer than I think I will need. I like to have the top part of the post be close to the surface of the buildup material I am going to add, so that when I am light curing from the incisal I can be sure that the light is going down the fiber post and into the canal and the surrounding cement. The literature shows that a fiber post that flexes when the tooth does causes fewer problems than an inflexible post.

Figure 11

Figure 11: I prefer to cut the post to size outside the patient’s mouth to avoid having the cut portion drop into the back of the mouth. Also, I prefer to do the cutting now, instead of while the post is in the tooth and the cement is setting, so that the vibration from the handpiece doesn’t break the cement bonds to the tooth structure and the post. As I am intentionally going with a passive fit of the post, I am counting on my cement bond to hold the post and core in place.

Figure 12

Figure 12: Holding the Rebilda Post with an articulating paper holder, I coat the post with alcohol to remove any contamination that might be present from inserting it into the canal. All posts are shipped in non-sterile packaging, so some dentists will coat them with alcohol prior to trying them in for the first time. There is certainly nothing wrong with doing that.

Figure 13

Figure 13: Next, I evaporate the alcohol using my A-dec Warm Air Tooth Dryer (A-dec Inc.; Newberg, Ore.). This might be the most obscure instrument in dentistry, and it’s certainly one of the tougher ones to find (most of your supply reps have probably never even heard of it). Without the dryer, which uses a venturi to remove any moisture from the air, I would have a lot less confidence in my bonding procedures. I use it on a hose that has never had a handpiece on it and is therefore free of oil because the presence of oil can cause even more bonding issues than moisture contamination.

Figure 14

Figure 14: Here, I am using a microbrush to coat the fiber post with the enclosed Ceramic Bond. Because there is some glass in this fiber-reinforced composite post, this silane does a great job of bonding the resin cement to the post. After coating the post and waiting 60 seconds, I will use the A-dec Warm Air Tooth Dryer to thin and evaporate the Ceramic Bond on the post prior to placement. At this point, you can flush the canal with sodium hypochlorite to make sure all gutta percha and dentinal debris have been removed.

Figure 15

Figure 15: Futurabond DC (VOCO America Inc.), a dual-cured, self-etching bonding agent reinforced with nano particles, is the bonding agent included with this system. VOCO’s clever unidose dispensing system ensures that you always have fresh material because the two components aren’t mixed until you push down on one side of the blister pack, causing the self-etching bonding agent to mix with the dual-cure activator. Here, you can see me squeezing the pack to mix the liquids.

Figure 16

Figure 16: After activating the Futurabond DC, simply punch through the foil pack with the enclosed microbrush, which is specially designed for placing bonding agents inside the canal. The long, tapered brush extends nearly all of the way into the prepared post space. I find it easier to puncture the foil surface with the handle side of the microbrush and then insert the elongated tip into the foil reservoir as shown. This helps prevent the microbrush from bending.

Figure 17

Figure 17: Once the tapered post brush is coated with Futurabond DC, I pump it up and down in the canal space for about 20 seconds. I have my operatory light turned off because we definitely do not want to cure the bonding agent in the canal at this point. If we were to do that or if it were to pool in the apical third of the canal, it would be impossible to get the post to seat properly.

Figure 18

Figure 18: Again, I use the A-dec Warm Air Tooth Dryer to evaporate the solvents from the Futurabond DC in the canal. You can see why introducing moisture or oil from a regular three-way syringe at this point in the bonding process could be especially problematic. A simple test is to take your air-water syringe and blow it for 20 seconds on the face of your wristwatch to make sure it is free of oil and moisture.

Figure 19

Figure 19: I have found that the best way to remove excess bonding agent from the apical third of the post space is not with air, but with a typical endodontic paper point. Place the paper point as far as it will go into the post space and then give it a few seconds to absorb any excess bonding agent. Observe the tip of the paper point when removed to see if it appears wet and then continue inserting points until one appears dry after removal.

Figure 20

Figure 20: You can now start the core buildup. The Rebilda DC dual-cure core buildup material is an automixing system dispensed directly into the post space using the enclosed microtip, as shown here. These tips are the thinnest I have seen for an automix system. In fact, at first glance it’s hard to believe the buildup material is going to be able to pass through the opening, but, of course, it does.

Figure 21

Figure 21: When filling up the post space, take care not to fill it completely. If you fill the post space completely and then try to jam the post down into place, the shape of the canal and a fundamental rule of hydraulics won’t allow this to happen. If you just were to fill up the apical half of the post space, you would be fine because by the time the post is inserted you would have excess buildup material flowing out the coronal aspect. In the rare instance when you might not use enough material, it is very easy to fill a void by placing additional material with the enclosed microtip.

Figure 22

Figure 22: If you happen to correctly estimate the amount of buildup material to place in the canal, you should see something like this. The tip of the post should be at the same length you measured it, indicating that it is properly seated. You shouldn’t see a mass of extra buildup material on the exterior of the tooth, although cleanup with the microtip is easy if needed.

Figure 23

Figure 23: I prefer to cure the post, Futurabond DC and Rebilda DC simultaneously before placing the coronal buildup. Otherwise, I would be curing through a huge ball of composite and, in my mind, the success of this post and core comes down to how well everything cures inside the canal. Curing it as you see here gives me the best opportunity to get light down the post and deep into the canal. I cure for 40 seconds.

Figure 24

Figure 24: In the past I have done free-form composite buildups, which I call the “soft-serve ice cream technique” because you swirl on material, swirl on more material and then cure. However, I always find myself coming back to shaping aids, both in the interest of speed and because I have a harder time getting an ideal prep shape with the soft-serve method than if I slightly overbuild it with a shaping aid and cut it back. Here, I am using the Rebilda Form.

Figure 25

Figure 25: I cut the Rebilda Form to an acceptable height and shape the gingival aspect to allow room for the papilla. I then stabilize the Rebilda Form with my index finger, while I fill the form with a fresh mix of Rebilda DC. I am using the endo tip again, but any tip would work here. You may notice that I am using the same material I used to bond the post for the buildup, ensuring compatibility at the interface and reducing inventory.

Figure 26

Figure 26: I set the curing light on top of the Rebilda Form and cure away, aiming for a 40-second cure. Sometimes I cure for 40 seconds and then hand the light to my assistant so she can cure it for an additional 40 seconds. Maybe it’s because I graduated from dental school in the late 1980s, but I really don’t trust most manufacturer-suggested curing times. Until a study comes out proving that overcuring is bad, I plan to stick to this technique.

Figure 27

Figure 27: After my marathon cure, I stick an explorer into the Rebilda Form, slide it up to the occlusal and remove the shaping aid. Oops! Look at the void I created in the buildup. I may have been pressing a little too hard with my index finger because the vertical void looks a lot like the tip of the explorer. Apparently, I neglected to continue to inject as I removed the tip from the Rebilda Form. This falls squarely under the heading of operator error.

Figure 28

Figure 28: Fortunately, the oxygen-inhibited layer is still present on the Rebilda DC, so all I need to do to fix these voids is to put a new tip on the buildup syringe and add material as I am doing here. This will also give me a chance to light cure again, especially from the gingival, where I wasn’t able to cure when the Rebilda Form was in place.

Figure 29

Figure 29: With the voids filled, I now have my preferred buildup shape, which is roughly the outline of an overbuilt lateral incisor. As I mentioned earlier, I find it much simpler to achieve an ideal lateral incisor prep through a subtractive process than through an additive process using the soft-serve technique.

Figure 30

Figure 30: I do not have the full contour of a lateral incisor in this case, so I can’t do my typical Reverse Preparation Technique on this tooth. Because I can’t use the round bur I usually start with, I begin with this super coarse 856-025 bur (Axis Dental; Coppell, Texas). I will start doing my axial reduction with this bur, but first I need to make sure I get rid of any flash at the gingival margin. I like to get my #00 cord (Ultrapak® Cord [Ultradent Products Inc.; South Jordan, Utah]) in the sulcus as soon as possible, but the flash first needs to be eliminated if we are going to have any chance of getting the cord smoothly into place.

Figure 31

Figure 31: The #00 cord is placed into the sulcus with the two ends flush. This will retract the gingival margin about 0.5 mm, which will allow us to drop the margin to this new gingival level. When the #00 cord is removed, the net effect will be a 0.5 mm subgingival margin without having to take a bur subgingival or cause bleeding.

Figure 32

Figure 32: Usually there is a fair amount of time between when I place the bottom #00 cord and the top #2E cord (Ultradent Products Inc.), but in this case the prep is almost finished after using only the 856-025 bur. This top #2E cord will provide the lateral retraction of the tissue and make room for the impression material, while the bottom cord provides the vertical retraction that allows us to prep our virtual subgingival margin.

Figure 33

Figure 33: One of the benefits of using an electric handpiece is the ability to turn it down to 2,000 rpm with the water off to see precisely what you are doing, preferably through loupes. Trace a line along the gingival margin to make sure it is crisp and clear. Remember, the handpiece is only spinning at 2,000 rpm, so there is not enough heat generated to damage the pulp.

Figure 34

Figure 34: With the top cord in place, the subgingival margin is just barely visible above the gingival margin. This top cord stays in place for eight to 10 minutes. When it is removed, there typically will be no bleeding because the bottom #00 cord is still in contact with the inflamed base of the sulcus. Once the top cord is removed, an impression of the finished post-and-core preparation can be taken.