5 Ways to Achieve Accurate Fit for Screw-Retained Crowns

A refined approach saves time, money, and headaches. Patients will thank you, too!

February 4, 2025
 image
Keith Peters
Brand & Product Marketing Manager
Glidewell

The fit of the final restoration is extremely important for patient comfort, longevity, and overall appearance of the restoration — not to mention the invaluable chair time of the clinician. While screw-retained crowns streamline the delivery of implant restorations, achieving accurate fit takes practice and adherence to key principles. There are a few simple steps you can take to help achieve an accurate fit when delivering a screw-retained crown. From choosing the restoration type, to taking a great impression, and reviewing delivery techniques, you can restore your implant cases with confidence and send your patients home smiling.

1. Begin with the Restoration in Mind

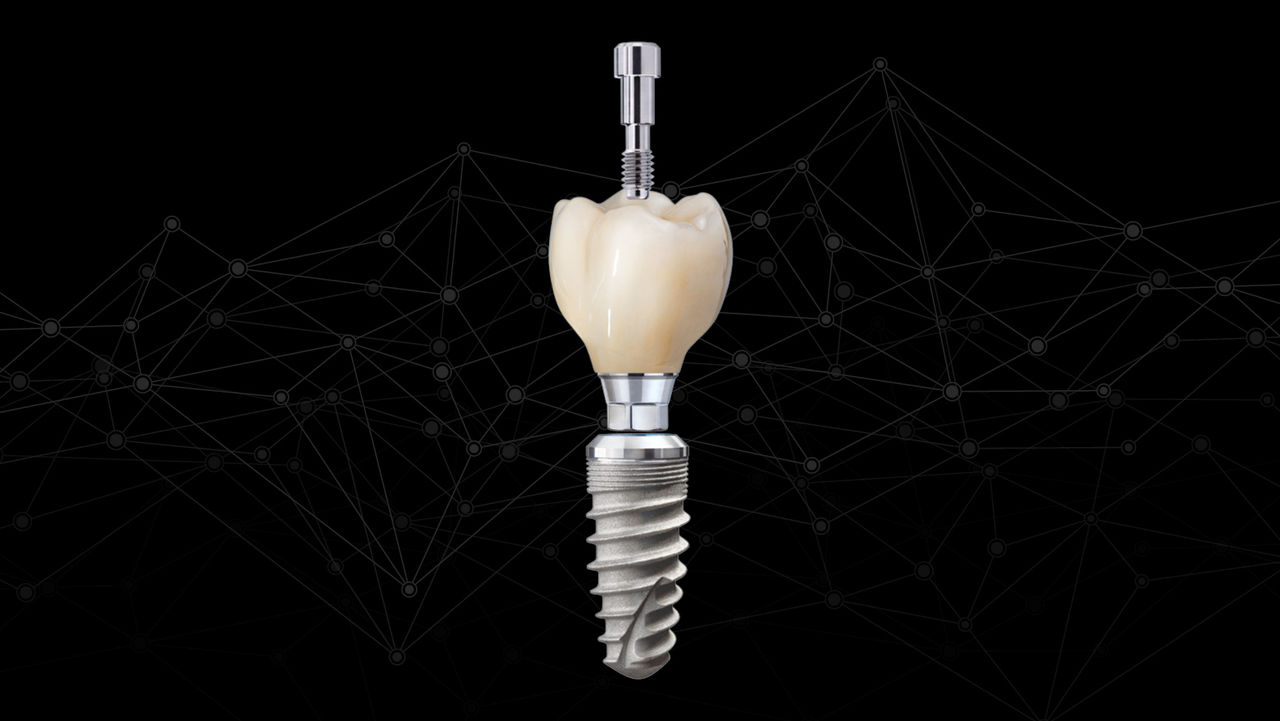
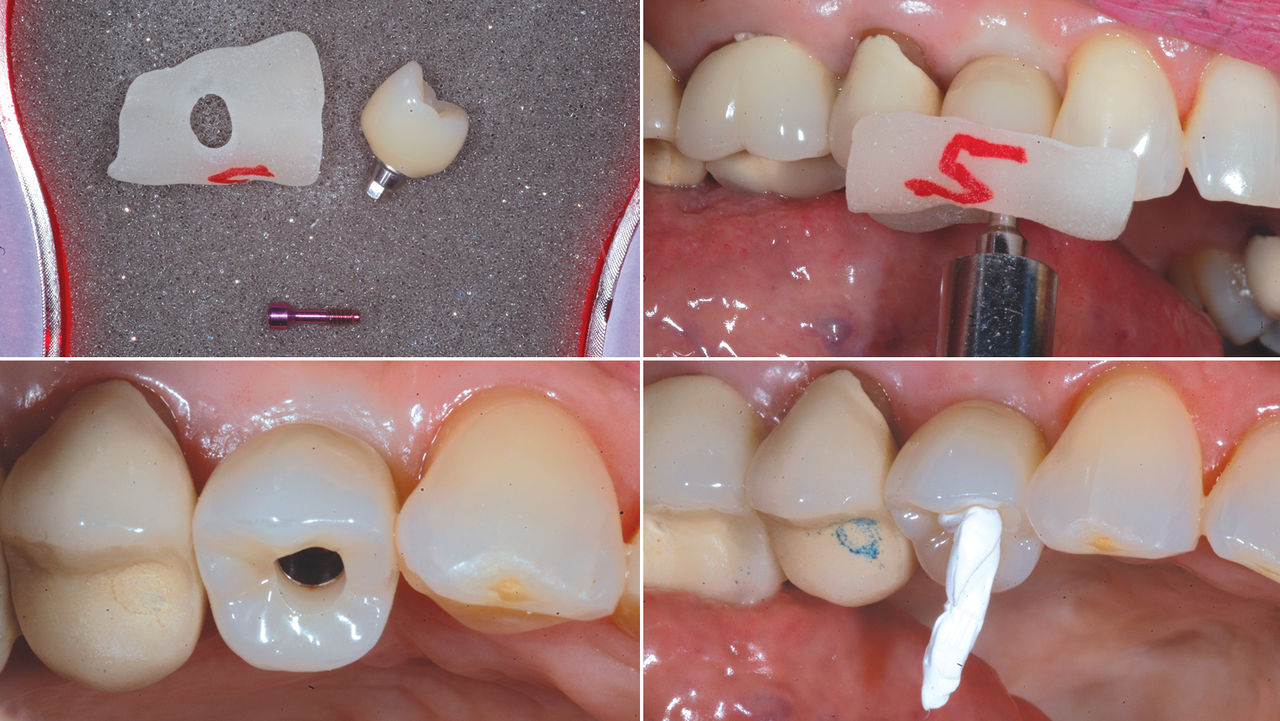
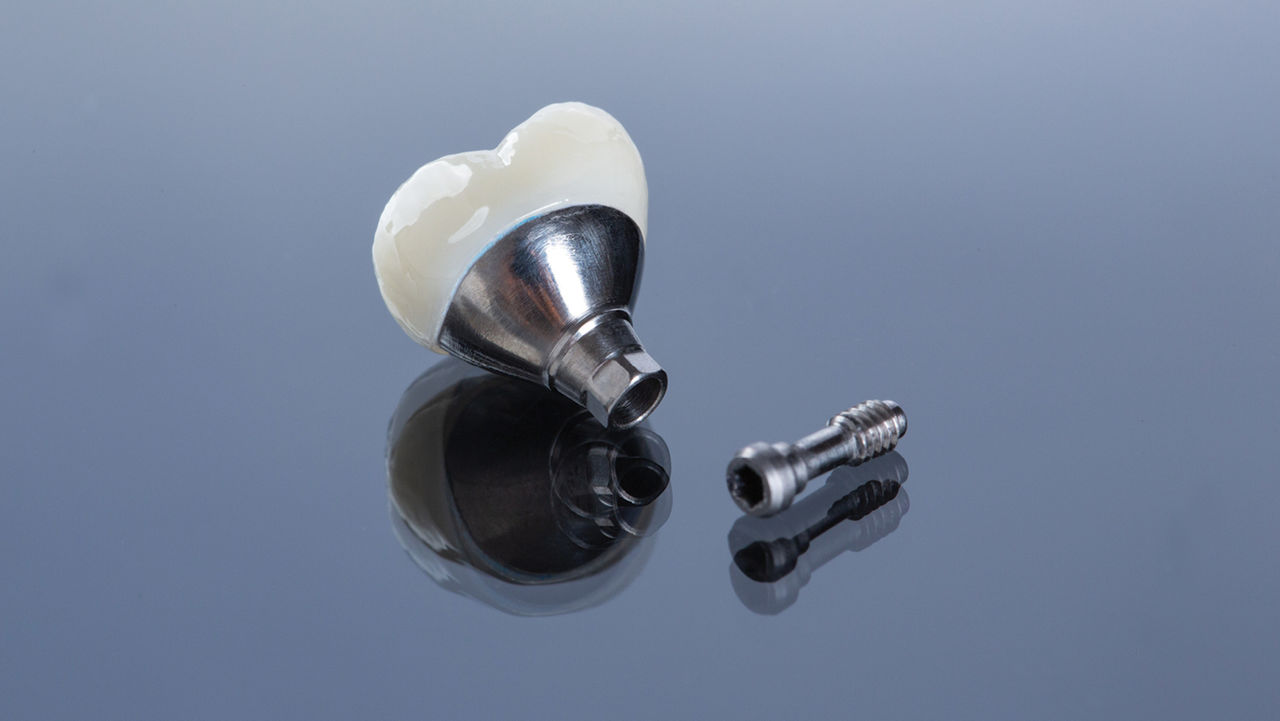
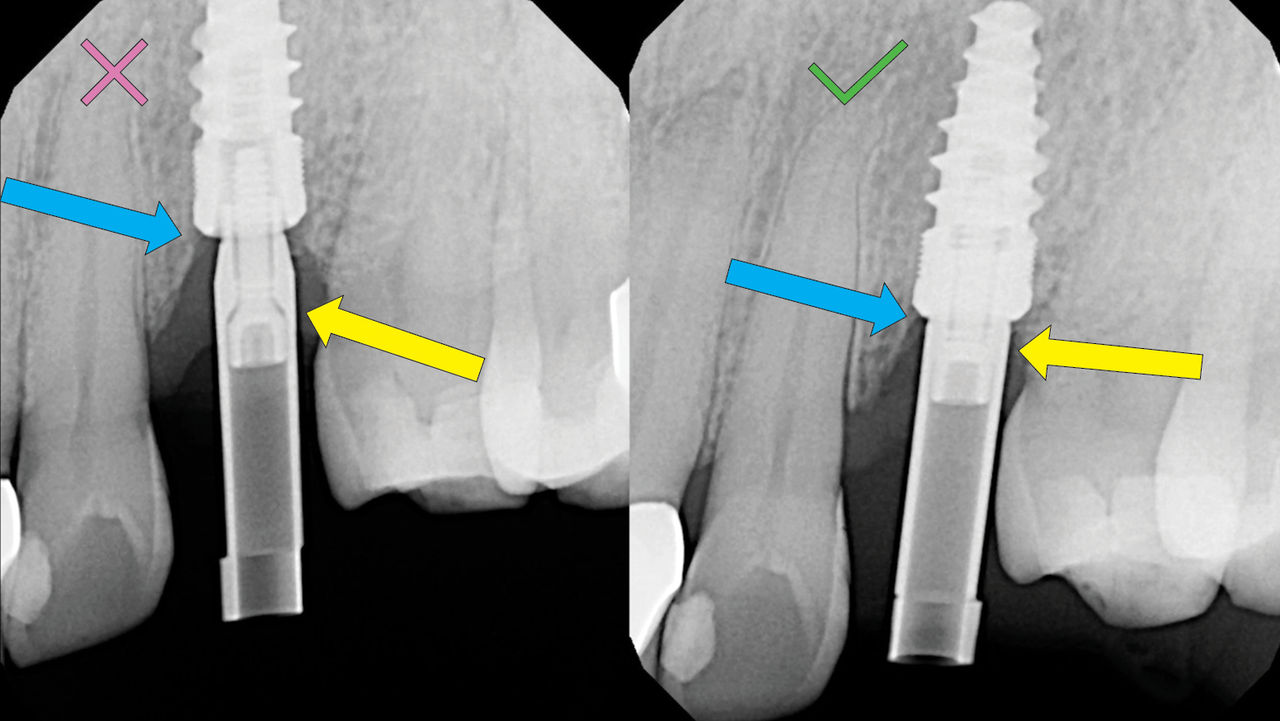
There are a few essential items to consider when working with implants, and more specifically, screw-retained crowns.  When beginning implant treatment, it’s important to think logistically — keeping the final outcome in mind from the outset. The contours of the final restoration should be considered when planning the implant position. That is to say, the screw access channel or long axis of the implant ideally should emerge through the central fossa of a posterior crown — through the cingulum of an anterior crown. If that is not the case, other surgical interventions or restorative options should be considered during treatment planning.

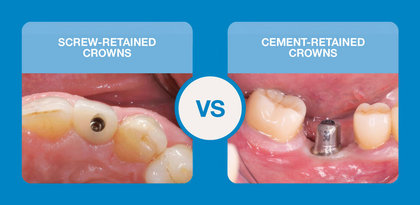
More and more dentists are choosing to prescribe screw-retained crowns over cement-retained crowns. This is partly due to the complications associated with residual cement at the implant site, caused by intraoral cementation of cement-retained implant crowns. Studies have demonstrated repeatedly that residual cement can lead to peri-mucositis and peri-implantitis.

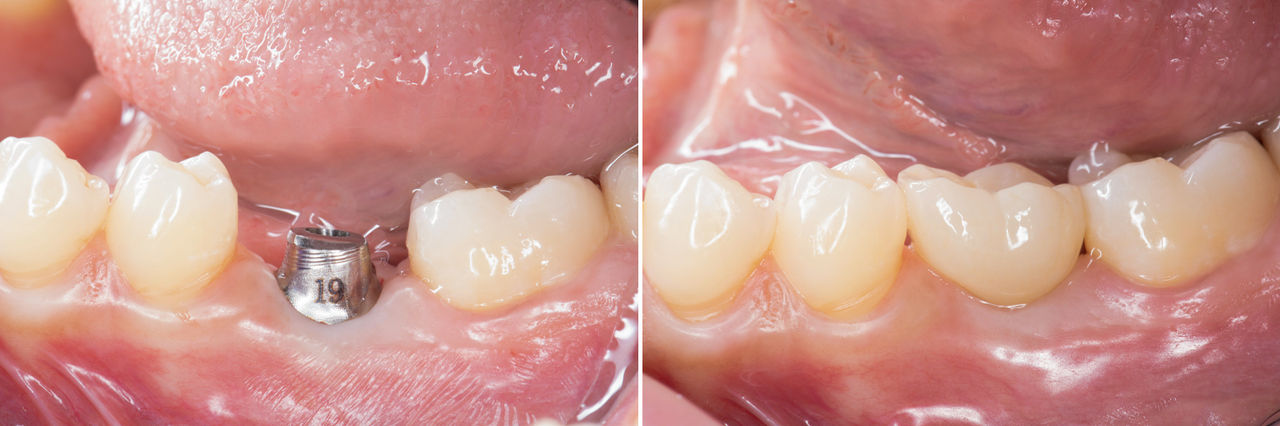
When preparing the site for an implant restoration, you must consider the contouring of the soft tissue. Shaping the gums allows for greater predictability and helps promote a stable restorative environment for the implant. Custom healing abutments or provisional screw-retained crowns can assist with the contouring process. 

2. Choose the Best Restoration for Your Case

When ready to move forward, you can then decide what type of restoration will be best suited for your case. There are three main categories to choose from, each with their own advantages and clinical indications.

Custom Abutments

In situations where there is a lack of restorative space, or the implant position is not ideal, a custom abutment can solve some of these challenges. Some clinicians prefer to work with custom abutments because crown delivery is similar to the procedure used during conventional crown & bridge restorations. Avoiding the screw access hole emerging from the facial or buccal surface of the restoration is one unique benefit of utilizing a custom abutment, and some patients appreciate the lack of a screw access hole on the occlusal surface of their crown.

Custom Abutments

The patient was concerned with the esthetics of a screw-retained crown, so a custom abutment was prescribed to avoid the appearance of a screw access hole. Custom abutments also offer customized margins, for use in areas where stock abutments are inadequate.

Screw-Retained Crowns

As opposed to custom abutments, screw-retained crowns are commonly placed in the posterior, but can be used anywhere in the arch given the right conditions. They offer a simple and straightforward delivery protocol — saving precious chair time due to cement-free delivery — whereas custom abutments require a more complex approach. Screw-retained crowns are the best choice if the restoration will need to be removed for maintenance or adjusted for any reason.

Screw-Retained Crowns

After a flapless surgical procedure, an implant was placed and a BruxZir® screw-retained crown was designed from a digital impression. The crown was delivered using a stent and Teflon tape was used to block the screw access opening prior to sealing with composite.

Screwmentable Crowns

Screwmentable crowns are a hybrid option that combine the benefits of screw- and cement–retained restorations. For this solution, a custom abutment is designed to support a cementable restoration. Since the cementation portion of delivery is performed outside the patient’s mouth, screwmentable crowns avoid issues commonly associated with intraorally cemented crowns. Screwmentables are ideal for correcting the angulation and idealizing the emergence profile while still offering the convenience of an access channel.

Screwmentable Crowns

Combining a custom abutment and BruxZir crown, this screwmentable crown was finally delivered as a one-piece restoration. The result was a lifelike emergence profile for the patient, an improved distribution of functional forces, and favorable conditions at the implant site.

3. Capture an Accurate Impression

Because screw-retained crowns require a high level of precision, not only via the angulation of the implant, but also the occlusal contacts and path of draw, it is especially important to send impressions of the utmost accuracy to the lab. Here’s a step-by-step protocol you can use to optimize your digital impressions:

  1. Insert the scan body and hand-tighten it into place.
  2. Use a radiograph to confirm the scan body is fully seated and engaging the connection of the implant.
  3. If bone is in the way, recontour the bone using a bone profiler or other appropriate instrument.
  4. Check your digital scan to make sure the scan region is clearly captured. If you are having trouble capturing this region, you can fill the screw channel with Teflon tape to help it show up better in the scan.
  5. Evaluate the adjacent and opposing teeth to determine if contact areas require adjustments, such as enameloplasty. The objective is to create broad, parallel contacts for improved stress distribution, ease of restoration delivery and reduced risk of food impaction.
  6. Clean and thoroughly dry the contact areas before you scan to ensure accuracy. If the scan is unclear or distorted, you should erase that section and retake the scan while the patient is still present. 
Capture an Accurate Impression

This slide shows the difference between an improperly seated scan body (left) and a fully engaged scan body (right). Radiographic confirmation is imperative to ensure the scan body is fully seated, helping to facilitate an accurate digital impression of the implant position. For more information on implant impressions, watch Dr. Manalili's video on the topic.

As always, implant restorations require extra consideration throughout each case, including intraoral scans. Note that you should replace the scan body with a healing abutment or provisional during the bite scan.

While digital workflows are favored for saving time and reviewing scans in greater detail, Glidewell also excels in producing restorations from analog impressions. Here are a few tips for better results with a conventional technique:

  1. Take a radiograph to confirm complete seating of impression copings.
  2. Use a full-arch impression tray.
  3. Provide a bite registration.
  4. To eliminate voids, use light-body syringe material around the impression coping and heavier materials in the tray.
  5. Make sure the impression material has fully set before removing the tray.

4. Prescribe the Optimal Restorative Material for Your Patient

With an accurate impression and detailed instructions provided to the lab, the majority of screw-retained crowns can be placed with an ultra-precise fit. Now, it’s time to think about which material will suit your patient’s needs and preferences. Glidewell offers several screw-retained crown materials for a comprehensive range of options.

BruxZir® Zirconia:

  • High-strength, monolithic, all-ceramic material backed by a lifetime guarantee when your case is restored by Glidewell
  • Offers lifelike translucency and withstands strong occlusal forces
  • Superior shade matching for consistently beautiful results
  • BruxZir Full-Strength, > 1,000 MPa
  • BruxZir Esthetic, 870 MPa
BruxZir Zirconia

IPS e.max®:

  • Glass ceramic material with outstanding esthetics
  • Average flexural strength of 500 MPa
IPS e.max

Obsidian® Fused to Metal:

  • 4x stronger and 2x more chip resistant than conventional porcelains
  • Natural appearance and perfect for limited occlusal space
  • Average flexural strength of 397 MPa
Obsidian Fused to Metal
When choosing the material, you’ll want to consider the opposing restorations. For example, if the patient has opposing IPS e.max® restorations, it would make sense to utilize an e.max screw-retained crown for consistency.

5. Brush up on Screw-Retained Crown Delivery Techniques

Based on the results of real implant cases over the years, Glidewell staff dentists have developed a protocol for smooth and successful screw-retained crown delivery. Adequate preparation should make delivery day a breeze — here are steps to ensure best results for your screw-retained crown cases.

  1. Clean the restorative connection of the implant, lubricating the screw channel (chlorhexidine or saline solution).
  2. Seat the crown, checking proximal contacts and emergence profile, confirming that there is appropriate gingival pressure.
  3. Hand-tighten the crown.
  4. Verify that the crown is fully seated via radiographic confirmation.
  5. Verify centric and excursive occlusal contacts.
  6. Once confirmed, torque to implant manufacturer’s recommended specifications.
  7. Cover the screw head with Teflon tape or similar material.
  8. Seal the access channel with the appropriate material, bonding where appropriate.
  9. Conduct a final occlusion check.
  10. Go over post-delivery hygiene instructions.

Conclusion

In summary, screw-retained crowns offer distinct advantages in terms of retrievability, stability and ease of maintenance. These benefits make them ideal for implant restorations in many clinical situations. By using these five ways to achieve accurate fit, you can easily and predictably deliver screw-retained crowns using minimal chair time and granting your patients satisfying, long-lasting solutions.

Ready to partner with Glidewell in delivering well-fitting screw-retained crowns for your patients? Access our implant lab Rx here, and find digital case submission information here.

More to Know

Related Dental Articles

Blog Posts

Educational Videos


IPS e.max is a registered trademark of Ivoclar Vivadent.

Send blog-related questions and suggestions to hello@glidewell.com.

Crown & Bridge
Implant Restoration