2201 Dupont Dr., Irvine, CA 92612
© 2020-2026 Glidewell. All rights reserved.
800-854-7256 USA
Start placing better fitting restorations by mastering these expert-approved implant scanning techniques.


Digital technology has made implant dentistry more efficient, accurate and predictable than ever before. Yet even the best scanner can only perform as well as the person holding it. When the quality of digital implant scans improves, so does every step that follows — from design, to fabrication, to seating the final restoration.
For most single-unit restorations, a few simple scanning principles can make the difference between a restoration that seats perfectly and one that needs extensive adjustment. Whether you’re a doctor or an assistant taking scans in the operatory, these guidelines can help you capture better data — and get better results from your lab.
What You’ll Learn in this Article
Scanning Implants: Understanding the Basics
Best Practices for Capturing the Scan
Checking Your Scan Before You Send
Common Scan Errors to Watch For
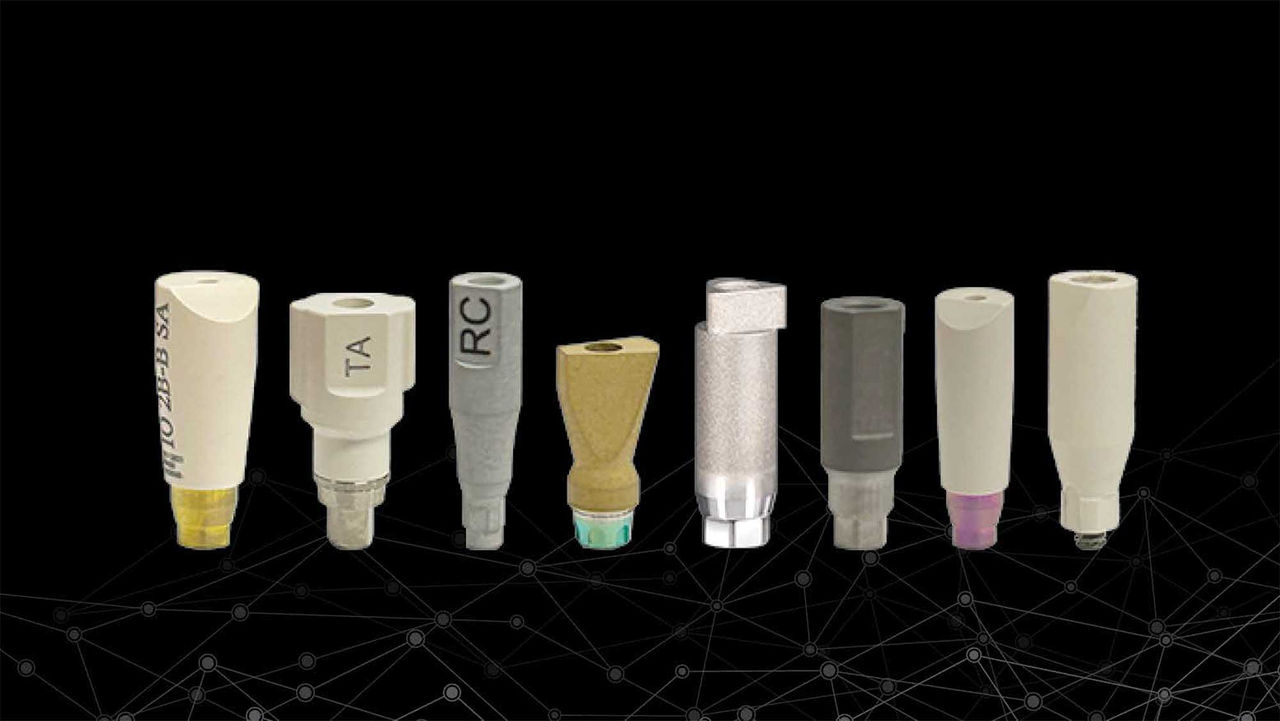
Scanning an implant site is not quite the same as scanning a natural tooth. Because the implant itself lies beneath the tissue, the scanner can’t detect its position directly. Instead, an implant scan body — sometimes called a scan abutment — acts as the reference point. Its unique geometry tells the lab exactly where the implant sits in three-dimensional space.
Implant scan bodies come in a variety of shapes and materials. Titanium and PEEK are the most common, with designs that include flat indexing features to help scanners recognize them more easily. The key is to identify the correct scan body for your implant system and ensure it is fully seated. When the right component is used and properly seated, your scanner will capture the data the lab needs for a precise digital restoration.
Before scanning, make sure the site is ready. The tissue around the implant should be healthy, dry and free of debris. If the hard or soft tissue has overgrown the platform, consider recontouring and using a healing abutment for a few days before scanning. Always verify that the scan body is fully seated both visually and radiographically, if needed, because even a slight gap will translate to a misfit in the final crown.
This is an important place to start, but there are other essential best practices to follow in order to capture accurate scans.
Once the scan body is in place, scanning strategy matters. For single units or short-span bridges, try to capture at least one tooth anterior and one posterior to the implant site. This gives the lab enough reference points to correctly orient the restoration.
Every scanner has their own recommended pathway for scanning. The goal is to capture the scan body itself, followed by the surrounding soft tissue, adjacent contacts and occluding surfaces. Work systematically and maintain a steady distance between the scanner tip and the surface. Moisture and glare are your biggest enemies; a quick air-drying pass can improve accuracy considerably.
When it’s time to take a digital bite registration, remove the scan body first. Because scan bodies often sit higher than the occlusal plane, leaving them in place can prevent full closure. Replace it with a healing abutment or provisional restoration, then take the bite scan. Finally, confirm that the digital bite matches the patient’s natural occlusion before submitting it to the lab.
One of the biggest advantages of digital impressions is instant feedback. If something was not captured correctly, you can fix it without having to retake the entire impression. Before submitting your case, take a moment to review the scan and follow these steps.

Switch your scanner view from color mode to model or stone mode, because it’s easier to visualize the quality of the scan data. Look for smooth, complete data capture without voids or rough, “grainy” patches. These often indicate moisture contamination or areas the scanner couldn’t fully read.

If you find missing data, simply dry the area and rescan that region. Avoid using the scanner’s autofill or patching features; they can make the model look complete, but the geometry they generate isn’t real. Even minor inaccuracies in this stage can translate to open contacts, poor seating or high occlusion later.
A few extra seconds spent verifying your scan can save you hours of adjustment — or even a full remake — once the crown returns from the lab.
Even if you’re confident in your scanning ability, there are common scan errors you may come across. This section details the most common ones doctors experience and how to fix the errors when they occur.
If the tissue is collapsing around the scan body before capture, the scanner may miss the emergence profile.
How to Fix: Utilize a lip/cheek retractor when scanning to limit pressure on the surrounding tissue. Place the scan body after removing a healing component and scan as quickly as possible.
Incomplete or distorted surfaces interproximally can cause the restoration to have tight or open contacts.
How to Fix: Scanning the contacts of the adjacent teeth with the healing abutment in place can make access easier to these hard-to-reach areas without worrying about soft tissue collapse. Thoroughly clean and dry these areas to remove any plaque buildup and saliva.
Scanner movement that’s too fast or too far from the surface can create a “ghosted” occlusal pattern.
How to Fix: Delete the distorted scan data and rescan the area slowly at the manufacturer’s recommended distance, keeping the scanner steady to allow data stitching.
When the bite doesn’t align properly, you may notice floating arches or overlapping cusps in the bite preview.
How to Fix: Verify the bite scan matches the patient’s maximum intercuspation position (MIP) bite. Ensure the scan body was removed before the bite was taken. Rescan if occlusion appears misaligned.

Reflective surfaces, especially titanium scan bodies, can confuse scanners and cause voids.
How to Fix: Turn off your overhead light and gently dry the scan bodies.
Occasionally, overlapping passes of the scanner create distorted or duplicated data.
How to Fix: Delete the defective section, reposition the scanner to a known point and recapture. Follow the specific scanner’s recommended scanning pathway.
By checking for these errors while the patient is still in the chair, you can correct them immediately — ensuring your scan data is complete, clean and accurate. When your scans are free of artifacts, moisture and gaps, the lab can design restorations that seat easily on delivery day.

Every scan you submit is essentially a digital blueprint of your patient’s mouth. If the data is incomplete or distorted, the restoration fabricated from that data will reflect those imperfections.
Open contacts are one of the most common issues traced back to incomplete scanning. They often occur when the adjacent teeth weren’t fully captured or when the autofill function smoothed over missing details. Before scanning, it can help to slightly smooth or broaden the proximal surfaces of the neighboring teeth. This simple step creates broader, more stable contact areas and helps distribute stress evenly once the restoration is seated.
Creating proximal guide plans on implant sites creates a path of draw for your restoration and makes seating even easier.
Think of your scan as a communication tool between your chair and the lab. The clearer and more complete your data, the easier it is for technicians to design a restoration that fits seamlessly. When the scan is accurate, the restoration arrives ready to seat — reducing chair time and enhancing patient satisfaction.
Digital scanning is one of the most powerful tools in modern implant dentistry. With just a few minutes of attention to detail — proper seating, controlled moisture, thoughtful scan path and final verification — you can dramatically improve the fit and accuracy of your implant restorations.
High-quality implant scans don’t just make your lab’s job easier; they also improve your own efficiency, reduce remakes and help deliver the predictable results today’s patients expect.
Learn more about digital implant workflows, case submission tips and education opportunities at Glidewell Dental — your partner in delivering accurate, efficient, esthetic restorations.
Send blog-related questions and suggestions to hello@glidewell.com.
2201 Dupont Dr., Irvine, CA 92612
© 2020-2026 Glidewell. All rights reserved.