In this issue:
Taking the Perfect Impression
Author
Introduction: Masterful Final Impressions
The excellence and marginal fit of the definitive laboratory restorations can only be as good as the master dies from which they are created. The precision of the master impression is something that cannot be compromised. Marginal detail and tooth structure apical to the restorative margin are both necessary elements of an acceptable final impression. Without precision, the definitive restoration is doomed to clinical failure. Remember in dental school hearing, “Let’s pour it up and see what we’ve got”? If you can’t see the margins in the impression, they won’t “magically” appear when the impression is poured. It is important for the dentist to have a critical eye and reject all but the “perfect” master impression. Techniques will be described to aid the dentist in achieving this result.
Restorative Margin Placement Is Dictated by the Restorative Material Chosen
Retraction techniques for master impressions will vary depending on restorative marginal placement. With today’s esthetic material options, the restorative margin can be located supracrevicular (above the gingival tissues), equicrevicular (at the free gingival margin) or intracrevicular (in the gingival sulcus). Porcelain fused to metal crowns are often more esthetic with intracrevicular margin placement. All-ceramic restorations can often be placed at the free gingival margin, or in the case of “contact lens” porcelain veneers, slightly supragingival. This is the ideal location for dentin and enamel bonding procedures.
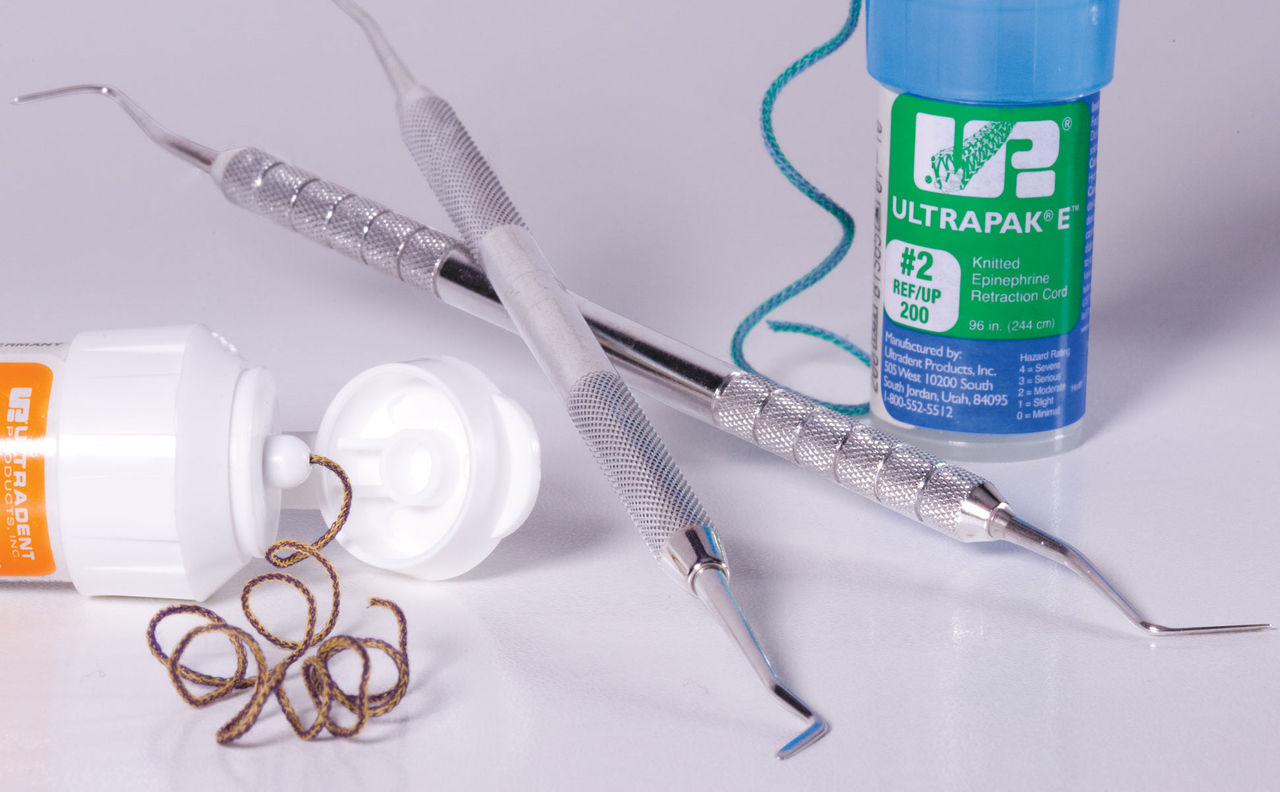
Intracrevicular Impressions: The Two-Cord Technique


A two-cord impression technique is utilized to capture most master impressions for full coverage (circumcoronal) restorations, with both intracrevicular and equicrevicular margins (at the free gingival margin). First, a #00 cord is packed around each preparation starting from the lingual, around the proximal to the facial aspect, then back through the remaining proximal area to the lingual aspect. The excess at both lingual ends is trimmed, and the ends of the cord are tucked into the lingual gingival sulcus so that the ends butt against one another. Next, a #1 cord is placed on top of the #00 in the same fashion. If desired, the cords may be soaked in a hemostatic solution, then dried with a 2×2 prior to placement. The preparation is cleansed with AcquaSeal™ Dentin Desensitizer (AcquaMed Technologies, Inc.; West Chicago, Ill.) on a cotton pledget. When ready, the #1 cord is teased out of the sulcus using an explorer from the facial aspect of each preparation, and the amount of retraction is evaluated. The impression should capture not only the entire restorative margin, but also about 0.5 millimeters of the tooth/root surface apical to the margin. If the marginal gingiva adjacent to any restorative margin rebounds to contact the tooth/margin, a small piece of a larger diameter cord (#2) is placed into the affected area for an additional minute, and then removed. This added retraction should be sufficient to create a space between the tooth surface and the inner lining of the gingival sulcus. The goal of retraction is to “create a moat (space in which to inject light bodied impression material) around the castle (tooth preparation).” To capture a precision impression, light bodied impression material should be injected not only around the prepared teeth, but also over all occlusal and incisal surfaces so that the stone models can be accurately articulated. The impression tray with the heavy bodied impression material is then placed in the mouth for the appropriate time, based on manufacturers’ recommendations. In the mandibular anterior region, it may be necessary to start with a #000 and place a #00 or #0 as the top cord due to the constraints of the gingival sulcus around these anatomically small teeth.
The Single-Cord Impression Technique


Use of a single-cord technique is most effective for equicrevicular margins where the retraction cord can be left in place while taking the impression. There is always a risk of laceration of the sulcular epithelial lining when removing a single-cord technique for intracrevicular preparations. We know that the two main “enemies” of impression materials are blood and crevicular fluid. Having healthy tissue before taking a master impression cannot be overemphasized. Using a technique where a cord is left in the sulcus will help maintain a dry environment to syringe impression material into. Even though many of the current impression materials are “hydrophilic” and have a low contact angle, impressions are always more predictable when taken in a dry sulcus. After placement of the single cord, usually a #00, if there is a need for further tissue “deflection,” a material such as Expasyl™ (Kerr Corporation; Orange, Calif.) can be used on top of the cord and then rinsed away prior to sulcular impression material injection. Expasyl also is an excellent astringent and drying agent, which helps promote a dry field.
The “No-Cord” Impression Technique


The “no-cord” impression technique is only indicated for supragingival margins where there is clearly tooth/root surface apical to the margin. A prime example would be for the supragingivally placed porcelain laminate veneers. Once the restorative margin reaches the free gingival margin, retraction is mandatory. Remember, the laboratory technician depends on tooth surface apical to the margin to create the proper emergence angle to the restoration. Without this critical information, most restorations will have improper cervical contours (overcontoured or undercontoured) leading to possible periodontal sequelae.
The “no-cord” impression technique is only indicated for supragingival margins where there is clearly tooth/root surface apical to the margin.
Conclusion: 100% or 0%
There is no “almost” in taking the perfect master impression. Control of the gingival tissues through precise provisionalization and proper retraction management will ensure repeatable excellence in this most critical step of dental reconstruction.
If you would like to contact Dr. Robert Lowe, call 704-364-4711, visit destinationsmile.com, or email boblowedds@aol.com.