
In this issue:
Common Problems with Digital Impressions — and How to Avoid Them
Author

With the increasing popularity of digital impressions, it’s important for the dental laboratory to develop an efficient and accurate method for placing data into production. At Glidewell, the Centralized Design Order Processing (CDOP) team was created to validate the quality of each scan you submit prior to sending it on for digital fabrication of the restoration. The CDOP team relays any issues with the submitted scan to the Customer Service team, which then works with you to make alterations or adjustments so that the quality of the restoration is not compromised.
Because Glidewell successfully processes more digital impressions than any other lab, I decided to examine the data from our CDOP team to determine the most prevalent issues they see that would warrant a call to your office, and how to avoid this disruption in your day by solving the problem before it happens.
Below are the three most common digital impression problems seen by the Glidewell CDOP team. For each problem, I’ll explain how to recognize it, identify what most likely caused it, and offer tips and techniques for avoiding it.
ISSUE NO. 1: MISSING SCAN INFORMATION
What It Looks Like
When viewed on the monitor, areas of the impression will be visibly absent. In most cases, this issue requires the doctor to rescan the patient and send in new files, as any interpolation made by the lab is very likely to affect the fit.
How It Happens
This one wins the award for “occurs most often” by a landslide. Whether you’re new to intraoral scanning or not, there are certain angles you’re required to achieve with the scanner wand inside the patient’s mouth that are always going to be difficult. The most commonly missing areas of digital scans are the mesial and distal surfaces of teeth adjacent to the preparation, which will create an issue in crafting a restoration with the proper contour and contacts. Keep in mind as you work that there are certain angles and distances from the teeth that will impact data acquisition as well.
How to Avoid It
As is the case with many tips and techniques, the key to superb digital impression scanning is to practice. The more you work with the scanner wand, the better you’ll be able to manipulate it in ways that are comfortable for both you and the patient, while still capturing the information you need.
Along with consistent effort, there are a few things you should double-check each time you perform a scan. Review the list below and get into the habit of running through each item mentally as part of your workflow until performing these checks becomes second nature:
- Make a visual inspection of your results. Some intraoral scanners have a data verification process built into the software, which will automatically highlight areas of a scan where information is missing. This is an excellent resource, but if your scanner doesn’t include one — or even if it does — it’s still important to make your own visual inspection on the screen. With practice, you’ll quickly learn to identify the “holes” in your work, which, ideally, will allow you to recognize where rescanning is needed while the patient is still in the chair.
- As mentioned, some areas of the dentition are just plain difficult to scan and may require some creative hand, wand and light positioning to capture. Once you’re able to identify those areas for yourself through practice, start building a repertoire of approaches to have in your back pocket for when those circumstances occur. Remember that holding the wand at a particular angle in a particular way might work beautifully for one patient, but not for the next one whose mouth is a different size entirely. Develop your own list of “holds,” set up your light source so that it’s easily repositioned as needed, and be willing to think on your feet and make adjustments as you go.
- Turn to your scanner’s manufacturer for resources if necessary. The majority of intraoral scanners available today feature not just basic user instructions, but also a certain amount of fairly in-depth user training. Many scanner suppliers are willing to offer everything from advanced training videos online to in-person instruction to help you perfect your skills.
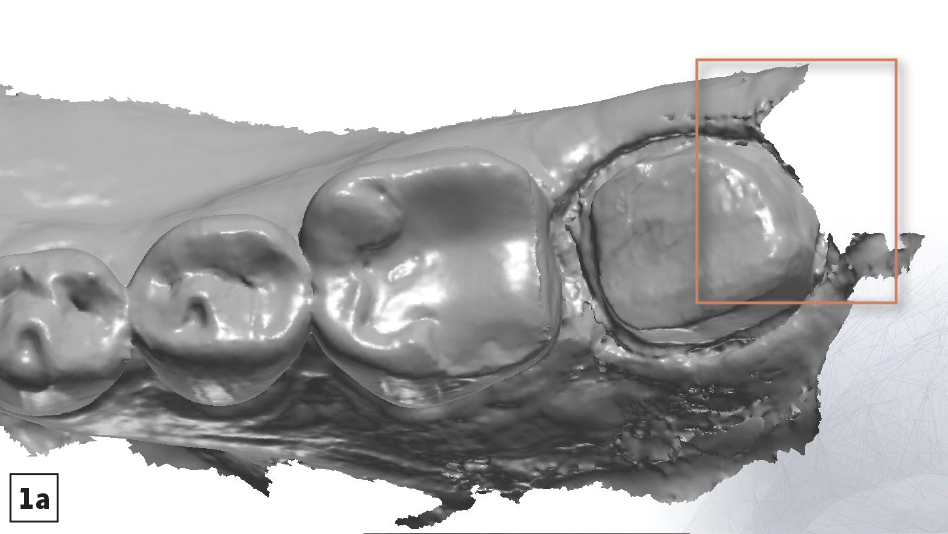
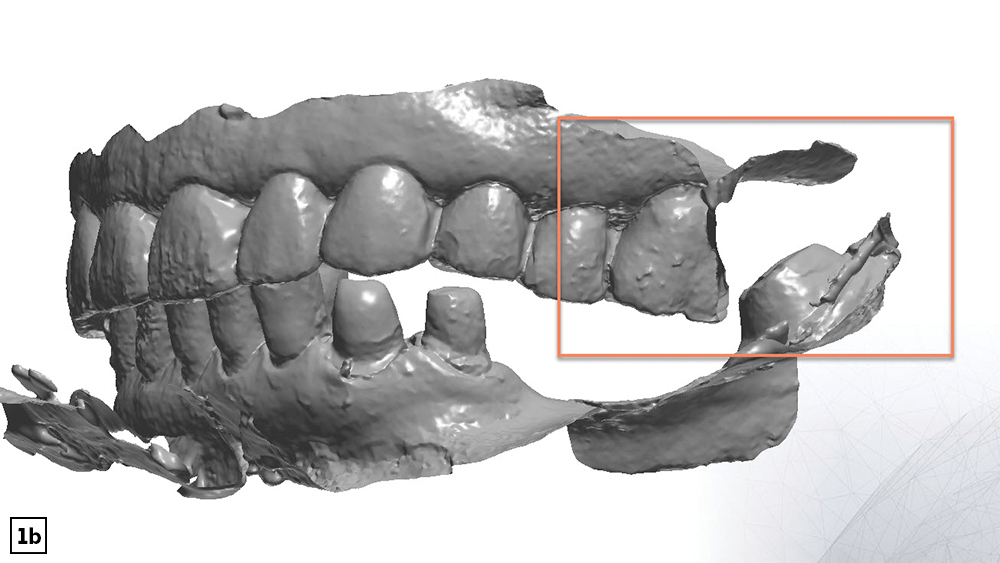
Figures 1a, 1b: Mesial and distal surfaces of teeth adjacent to the preparation are the most-often missed areas when scanning (1a). Any difficult-to-access areas, like the opposing teeth in a posterior bite (1b), should be checked to confirm they were fully captured for a complete and accurate impression.
ISSUE NO. 2: DISTORTION CAUSED BY MOISTURE
What It Looks Like
Areas of the impression will be visibly distorted or misshapen. When an intraoral scanner picks up anything that reflects back at it, such as saliva or other fluids, it can’t differentiate between that reflection and the rest of the image it’s capturing. The liquid reflections are worked right into the 3D model, leading to a model that relies on warped or rippled images. Depending on the viscosity and amount of liquid, it will either warp or entirely blot out the dentition beneath it, leading to models that don’t reflect reality or are missing information.
How It Happens
Moisture is left behind when the doctor doesn’t isolate the area well enough with cotton rolls, doesn’t suction fully, or doesn’t use tools such as dry angles to keep things moisture-free while scanning.
How to Avoid It
It’s all about preparing for the scan. Taking the time to remove moisture completely from the area is essential to getting a full and accurate 3D model, and it saves you time in the long run by eliminating the need for rescans. Here are a few more tips to keep in mind to help keep moisture and the resulting distortion from being a problem:
- Have the scanner ready on standby. Ensure the lens on the scanner’s wand is dry and free from smudges.
- Suction excess saliva while air-drying the field. Have the patient refrain from closing his or her mouth.
- Place cotton rolls in the lingual vestibules to help absorb moisture during mandibular scans. Cotton-roll material placed against the buccal mucosa can help control moisture during all scans.
- If packing cord, remove retraction cord while hydrated. Then, use gauze and air-syringe to dry the field again.
- If space allows and the patient can tolerate it, keep the saliva ejector in place as you scan.
Note: Some intraoral scanners require the use of spray powder. If this is the case with your scanner, remember that the teeth must be completely dry before the powder is sprayed onto them. Also note that over-powdering the teeth with the spray, or applying it in uneven layers, can lead to distorted scans, just as moisture can.
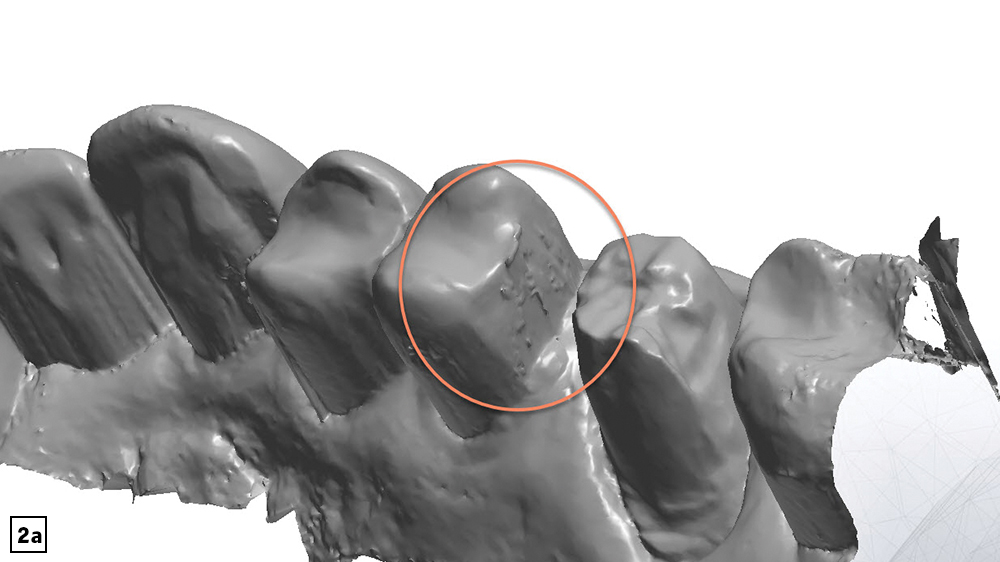
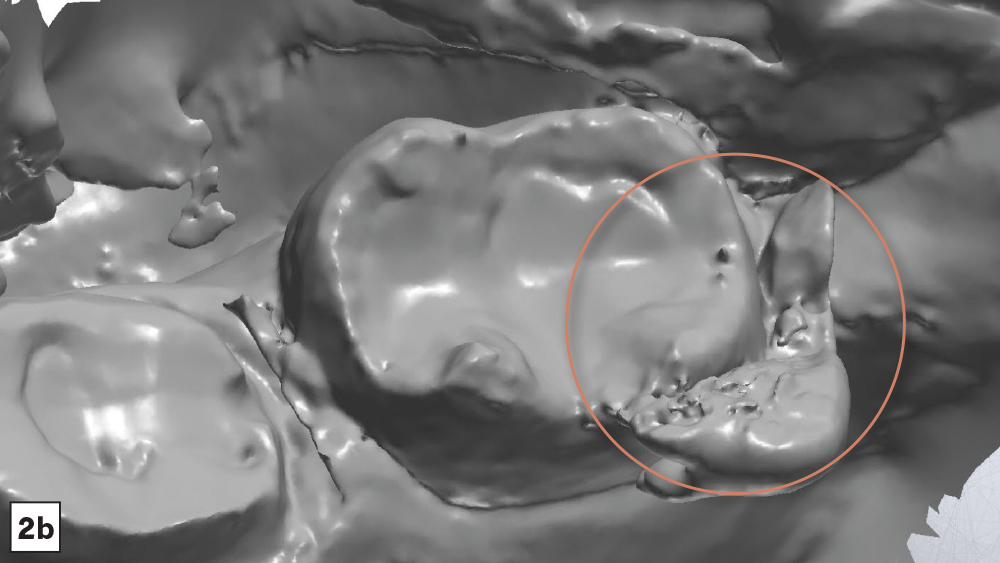
Figures 2a, 2b: When too much moisture is present during digital impressions, the intraoral scanner picks up the reflection of the liquid and treats it like part of the dentition. This results in errors ranging from misleading shapes and textures on the teeth (2a), to the presence of actual droplets in the 3D image that blot out the dentition you’re trying to capture (2b).
ISSUE NO. 3: MISALIGNMENT IN THE BITE SCAN
What It Looks Like
Inaccurate occlusion in the bite scan may sometimes result in an impression where the bite shows as being open or misaligned in a way that doesn’t match reality. You may also see artifacts that interfere with the image, or distortions that create misshapen teeth or inaccurate bite alignment.
Unfortunately, some errors that occur in the buccal scan may be difficult to detect at the impression phase, and may not actually reveal themselves until the restoration comes back with a bite that is too high and requires occlusal adjustment. This is why extra attention must be given to the scanning process when it comes to the buccal angle.
How It Happens
Typical protocol for taking digital impressions involves three main scans: the lower arch, the upper arch and the buccal view. Of the three, the buccal view is particularly prone to artifacts and interference due to the cheeks and tongue, which can cause interference, especially when the patient has a small mouth.
Digital impressions of the buccal are also prone to errors caused by an abnormal bite on the patient’s part.
How to Avoid It
Providing clear instructions to the patient, and doing several visual checks to ensure that the bite at the time of scanning is the same as natural occlusion, are skills you’ve likely developed while taking traditional impressions in the past. The same skills apply here. The good news is that digital impressions tend to make it easier for patients to comply, as it’s much easier to relax and hold a normal position without trays and impression material in the mouth.
- Before you begin to scan, establish the correct bite with the patient to allow for easier repositioning during the scan. Only activate the scanner once the patient’s bite has been verified, with the wand correctly positioned on the buccal.
- Once you’ve completed the bite scan to establish the patient’s occlusion, inspect the 3D model thoroughly from a buccal view to verify that the contact points and intercuspation match the patient’s true bite.
- Make sure to capture sufficient buccal data for the maxillary and mandibular scans, so that the software has more data points to align during the bite scan.
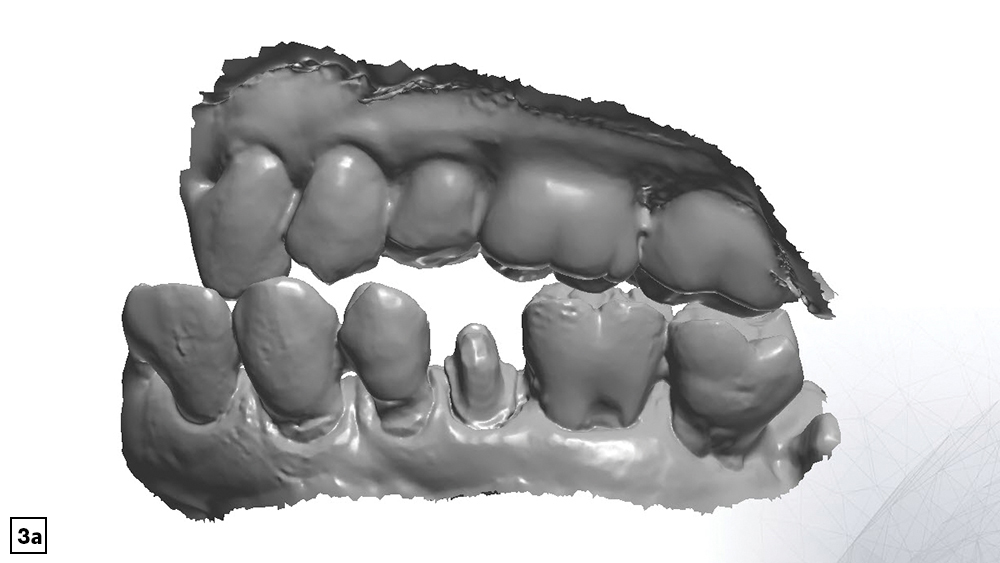
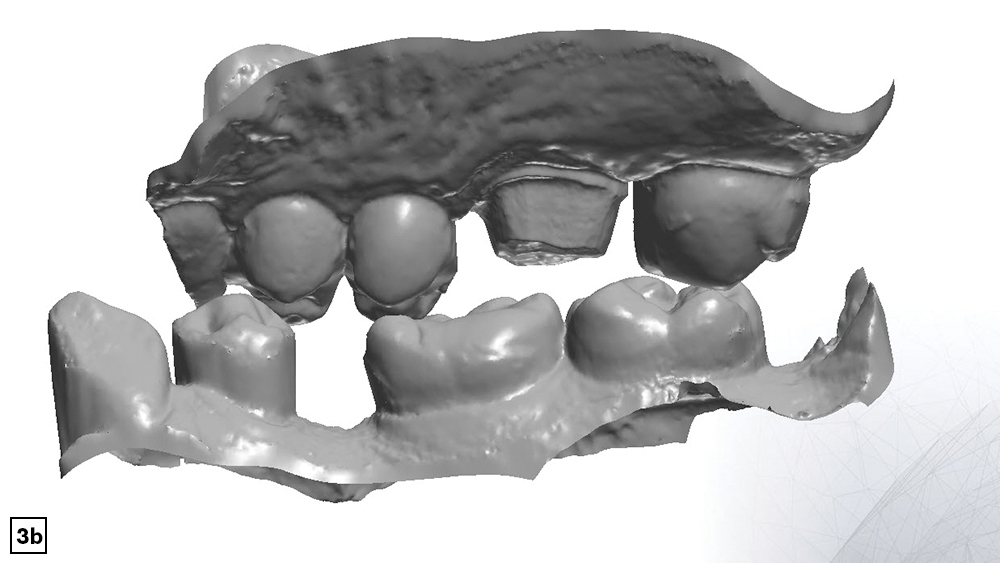
Figures 3a, 3b: An unnatural or abnormal bite on the patient’s part can result in an inaccurate buccal scan (3a). Interference from the cheeks and tongue can also lead to missing data, which results in an impression that may or may not match reality (3b). Both issues create misaligned buccal scans that can result in an improperly fitting restoration.
Once you’ve identified the areas where your scans have fallen short of ideal in the past and where you might benefit the most from these tips, it’s a simple matter of practicing them consistently until they become a natural part of your workflow. At that point you’ll find yourself quickly rewarded with increased accuracy, not only in your digital impressions, but also in the final restorations that rely upon them.