Identification and Correction of Common Impression Problems
Impression fabrication is the most critical and technique-sensitive step in the fabrication of fixed prosthetics. It can also be the most frustrating stage, both to the clinician and the laboratory technician. Clinicians must take care to identify and correct potential complications that will affect the prosthetics fabricated from the impressions. This article will address some common difficulties, address what factors may cause errors, and present methods to correct and avoid such complications.
Inadequate Margin Detail
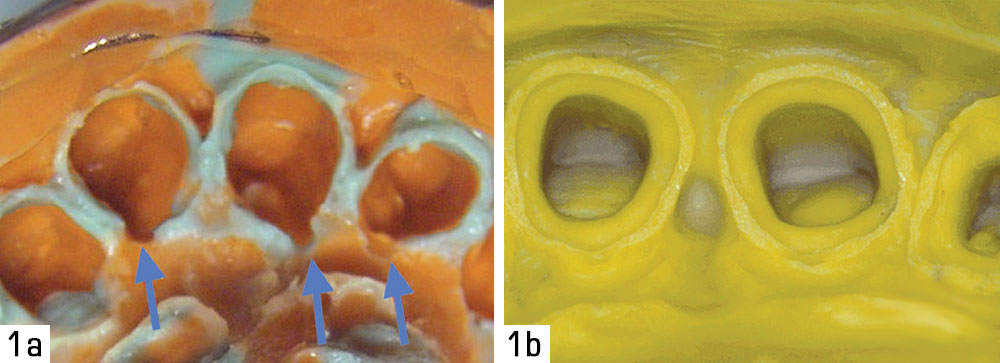
The primary complaint laboratory technicians have with the impressions they receive daily is inadequate marginal detail. Marginal detail is the most critical aspect of the impression. Failure to capture the true details of the margin of the preparation will result in open margins and inadequate prosthetic fit. Voids at the margins are the result of either insufficient retraction or fluid accumulation that prevented the impression material from flowing around the margin. This can be avoided by using improved retraction methods such as syringeable hemostatics (e.g., Retrac [Centrix; Shelton, Conn.]; Expasyl™1,2,3 [Kerr/Sybron; Orange, Calif.]), bipolar tissue management (Synergetics USA; King of Prussia, Pa.), or Comprecaps (Coltène/Whaledent; Cuyahoga Falls, Ohio) (Fig. 1).
Internal Bubbles
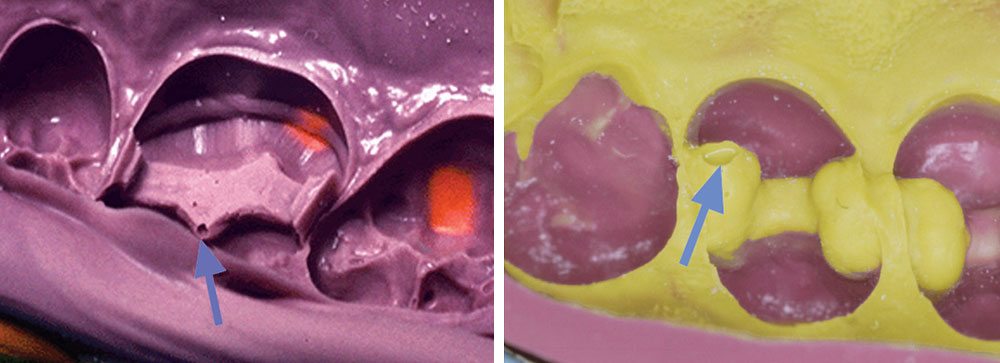
Internal bubbles occur as a result of either fluid accumulation (when larger and less sharp in definition) or air entrapment (when small and well defined) (Fig. 2). Bubbles on the margins of the preparations can negatively affect the fit of the prosthetics. If the bubbles occur on the internal line angles of inlay and onlay preparations due to fluid accumulation, a substandard fit will be developed. If they occur due to air entrapment, fit will not be compromised.
Bubbles that occur as a result of fluid accumulation may be large enough to affect the long-term success of the luting agent, which must now fill a wider space. The prosthetic material may also be thinner than recommended. This can be more critical when using all-ceramic materials, as they require minimum thicknesses to perform as expected. Use of a wash impression is difficult in a completed inlay/onlay impression, as complete seating can be complicated and lead to either a “stepped” or distorted impression. In these cases, it is more prudent to take a new impression and be assured of accurate detail capture. While the cause of large, internal, ill-defined areas in these preparations is usually fluid accumulation, air entrapment may also be a factor in narrow, deep preparations. These errors may be avoided by thorough flushing and drying of the preparation prior to impression taking. Placing a curved intraoral impression tip into the deepest part of the preparation floor and extruding a light body polyvinylsiloxane (PVS) material — making sure to keep the tip in the material as it’s expressed — will force air out of the preparation, decreasing entrapment.
If an air bubble remains on the cast after the impression is poured, a corresponding void will be created in the prosthetic material. This should not interfere with seating of the restoration and will be filled with the luting agent. These spots can often prevent complete seating when removed from the cast prior to restoration fabrication. Identification of premature internal contacts can be performed with paint on occlusion indicator liquids (e.g., AccuFilm® IV [Parkell, Inc.; Edgewood, N.Y.]; Arti-Spot® [Bausch; Nashua, N.H.]). The laboratory can block out around these tiny internal bubbles prior to fabrication to decrease chair time.
Marginal Tears
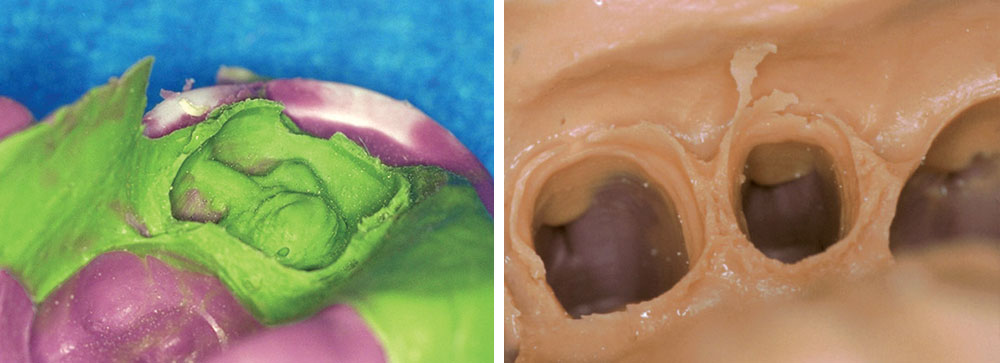
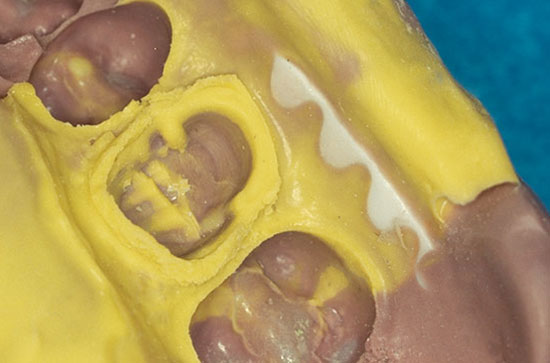
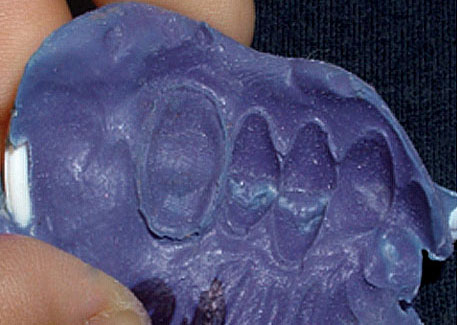
Marginal tears usually occur when a syringeable material with insufficient tear strength is used (Fig. 3). Tear strength will vary between manufacturer and viscosities. These deformities can result when using a syringeable PVS in a thin deep sulcus. Removal of the impression prior to complete setting of the syringeable material may also cause marginal tearing.
Prior to retaking the impression, any remnants of the original impression material must be removed from the sulcus. Additional tissue retraction may be indicated to facilitate use of a thicker syringeable material. Switching to a more viscous syringeable material may further prevent development of another tear. Syringeable hemostatic materials can be used to limit the amount of fluid evident in the treatment area, and the patient can be instructed to occlude into a cotton device for several minutes, thereby physically pushing the tissue away from the tooth and forcing the chemostatic deeper into the tissues.4,5
Drags and Pulls
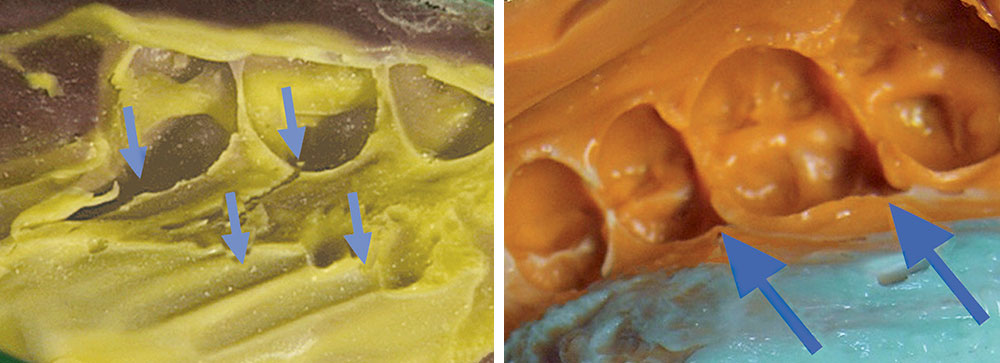
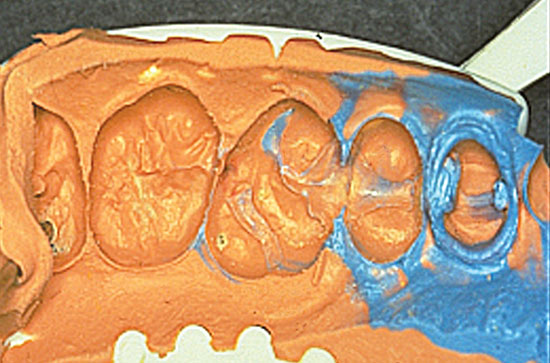
A common complication encountered when using more viscous impression materials (e.g., putty or heavy body materials) is drags and pulls. A drag results when long, rounded depressions that resemble the cuspal edges of the teeth are left in the impression material upon insertion of the tray (Fig. 4). Whereas, a pull (also referred to as a fold) results when the material creates a fold in the material, usually at the gingival aspect (Fig. 4). These deformities can both result from:
- Teeth rebounding off the tray and sliding into position.
- Impression material beyond its working time (no longer in its most fluid state).
- Failure of the impression material to adapt to the teeth.
- Exceeding working time of the material prior to intraoral insertion.
- Insertion of the tray in one motion.
Drags and pulls can be avoided by using a less viscous material either syringed around the teeth or placed over the more viscous material in the tray prior to insertion. Correction of a pull in the impression can be accomplished by removal of the interproximal impression material so the impression can be reinserted without interference. A syringeable impression material (light or extralight) should be placed over the entire impression, and the depressions should be filled. The impression can then be reinserted intraorally. Drags, on the other hand, often are not correctable by adding additional material, as they may have caused distortion of the tray. Avoiding contact between the tray and the teeth will help avoid these deformations.
Tray Selection
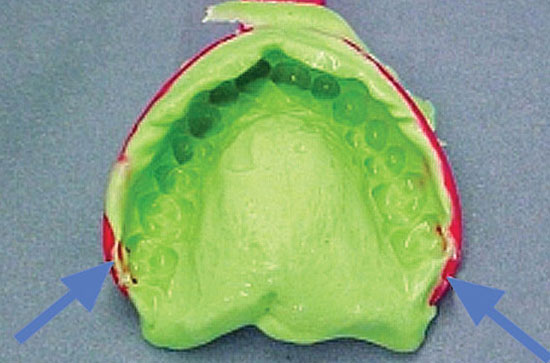
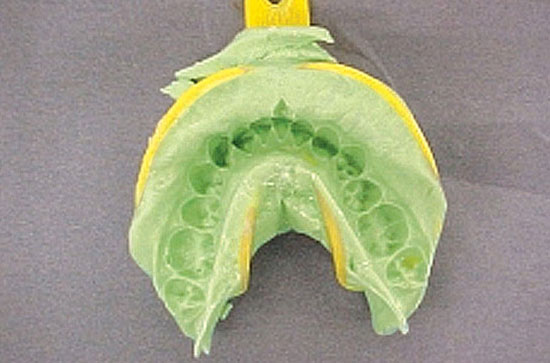
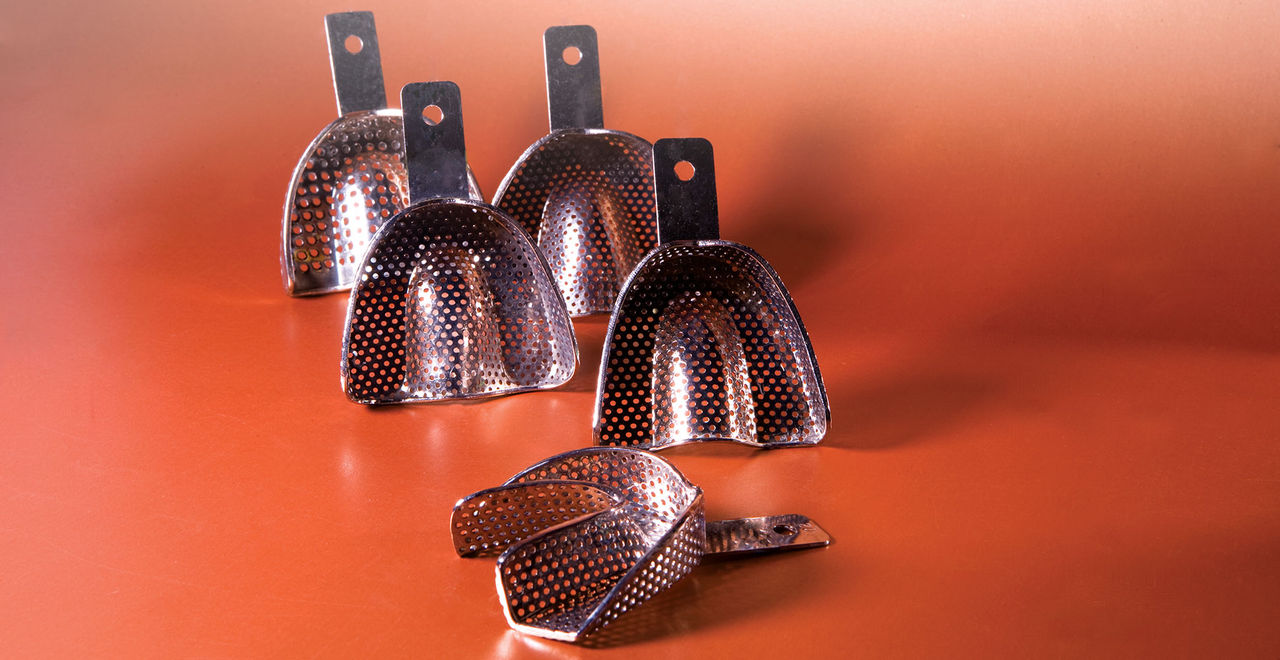
Tray selection is important to capture the needed area without distortion and provide the needed details.6,7 The tray, either a dual arch tray (also known as a bite impression tray) or stock single arch tray, should be large enough to encompass all the teeth without contacting the soft tissue (Fig. 5). The completed impression should not demonstrate any show-through of the tray. Show-through indicates that the tray used was either positioned improperly or the tray was too small (Fig. 6).
When using stock full arch trays, it is important to select a tray that is long enough to capture the entire arch from the hamular notches or retromolar pads to the most anterior aspect of the buccal vestibule. In addition, the width of the selected tray is also important. A tray that is too narrow may prevent adequate seating of the tray leading to missing of needed arch detail (Fig. 7). Stock trays are provided in basic sizes that may not fit all patients seen in the practice. Metal trays may be bent to widen them in the posterior, but modifications to the anterior of the tray can be difficult. Plastic stock trays are easier to modify. An alcohol torch may be used to heat the plastic tray and the flanges readapted to fit the specific patient. Different companies provide different arch shapes, and it may be advisable to stock several different brands of each size tray.
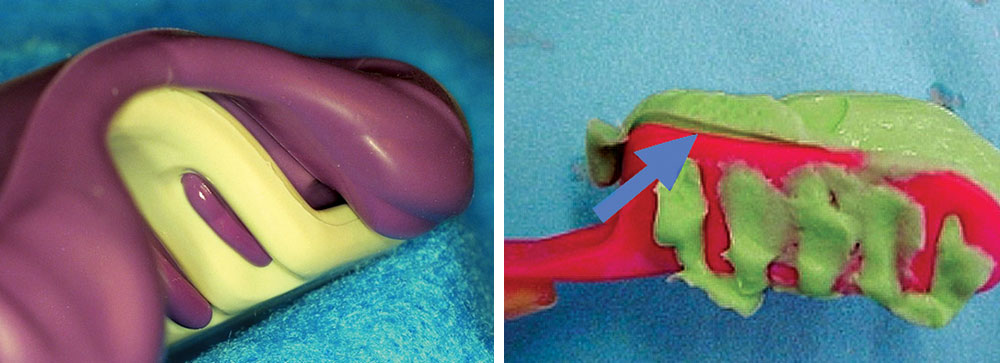
When using quadrant or dual arch trays, it is important to capture at least one full tooth (or the equivalent space) both mesial and distal to the tooth to be restored. Failure to provide this in the impression may make it difficult for the laboratory to properly mount the casts and achieve an accurate occlusion (Fig. 8).
Separation from the Tray
Separation of the impression material from the tray may not be obvious until the restoration is returned and tried in (Fig. 9). This deformity may be overlooked when using trays with slots and holes to lock the impression material. Tray adhesive should be used with all impressions to help eliminate impression separation from the tray.8 Roughen, create holes for mechanical retention, and clean the inner surface of tray with alcohol before applying adhesive. Each impression material’s chemistry is different, so it is advised that the clinician use the tray adhesive from the same manufacturer as their impression material. Allow the adhesive to dry prior to applying the impression material. The adhesive can be applied at the beginning of the appointment and will then be dry and ready when it is time to take the impression.
Tray Distortion
Trays can distort when they come in contact with the teeth or tissue. Distortion of the tray is more common with dual arch trays due to their more flexible nature as the patient occludes. This distortion can cause either a widened cast tooth when the impression material is stiff enough to resist spring back, or an elongated cast tooth if impression spring back does occur (Fig. 10). Proper selection of a tray that does not contact the teeth and is rigid enough to resist distortion is critical. When using triple trays, it is advisable to use a rigid setting PVS material (e.g., a bite registration material) as the bulk of the impression to provide a stable impression.9 Two-phase impressions can be used to create a custom format using the triple tray. The preliminary impression creates a rigid base that will provide hydraulic pressure to force the syringeable material in and around the preparations. Trimming the interproximal material from the preliminary impression can aid in seating the wash impression.
Inadequate Syringe Material
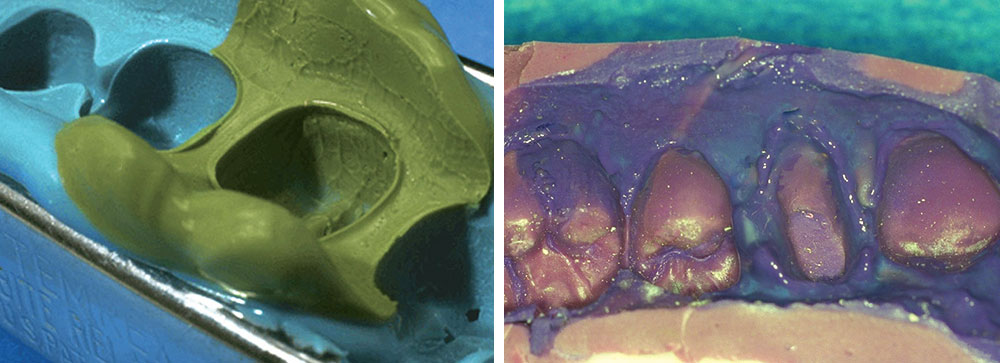
A “stepped” impression may result when using a two-phase impression technique and insufficient syringeable material has been placed (Fig. 11). The result is restorations that require excessive occlusal adjustments. This can be avoided by filling the entire set tray material where the teeth depressions are with syringeable material, to provide a uniform impression.
Dual Arch Trays
Dual arch trays work well for fixed prosthetic applications, as long as the patient has holding contacts in the section of the arch to be restored. As indicated, it’s important that at least one tooth mesial and distal to the prepared tooth be captured in the impression. Dual arch trays are available as posterior quadrant, anterior arch, ¾ arch and full arch versions.
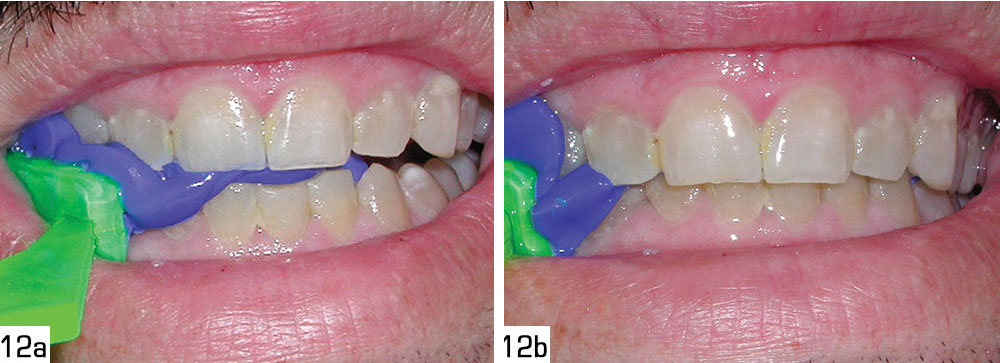
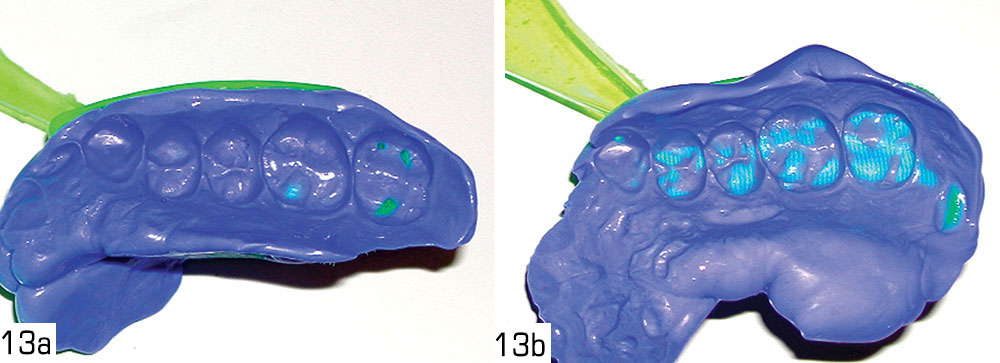
When the tray is inserted and the patient occludes, it is important that maximum intercuspation be observed on the adjacent side (Figs. 12a, 12b). When using anterior dual arch trays it is often difficult to determine if the patient has occluded fully, so a separate bite should be provided to the laboratory in a very stiff PVS material designed for occlusal records. Posterior and ¾ quadrant trays have a distal loop on the tray to stabilize the tray at insertion. It is critical that the patient not occlude on this loop, as this will lead to distortion of the tray and resulting spring back when the tray is removed (Figs. 13a, 13b).
Upon removal of the dual arch tray impression, the clinician should be able to see contacts through the material to the tray’s mesh where the teeth are intercuspated (Fig. 13). Holding the tray up to the light should reveal illumination at these contact points. An impression that was improperly occluded will show lack of occlusal shine-through and thicker material between the arches. If there is any chance that the laboratory cannot verify the occlusion, a separate bite should be taken with an appropriate PVS material and included with the case.
Surface Contamination
A less common problem can present as unset impression material on the surface of the set tray material. This presents as an unset tacky layer (Fig. 14). Exposure to air-inhibited methacrylates (e.g., composites, adhesives, core buildup materials, bis-acryl temporary crown and bridge materials) may leave a greasy coat on the prepared tooth that inhibits the material’s ability to set correctly. When using two-step impressions, failure of the syringeable material to adhere to the tray material may occur when the preliminary impression is utilized to fabricate the temporary prosthesis. Wiping down both the tooth and preliminary impression with alcohol to remove the greasy air-inhibited layer can prevent these issues.
The following may transfer sulfur to critical areas of the impression and cause inhibition of setting reaction of the marginal PVS material: retraction cords and solutions containing ferric sulfate or aluminum chloride; glove contact of the prepared teeth or surrounding tissues; rolling retraction cord in gloved fingers; or the use of a rubber dam. Rinsing the area with mouthwash or water after rubber dam removal and thoroughly drying can avoid this problem. Latex contamination of the putty can occur when mixing by hand. This may be avoided by washing the gloved hands to remove any residual powder and surface sulfides. Powder-free or vinyl gloves are an alternative to prevent putty contamination.
When a small area of unset material is noted in the final impression, but the remainder of the material has set properly, this may be the result of a failure to bleed the cartridge prior to expressing material from the auto mix tip. All new cartridges should be “bled” prior to use. It is a wise practice to express a small amount of base and catalyst prior to placement of an automix tip each time to ensure that both materials are flowing from the cartridge and have not set at the end of the cartridge.
Disinfection of the completed impression can be performed either prior to sending the impression to the laboratory or at the laboratory. Immersion of the impression in common disinfecting solutions (e.g., phenols and gluteraldehydes) for periods of up to 60 minutes has not shown clinically significant distortion of the impression material.10,11 However, overnight immersion is not recommended as this may result in a decrease in accuracy of the final cast.12
Inadequate Impression Material Mixing
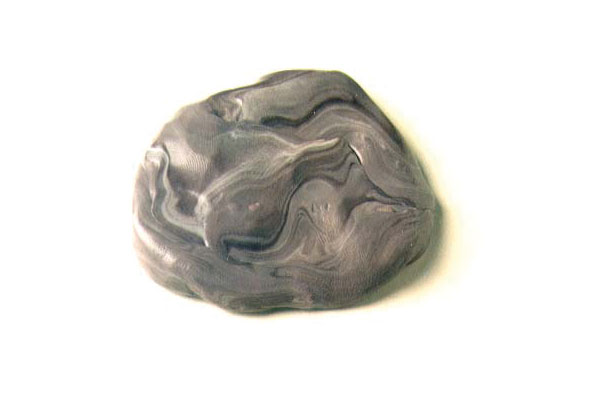
Once the impression material is combined, it should contain a uniform color with no streaking. Streaking is more common with hand mixed putty materials than with cartridge materials (Fig. 15). This may also occur if the automix cartridge is not bled prior to attaching the mixing syringe. When hand mixing putty, the material should be kneaded quickly to keep within the working time and yield a uniform color when completed.
Cast Discrepancies
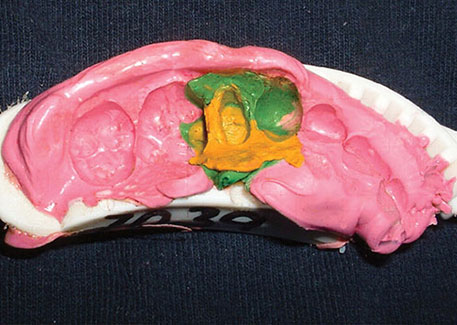
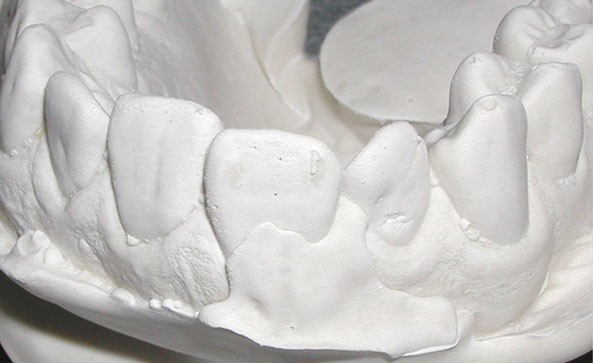
Large bubbles on the cast will correspond to a defect in the impression material (Fig. 16). These bubbles are invariably caused by an insufficient amount of impression material or air trapped between the impression material and the arch at tray insertion. These defects can be avoided by syringing material around the teeth and into the vestibule prior to tray insertion. In patients with deep palates, it is also advisable to place some impression material into the depth of the palatal vault. Should the impression be removed and a void noted due to air entrapment, a wash impression can be used to fill the void. It is advisable that the interproximal material be removed from the impression to allow full seating and the entire tray be covered in the syringeable material to ensure a continuous impression with no “step” appearance.
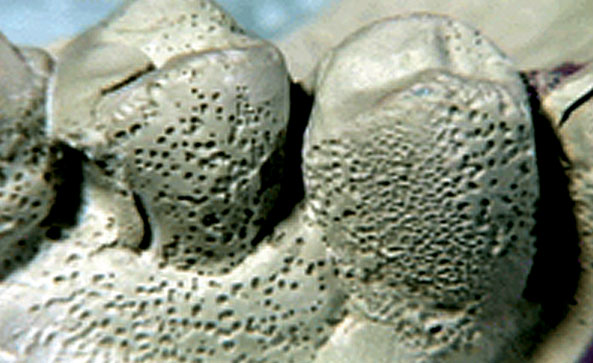
A cast that is covered with multiple tiny voids while the impression does not have corresponding defects can be the result of hydrogen gas release from the impression (Fig. 17). Hydrogen is a by-product of PVS polymerization. Should the cast present with this defect, if the impression is still intact it can be re-poured. This defect can be avoided by following the manufacturer’s recommendation with regard to the duration that should be observed prior to pouring the cast.
Conclusion
Complications during the impression process can be perplexing to both the dentist and laboratory technician. Some of the more common concerns include tearing, voids, bubbles, and tray contact. This article addressed solutions for correction of some of the most prevalent impression defects experienced in clinical practice. By taking the necessary precautions to avoid damaged impressions, clinicians can ensure improved accuracy in communication of critical parameters as well as an overall improvement in restorative fit.
To contact Dr. Gregori Kurtzman, call 301-598-3500 or email dr_kurtzman@maryland-implants.com. Contact Dr. Howard Strassler at HStrassler@umaryland.edu.
Acknowledgments: The authors mention their gratitude to Gary Hult, 3M™ ESPE™, St. Paul, MN; Christopher Gross, DENTSPLY Caulk, Milford, DE; Maribelle Velasco, Kerr/Sybron, Orange, CA; Dr. Mark Patel and Linda Bellisario, Heraeus Kulzer, Armonk, NY; and, Mark Mumme, RDT, Falcon Dental Laboratories, for providing the images that accompanied this article. The authors declare no financial interest in any of the products cited herein.
This article was originally published in Pract Proced Aesthet Dent. 2004 Jun;16(5):377-82.
References
- ^ Shannon A. Expanded clinical uses of a novel tissue-retraction material. Compend Contin Educ Dent. 2002 Jan;23(1 Suppl):3-6.
- ^ Poss S. An innovative tissue-retraction material. Compend Contin Educ Dent. 2002 Jan;23(1 Suppl):13-7.
- ^ Pescatore C. A predictable gingival retraction system. Compend Contin Educ Dent. 2002 Jan;23(1 Suppl):7-12.
- ^ Hondrum SO. Tear and energy properties of three impression materials. Int J Prosthodont. 1994 Nov-Dec;7(6):517-21.
- ^ Chai J, Takahashi Y, Lautenschlager EP. Clinically relevant mechanical properties of elastomeric impression materials. Int J Prosthodont. 1998 May-Jun;11(3):219-23.
- ^ Brosky ME, Pesun IJ, Lowder PD, Delong R, Hodges JS. Laser digitization of casts to determine the effect of tray selection and cast formation technique on accuracy. J Prosthet Dent. 2002 Feb;87(2):204-9.
- ^ Thongthammachat S, Moore BK, Barco MT 2nd, Hovijitra S, Brown DT, Andres CJ. Dimensional accuracy of dental casts: influence of tray material, impression material, and time. J Prosthodont. 2002 Jun;11(2):98-108.
- ^ Giordano R 2nd. Issues in handling impression materials. Gen Dent. 2000 Nov-Dec;48(6):646-8.
- ^ Ceyhan JA, Johnson GH, Lepe X. The effect of tray selection, viscosity of impression material, and sequence of pour on the accuracy of dies made from dual-arch impressions. J Prosthet Dent. 2003 Aug;90(2):143-9.
- ^ Rios MP, Morgano SM, Stein RS, Rose L. Effects of chemical disinfectant solutions on the stability and accuracy of the dental impression complex. J Prosthet Dent. 1996 Oct;76(4):356-62.
- ^ Oda Y, Matsumoto T, Sumii T. Evaluation of dimensional stability of elastomeric impression materials during disinfection. Bull Tokyo Dent Coll. 1995 Feb;36(1):1-7.
- ^ Lepe X, Johnson GH. Accuracy of polyether and addition silicone after long-term immersion disinfection. J Prosthet Dent. 1997 Sep;78(3):245-9.

