In this issue:
Cosmetic Dentistry: The Anatomy of a Natural Smile
Author

As dental practitioners dedicated to enhancing smiles, we walk a fine line in trying to give our patients the results they desire. Even though they’re not happy with the current appearance of their smile, they don’t want their new teeth to look artificial. The good news is that we can give patients a beautiful, natural-looking smile by sticking to the fundamentals and designing a restoration that’s both simple and attractive.
When designing a smile, there are so many choices that even the most seasoned practitioner can become confused — not to mention the patient. Shorter lateral incisors? Pointy canines? Irregular incisal edges? Strong facial anatomy? Should you follow the “Golden Proportion”? Are you confused yet?
Dental education concentrates on the most intricate details. We must know exact measurements, formulas, and the specifics of everything we do and use. But smile design is about the overall appearance; it’s about delivering restorations that complement the entire face. This is not to say that the specifics of accurate diagnostic records, preparation design, smile symmetry, and restoration contours, contacts and margins do not need to be followed — they do. However, creating the most pleasing smile for the individual patient requires that we see the patient’s facial features as a whole.
When I look at all the smiles that I have created, I find that those that have generated the most happiness — and the most patient referrals — were not based on some complicated formula. People simply want beauty, and you can give that to them by adhering to these six basic smile design principles:
I. DIAGNOSTIC RECORDS
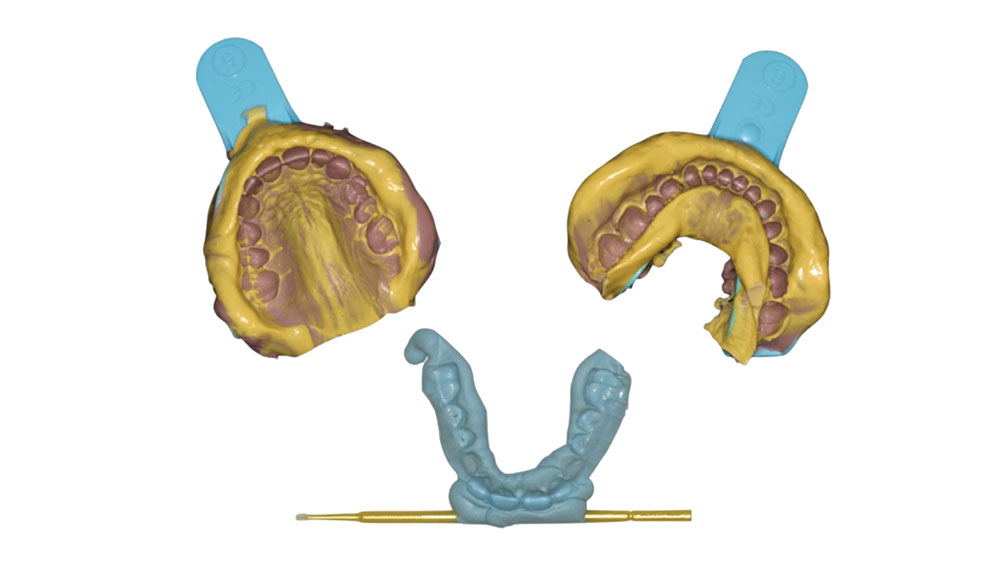
Figure 1: Producing accurate diagnostic records is imperative. I recommend using a medium-body VPS material for preliminary impressions. The Capture® Impression System (Glidewell Direct; Irvine, Calif.), available in light, medium and heavy viscosities, is an excellent option. When utilizing the proper technique, the material will remain dimensionally stable for up to two weeks. Also, this enables you to capture a very detailed impression, which the laboratory will appreciate.
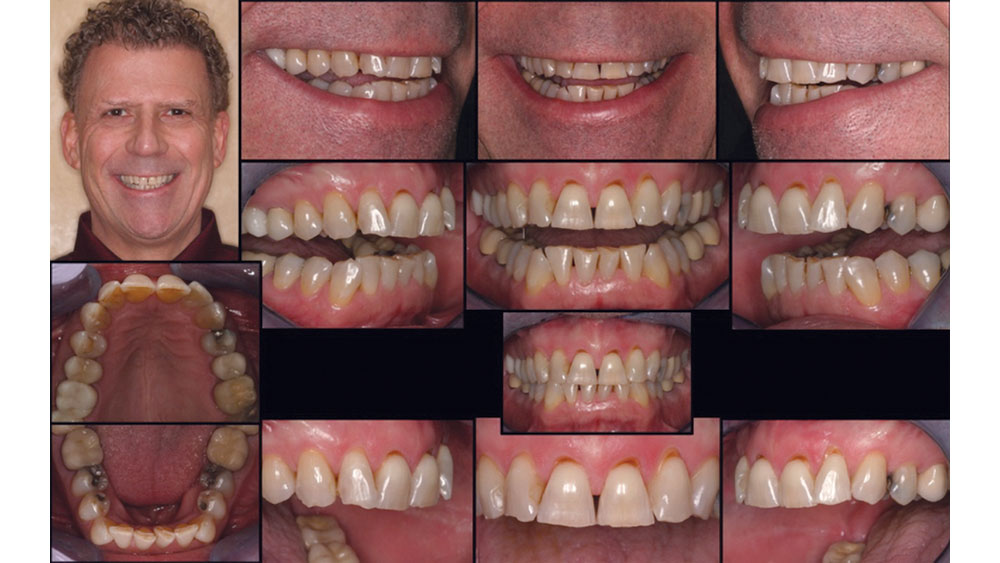
Figure 2: Another important part of diagnostics is photography, which is essential in taking an objective look at the teeth, lips and facial structure of the patient. Photography enables us to evaluate the patient’s dentition and smile long after they leave the office, and allows us to display our smile creations so patients know we are proud of our work. It’s a great communication tool to use with the patient and the laboratory. The best way to make this process seamless is to create a template of photographs to eliminate any uncertainty later. The photos above represent the template my staff follows.
II. MIDLINE
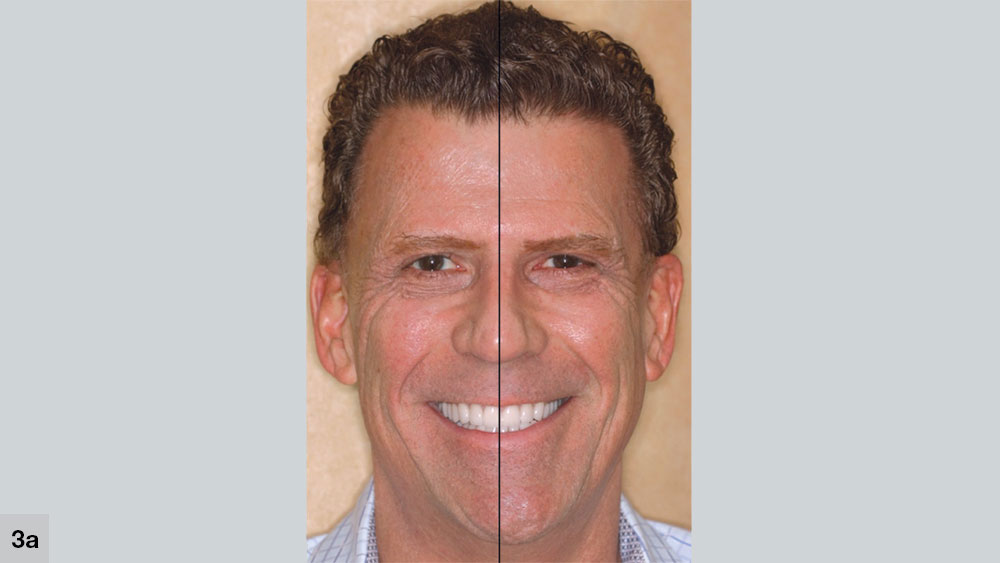

Figures 3a, 3b: The midline does not necessarily have to be in the middle of the face, which may be impossible in some cases. Rather, it should be parallel to the long axis of the face (3a). In situations where the midline is canted, the inconsistency of the center of the face and midline of the central incisors becomes readily noticeable. To create a pleasing smile in such cases, the midline does not align with the middle of the face (3b). Yet, this inconsistency is unnoticed because the midline parallels the long axis of the face.
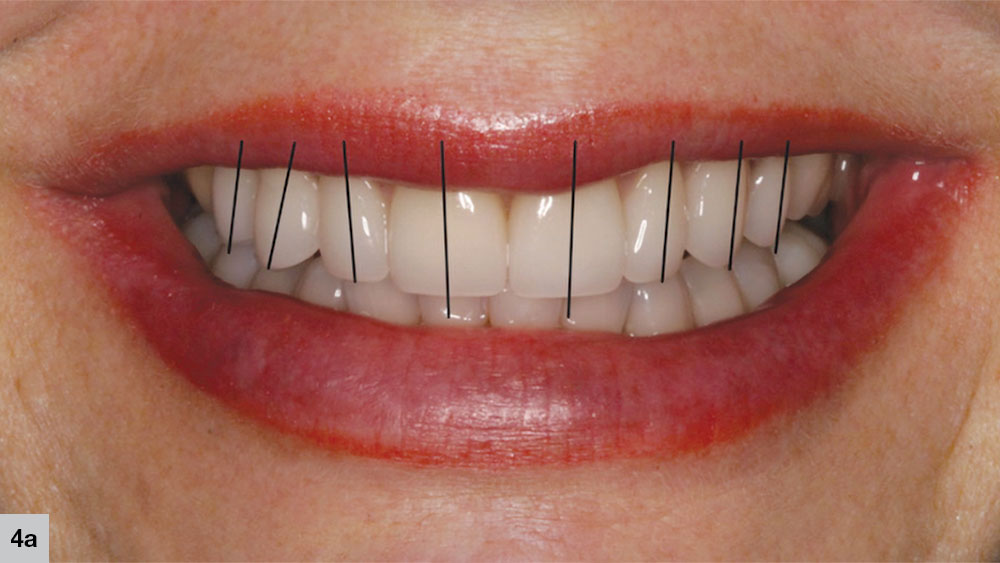
Figures 4a, 4b: One of the major issues to avoid when creating a smile is a distraction with any individual teeth that draw an undue amount of attention away from the overall esthetics you have created. Having the proper long-axis position of the teeth is crucial in this regard. A good rule to follow is that the teeth should all have a slight mesial cant toward the midline. In the first example, the teeth are tilted slightly toward the midline, except for the patient’s upper right first bicuspid and canine, drawing one’s attention to the teeth that are slightly out of position (4a). In the second example, the teeth all have a slight mesial cant toward the midline, and therefore, there are no distractions (4b).
III. MODIFICATION OF THE GOLDEN PROPORTION PRINCIPLE
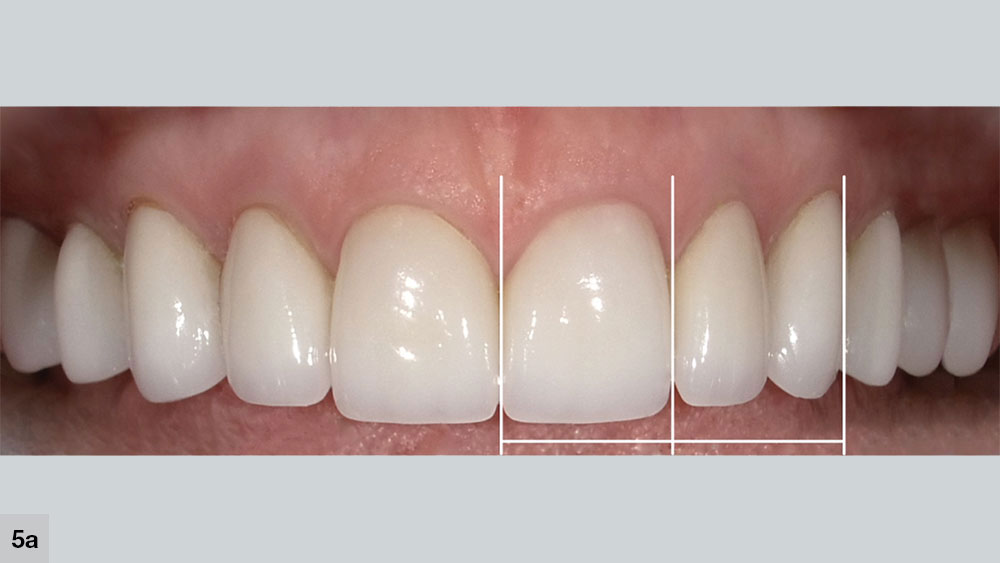
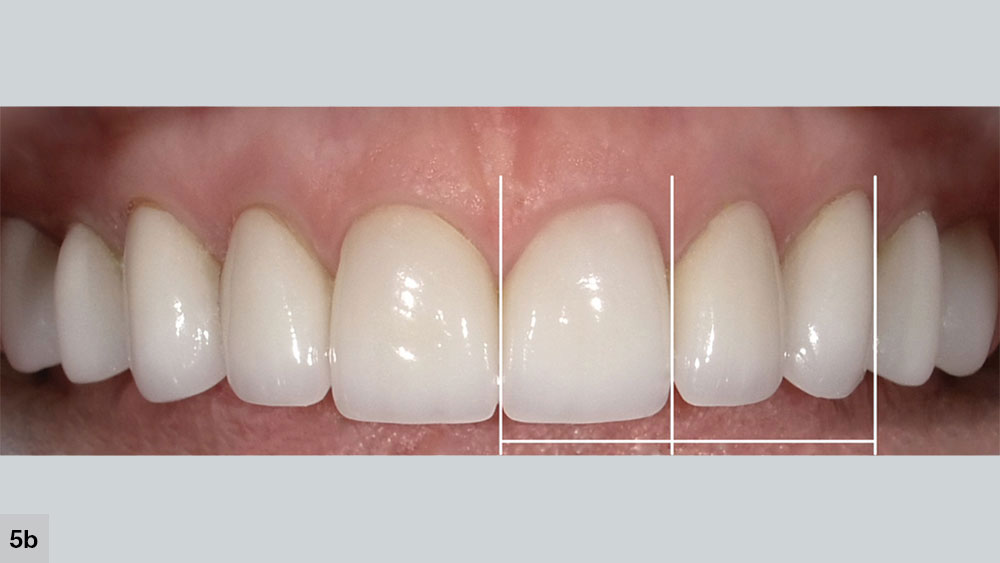
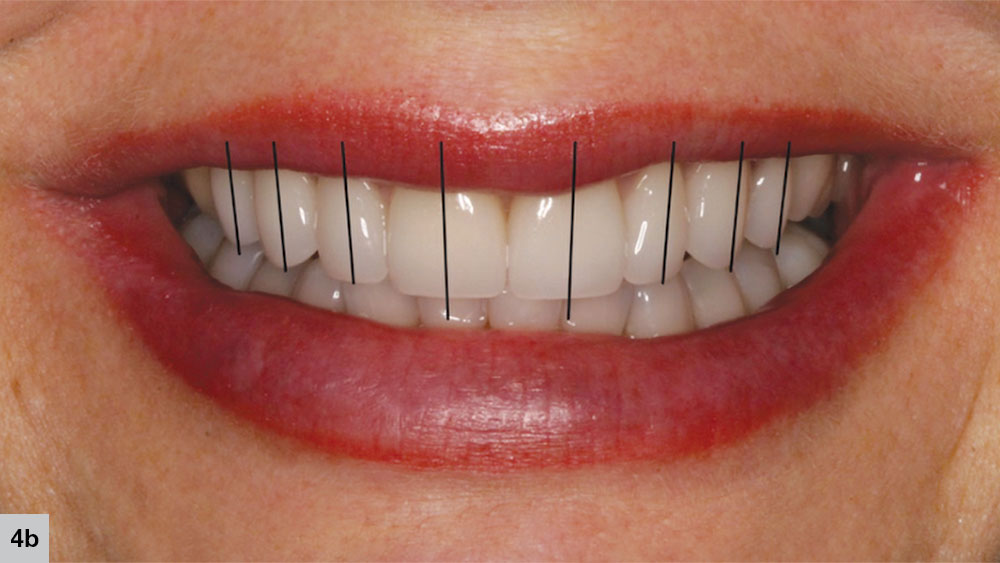
Figures 5a, 5b: The Golden Proportion principle says that the central incisor width should equal the combined width of the lateral incisor and canine when viewed from the front (5a). However, this is not quite as naturally beautiful as one would hope and can often create a more diminutive lateral incisor. Adjusting this proportion is usually the key to enhancing the smile. A slightly larger lateral incisor is more youthful, and that’s what our patients want. Altering this proportion so that the combined width of the lateral and canine is 15–20 percent wider than the central incisor is the key to natural, youthful smiles (5b). This will also eliminate the possibility of the central incisors attracting too much attention. Instead, they are simply the starting point to view the smile.
IV. SMILE SYMMETRY
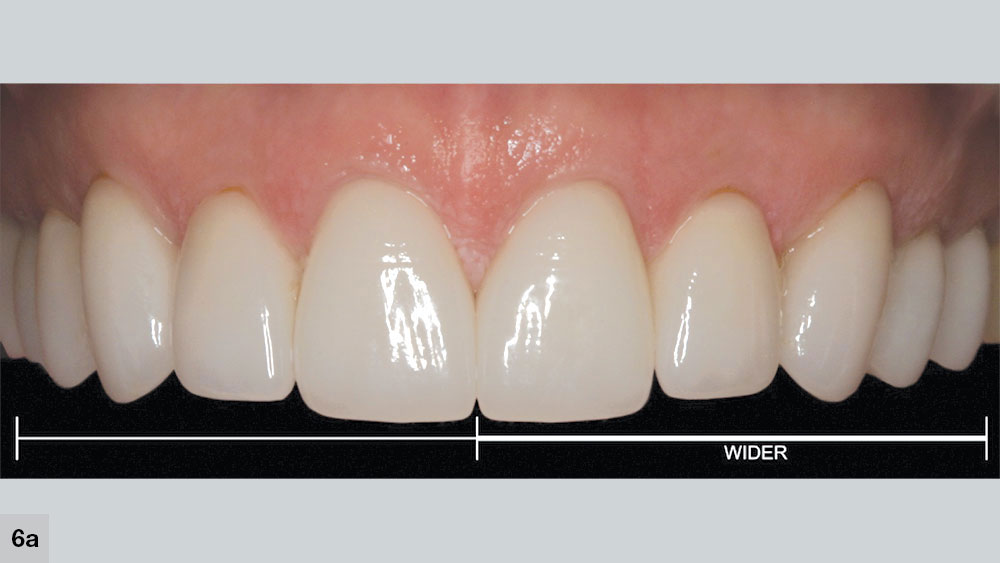
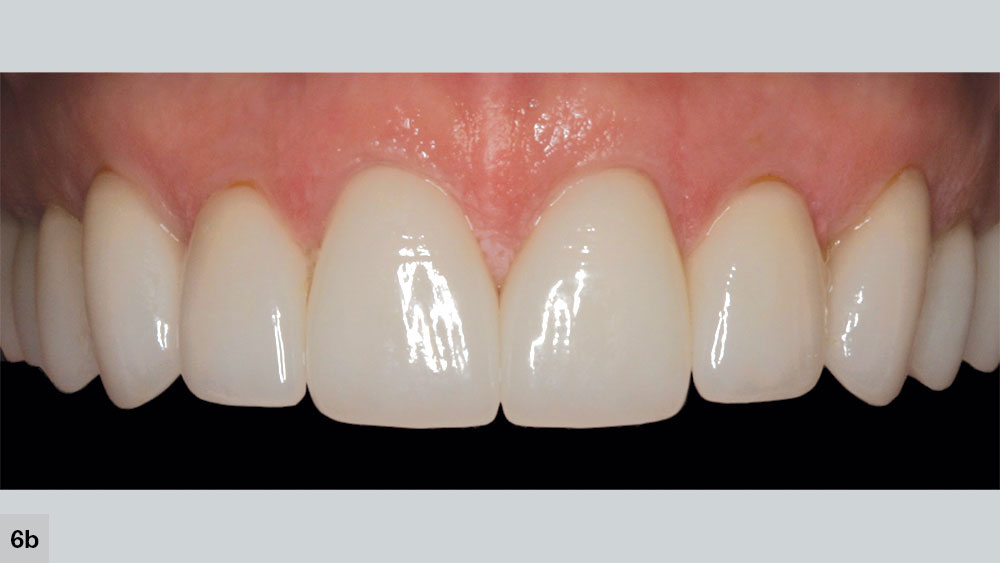
Figures 6a, 6b: Lack of symmetry with regard to tooth size harmony on both sides of the arch, specifically in the buccal corridor, can also serve as a distraction and detract from the beauty of the smile. In the first example, note how the patient’s left side is wider than the right, making the smile look unbalanced (6a). Instead, strive for balance on both sides of the buccal corridor, creating more harmony and less distraction (6b).
V. SMILE LINE AND USE OF THE LIPS
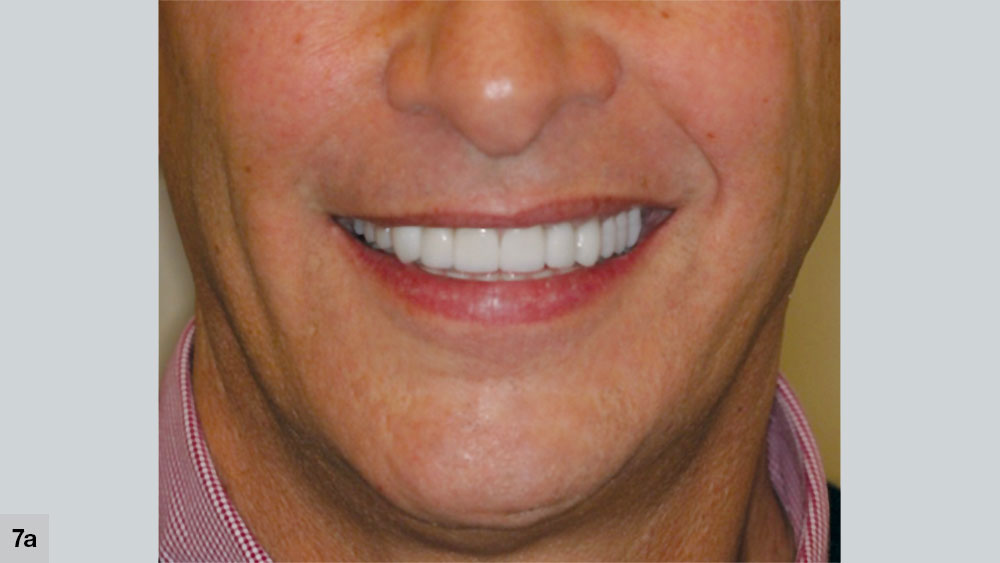
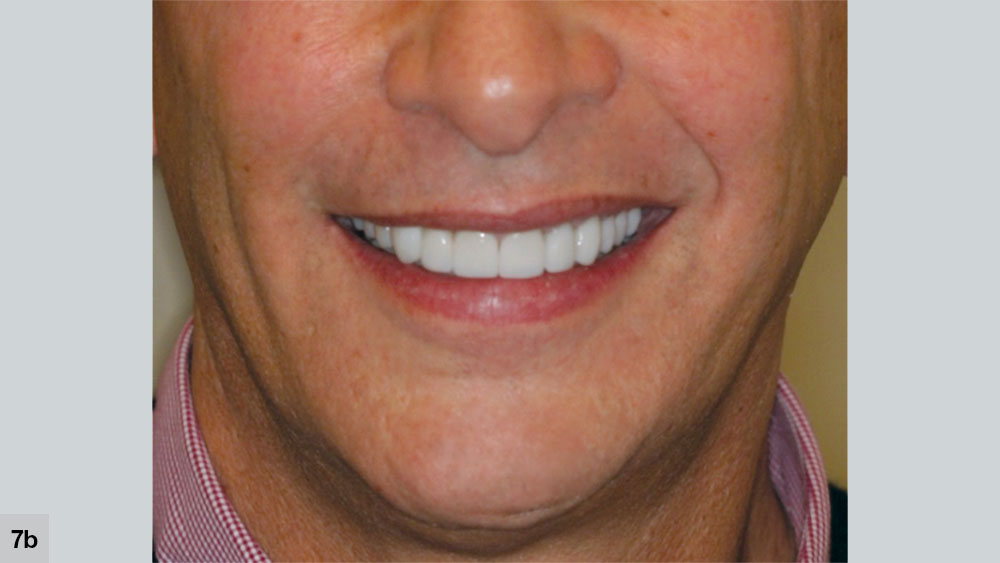
Figures 7a, 7b: We often overlook facial features when creating a smile because we are dentists, not plastic surgeons. Yet taking advantage of the lip contour will enhance the final result. If there is a nice bow, or curve, to the lower lip, it behooves the clinician to follow it as much as possible. If given a symmetrical curve in the lower lip, following this will help create a beautiful smile (7a). A smile that does not follow the lip contour isn’t as pleasant-looking (7b).
VI. FACIAL SURFACE ANATOMY AND INCISAL TRANSLUCENCY
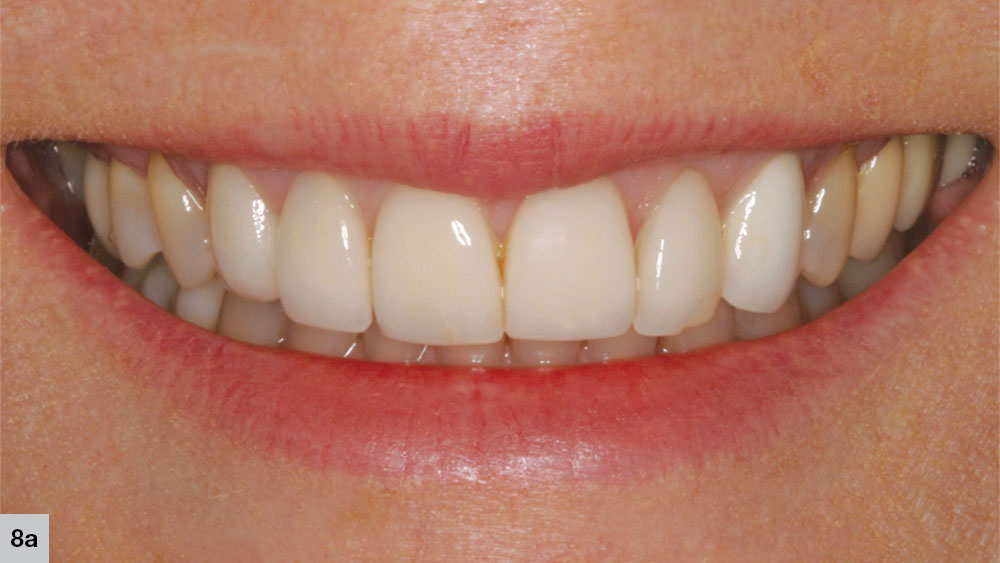
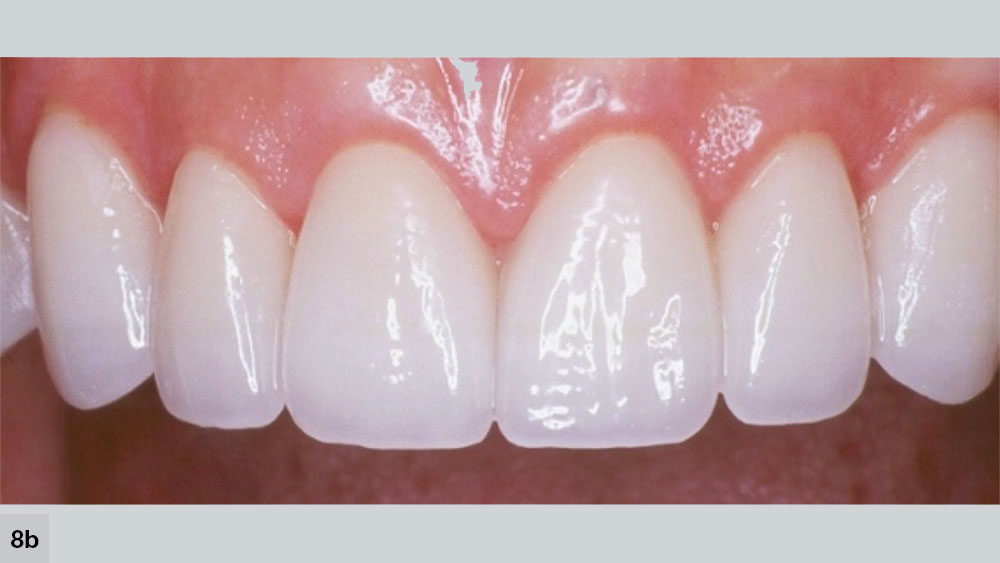
Figures 8a, 8b: Facial anatomy and incisal translucency should be present, but subtle. Regardless of color, teeth that are void of all facial anatomy do not reflect light well and appear fake, like the classic “Chiclet look” (8a). On the other hand, teeth with too much facial anatomy will feel “rough” or “unnatural” to the patient. Note how above, the patient’s upper left central incisor has too much anatomy and looks out of place next to the other ceramic restorations (8b).
Figures 8a, 8b: Facial anatomy and incisal translucency should be present, but subtle. Regardless of color, teeth that are void of all facial anatomy do not reflect light well and appear fake, like the classic “Chiclet look” (8a). On the other hand, teeth with too much facial anatomy will feel “rough” or “unnatural” to the patient. Note how above, the patient’s upper left central incisor has too much anatomy and looks out of place next to the other ceramic restorations (8b).
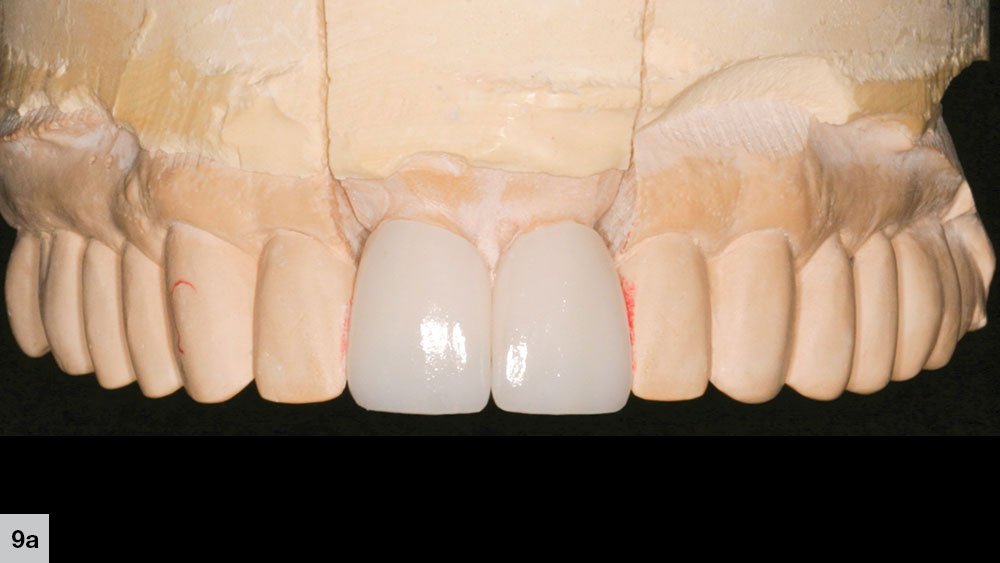
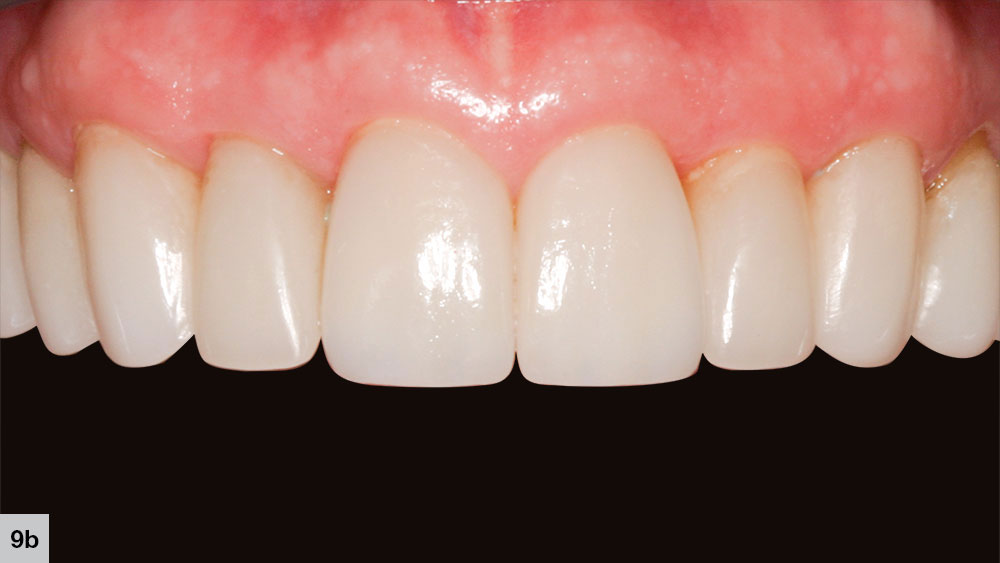
Figures 9a, 9b: Definitive mesial and distal lines are all that are needed to dictate the visual perception of the width and length of the tooth. Shown here are Obsidian® lithium silicate restorations that are contoured properly, providing a few distinguishing features such as line angles and subtle undulations on the facial to convey natural beauty.
Figures 9a, 9b: Definitive mesial and distal lines are all that are needed to dictate the visual perception of the width and length of the tooth. Shown here are Obsidian® lithium silicate restorations that are contoured properly, providing a few distinguishing features such as line angles and subtle undulations on the facial to convey natural beauty.
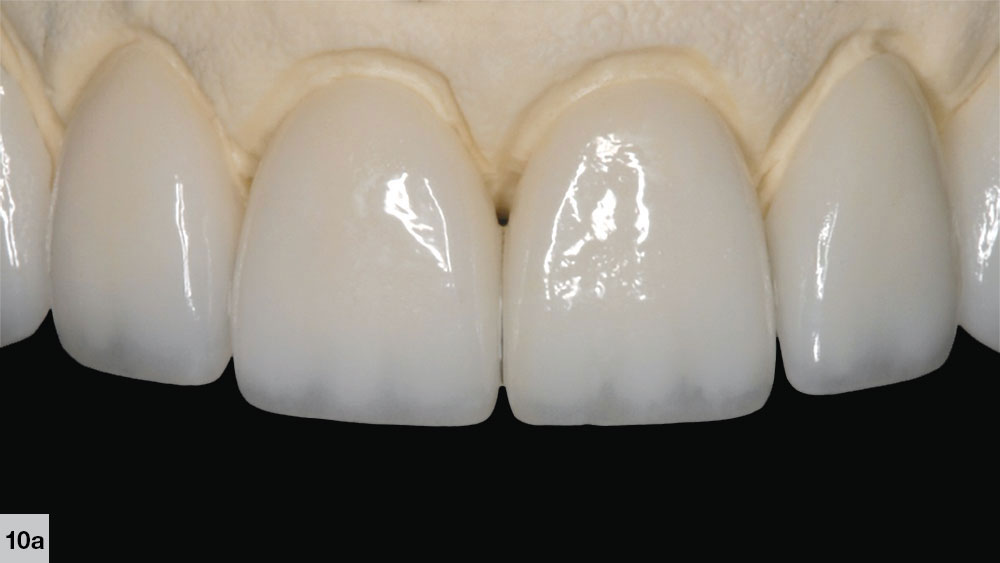
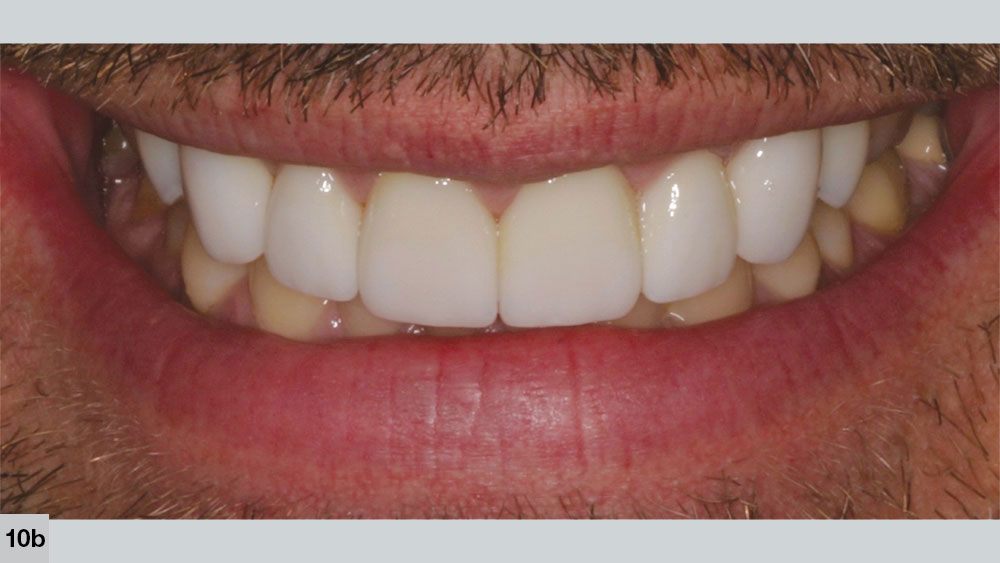
Figures 10a, 10b: Incisal translucency is a subtle characteristic that provides depth to the tooth. If overdone, the tooth looks fake and does not convey a natural look (10a). It is viewed by patients as a grey band on the edge of the teeth. However, a complete lack of incisal translucency looks artificial (10b).
Figures 10a, 10b: Incisal translucency is a subtle characteristic that provides depth to the tooth. If overdone, the tooth looks fake and does not convey a natural look (10a). It is viewed by patients as a grey band on the edge of the teeth. However, a complete lack of incisal translucency looks artificial (10b).
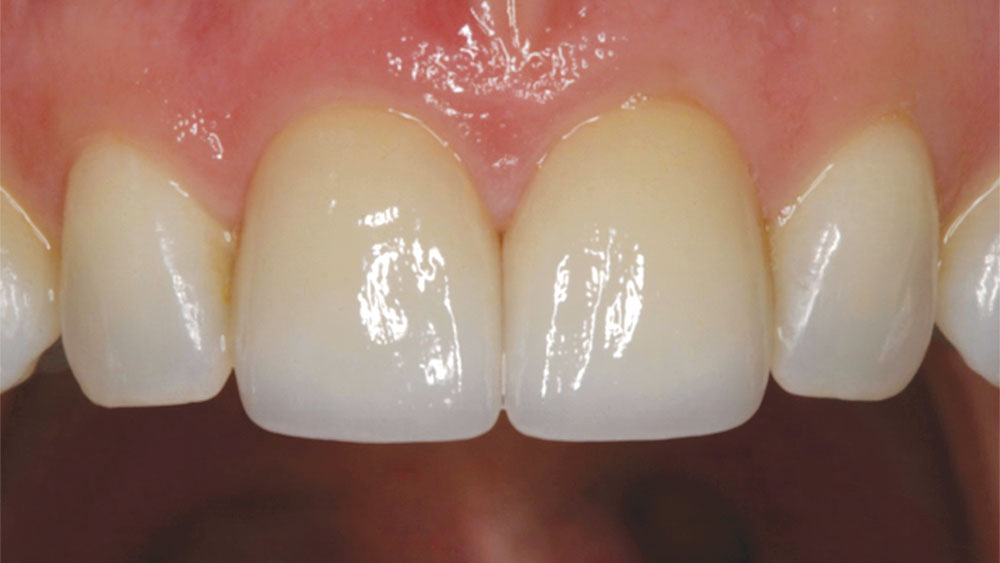
Figure 11: Subtle incisal anatomy and translucency work best. Note the slight irregularities that flow along the incisal edges of these restorations on teeth #8 & #9, resulting in lifelike esthetics that compare favorably with the neighboring dentition.
- 1
- 2
- 3
- 4
- 5
- 6
- 7
SIX BASIC PRINCIPLES OF SMILE DESIGN
- Produce accurate diagnostic records.
- Establish the midline parallel to the long axis of the face.
- Follow a modification of the Golden Proportion principle.
- Strive for smile symmetry with regard to tooth size.
- Use the lips to enhance the smile line when possible.
- Create subtle facial surface anatomy and incisal translucency.
CONCLUSION
Planning and executing a successful smile enhancement requires following some basic principles along with a comprehensive evaluation of the whole face. While every case requires its own unique approach, adhering to tried-and-true techniques in cosmetic dentistry will help give your patient a smile they are proud of.