Car Salesman Gets a New Grille

November 1, 2024
 image
Timothy F. Kosinski, DDS, MAGD
Car Salesman Gets a New Grille

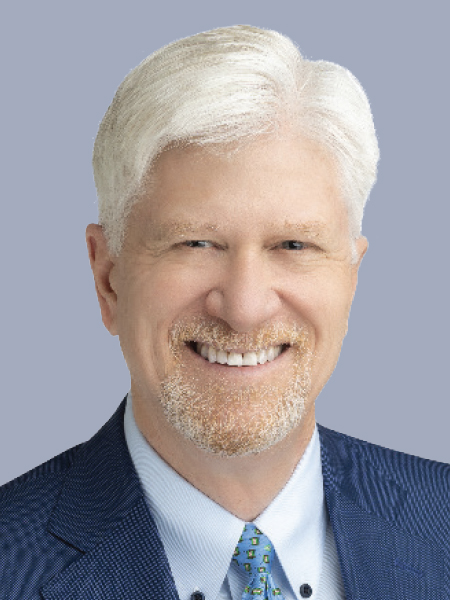
Sometimes a disappointing experience can prevent patients from pursuing treatment that they need and want. The patient in the following case study, a personable automobile sales professional, felt apprehensive about pursuing dental implant treatment after an unsatisfying consultation with another doctor several years earlier.

After he shared his story with me, we arranged a no-fee consultation so I could understand his expectations and provide the details he needed to make an informed decision. The process is not about closing a “sale” — our goal is to educate the patient about how we can meet their desires and address their health needs.

CASE REPORT

The desire for improved esthetics motivated the patient to seek consultation. A retracted view shows the patient’s anterior misalignment and malocclusion in the maxillary arch. CBCT analysis showed extensive periodontal bone loss that warranted extraction and implant reconstruction in the maxilla and posterior mandible.

Figures 1a, 1b: The desire for improved esthetics motivated the patient to seek consultation. A retracted view shows the patient’s anterior misalignment and malocclusion in the maxillary arch. CBCT analysis showed extensive periodontal bone loss that warranted extraction and implant reconstruction in the maxilla and posterior mandible.

After reviewing the patient’s health history and finding no contraindications to the treatment plan, the next step was evaluating the bone volume available to support the implants.
The case was planned preoperatively through the digital treatment planning (DTP) process, working with the DTP team at Glidewell.

Figures 2a, 2b: After reviewing the patient’s health history and finding no contraindications to the treatment plan, the next step was evaluating the bone volume available to support the implants.

The case was planned preoperatively through the digital treatment planning (DTP) process, working with the DTP team at Glidewell.  This method provides the ability to plan the case from extraction, bone reduction, and implant placement, all the way through to the provisional and final restorations. Through a series of stackable guides, each step is fully guided to ensure the safety of the patient and the most precise outcome.

The process is not about closing a “sale” — our goal is to educate the patient about how we can meet their desires and address their health needs.
I extracted the hopeless and compromised teeth, with minimal trauma in order to maintain the facial plate.

Figures 3a–3c: I extracted the hopeless and compromised teeth, with minimal trauma in order to maintain the facial plate.

First, I positioned the foundation guide. Using the bone reduction guide, excess bone was reduced in order to level the surface and provide 14–16 mm of interocclusal space for the restoration.

Figures 4a, 4b: First, I positioned the foundation guide. Using the bone reduction guide, excess bone was reduced in order to level the surface and provide 14–16 mm of interocclusal space for the restoration.

The osteotomy guide was then passively and completely seated, allowing for precise positioning of the implants.
Implant sites were created using the sequential drills in the Glidewell HT™ Implant Guided Surgery System (Glidewell Direct; Irvine, Calif.).
Each implant was placed at a torque of 25 Ncm. I then threaded 3-mm-tall healing abutments into place, according to the digital treatment plan provided by the team at Glidewell.

Figures 5a–5c: The osteotomy guide was then passively and completely seated, allowing for precise positioning of the implants. Implant sites were created using the sequential drills in the Glidewell HT Implant Guided Surgery System (Glidewell Direct; Irvine, Calif.). Each implant was placed at a torque of 25 Ncm. I then threaded 3-mm-tall healing abutments into place, according to the digital treatment plan provided by the team at Glidewell.

I used Newport Biologics™ allograft particulate (Glidewell Direct; Irvine, Calif.) to fill in facial defects and socket sites to prevent the invagination of epithelium.
We used a plateletrich fibrin membrane to promote healing and bone regeneration. I closed the flap with continuous REDISORB PRO® sutures (available through Glidewell Direct).

Figures 6a–6c: I used Newport Biologics allograft particulate (Glidewell Direct; Irvine, Calif.) to fill in facial defects and socket sites to prevent the invagination of epithelium.  We used a platelet-rich fibrin membrane to promote healing and bone regeneration. I closed the flap with continuous REDISORB PRO® sutures (available through Glidewell Direct).

After closing the site, I seated a 3D-printed immediate denture relined with Mucopren® reline material (Kettenbach; Huntington Beach, Calif.).

Figure 7: After closing the site, I seated a 3D-printed immediate denture relined with Mucopren® reline material (Kettenbach; Huntington Beach, Calif.). Although some of the patient’s mandibular teeth were extracted for eventual implant  treatment, a sufficient number of teeth remained to stabilize the occlusion, so no temporary solution was provided for the lower arch.

After a four-month period for healing and osseointegration, the tissue that healed over some of the implant sites was removed using a No. 8 round bur while ensuring maintenance of attached gingiva.

Figure 8: After a four-month period for healing and osseointegration, the tissue that healed over some of the implant sites was removed using a No. 8 round bur while ensuring maintenance of attached gingiva. I then threaded impression copings into place and made an initial implant-level impression using medium and heavy-body vinyl polysiloxane material. I then replaced the healing abutments and sent the patient home with the immediate denture.

Glidewell technicians chose the multi-unit abutments and angulations for ideal access-hole positioning with the final prosthesis.

Figure 9: Glidewell technicians chose the multi-unit abutments and angulations for ideal access-hole positioning with the final prosthesis.

The implant verification jig (IVJ) process helps ensure the accuracy of the master model. After luting the individual pieces of the IVJ together intraorally, I picked them up in the final impression. The provisional as well as the final full-arch BruxZir® Implant Prosthesis used this master cast for fabrication.

Figures 10a, 10b: The implant verification jig (IVJ) process helps ensure the accuracy of the master model. After luting the individual pieces of the IVJ together intraorally, I picked them up in the final impression.  The provisional as well as the final full-arch BruxZir® Implant Prosthesis used this master cast for fabrication.

A wax rim was tried in and adjusted to determine the appropriate vertical dimension. I then threaded multiunit abutment (MUA) healing caps over the MUAs for the patient’s comfort and added retention of the transitional complete denture.

Figures 11a, 11b: A wax rim was tried in and adjusted to determine the appropriate vertical dimension. I then threaded multi-unit abutment (MUA) healing caps over the MUAs for the patient’s comfort and added retention of the transitional complete denture.

Once the first denture setups were tried in over the multi-unit abutments and approved, a polymethyl methacrylate (PMMA) provisional was milled. I then inserted this prosthesis and verified esthetics and function.

Figures 12a–12c: Once the first denture setups were tried in over the multi-unit abutments and approved, a polymethyl methacrylate (PMMA) provisional was milled. I then inserted this prosthesis and verified esthetics and function.

No changes to the design were indicated, so the final BruxZir Implant Prosthesis was delivered during the next visit. Final adjustments were made, and the screw access holes were sealed with Teflon tape and composite.

Figure 13: No changes to the design were indicated, so the final BruxZir Implant Prosthesis was delivered during the next visit.  Final adjustments were made, and the screw access holes were sealed with Teflon tape and composite.

The patient was thrilled with the final result.

Figure 14: The patient was thrilled with the final result.

Pre- and postoperative photos show the successful result.
The full-arch implant restoration met the patient’s expectations for esthetics, form and function to improve his quality of life.

Figures 15a–15c: Pre- and postoperative photos show the successful result. The full-arch implant restoration met the patient’s expectations for esthetics, form and function to improve his quality of life.

CONCLUSION

Esthetics motivated the patient to pursue a full, upper implant reconstruction. However, the additional health benefits further validated his decision.

A thorough yet efficient process made the procedure possible and addressed any reservations the patient had due to past experiences. Emphasizing the many positives, without pressure — implants as a health and lifestyle choice as opposed to a product to be sold — helped the patient take this important step.