Socket Grafting and Implant Placement: A Simplified Approach (1 CEU)

November 28, 2023
 image
Timothy F. Kosinski, DDS, MAGD
Laboratory and Chairside Partnership for a Full-Mouth Restoration

Note: The Hahn Tapered Implant System is now known as the Glidewell HT Implant System

Bone grafting procedures are becoming commonplace in the general practice, whether for simple procedures like socket grafting or more complex ones like prosthetic reconstruction and implant placement. Fortunately, dentists today have access to bone grafting solutions that make socket grafting, ridge augmentation and peri-implant management simple and repeatable.

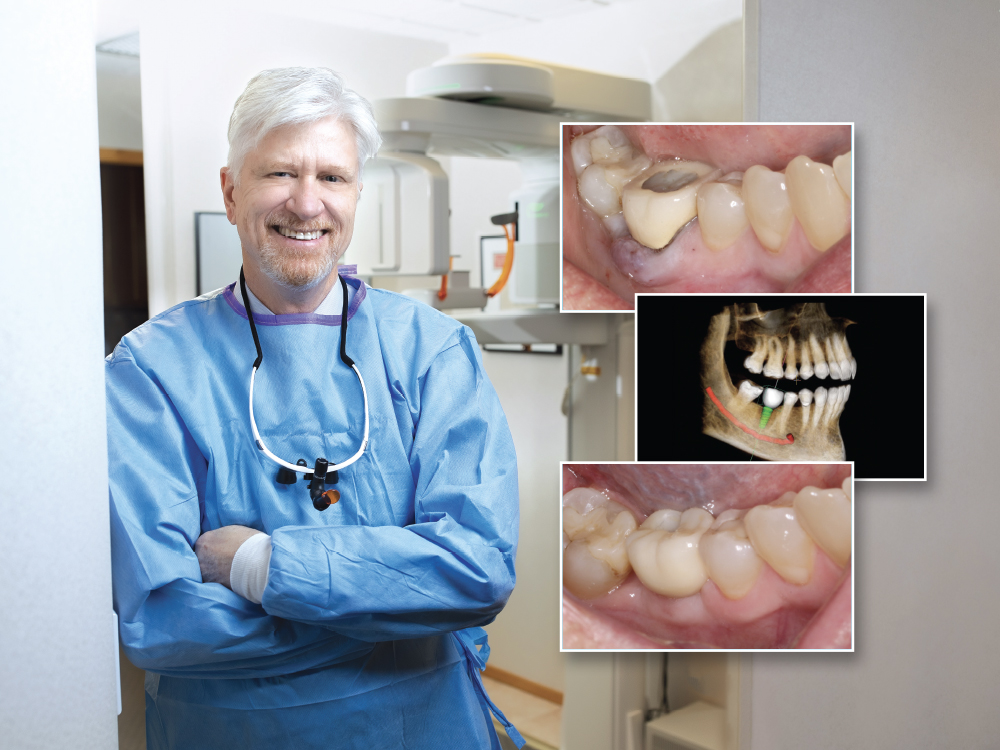
The patient in this case study presented with a failing, endodontically treated lower right first molar. At the time of tooth extraction, the clinician must decide whether to immediately place the implant or graft the site to ensure there will be adequate hard tissue for future implant placement. In this case, because I noted a defect in the facial wall of the socket, I determined that a grafting procedure and healing period were required prior to implant placement.

An OsteoGen® Plug (Glidewell Direct; Irvine, Calif.) was the material of choice for this socket grafting procedure due to its quality and predictability. The final restoration of the integrated implant was placed using a BruxZir® screw-retained crown fabricated by the team at Glidewell to support the optimal emergence profile.

At the time of tooth extraction, the clinician must decide whether to immediately place the implant or graft the site to ensure there will be adequate hard tissue for future implant placement.
Figure 1a
Figure 1b

Figures 1a, 1b: The patient presented with a non-restorable tooth #30 with a horizontal fracture that resulted in a significant abscess, necessitating extraction.

Figure 2a
Figure 2b

Figures 2a, 2b: Post-extraction, thorough curetting of the socket site was conducted, which resulted in the removal of a large granulomatous mass.

Figure 3a
Figure 3b
Figure 3c
Figure 3d

Figures 3a–3d: An envelope reflection revealed a facial bone defect. The socket was grafted using an OsteoGen plug, a 2-in-1 bone grafting solution which combines grafting material with a collagen plug and eliminates the need for a barrier membrane. The plug was firmly packed to rest slightly above the crest of the socket.

Figure 4a
Figure 4b

Figures 4a, 4b: After graft placement, the envelope soft-tissue reflection was closed using a Reli® REDISORB® PRO polyglycolic acid (PGA) suture (Glidewell Direct). A digital radiograph taken immediately following the surgical procedure illustrated some radiolucency at the grafted site.

Figure 5

Figure 5: After three months of healing, the extraction site was evaluated via CBCT scan. Here, the analysis is shown in the sagittal view, illustrating the available height and width of bone. CBCT scanning allows for thorough measurement and review of vital anatomy, enabling clinicians to determine if there is adequate bone available for implant placement, or if further grafting is needed

Figure 6a
Figure 6b

Figures 6a, 6b: These images illustrate the virtual placement of the appropriately chosen Hahn™ Tapered Implant (Glidewell Direct). The mandibular nerve position was mapped out and the implant positioning was digitally planned prior to any surgical intervention. Several characteristics of the Hahn Tapered Implant System have been shown to promote favorable integration: The aggressive thread design and tapered macrostructure of the implant provide excellent initial stability while the unique 1 mm machined collar around the coronal portion aids in the preservation of peri-implant health.

Figure 7

Figure 7: After determining that an implant could be ideally placed, an envelope flap reflection was made, exposing the implant site, which showed the excellent integration of the bone graft placed several months prior. No vertical releasing incisions were made in the attached gingiva or mucosa, reducing prostaglandin and histamine release, and providing a site that could easily be repositioned to maintain an adequate width of attached gingiva.

Figure 8a
Figure 8b

Figures 8a, 8b: A core sample was made prior to the osteotomies. Histologic evaluation indicated healthy bone turnover in the previously grafted socket.

Figure 9

Figure 9: The Hahn surgical protocol was followed with a “tooth-down” approach. The final crown was visualized prior to any surgical intervention, and ideal mesial-distal and facial-lingual position were determined by the adjacent teeth. The vertical depth of the implant was determined through CBCT measurement. A 2.4-mm-diameter pilot bur was used to create the initial penetration into the ridge followed by the predetermined 3.0 mm surgical bur. Each of the osteotomy burs have one precise depth marking, simplifying visualization of the correct depth. A radiograph can be used to verify angulation and depth. This eliminates potential positioning errors and restorative compromises. Once depth and mesialdistal and facial-lingual positioning were established, the osteotomy was widened using the 3.5-mm-diameter Hahn bur. The widest part of the tapered bur rests at the crest of the edentulous ridge.

Figure 10

Figure 10: A 4.3-mm-diameter shaping drill was then utilized to continue the preparation. This is a quick process that widens the osteotomy without changing vertical positioning as long as excessive vertical pressure is not applied. Finally, the 5.0-mm-diameter Hahn bur was used to complete the osteotomy. The osteotomy itself was 0.5 mm smaller than the chosen implant, which provided excellent initial stability and retention of the implant.

Figure 11a
Figure 11b
Figure 11c

Figures 11a–11c: The preselected Hahn implant was then torqued to the crest of the ridge, and the primary stability was documented. Placement torque of 25 Ncm or greater indicates the ability to complete a singlestage surgical procedure. Ideal implant placement was confirmed with CBCT analysis and digital radiographs. Virtual imaging of the final implant-retained crown prior to surgical intervention assisted in this simple and predictable implant placement.

Figure 12a
Figure 12b

Figures 12a, 12b: A 3.0-mm-tall healing abutment was torqued to 25 Ncm. This allowed the attached gingiva to be repositioned with the healing abutment above the tissue level and eliminated the need of a subsequent surgical procedure to uncover the implant.

Figure 13a
Figure 13b

Figures 13a, 13b: The attached gingiva was repositioned using a PGA suture. Note the adequate band of attached gingiva on the facial aspect of the healing abutment.

Figure 14a
Figure 14b

Figures 14a, 14b: After three months of healing and integration, the healing abutment was removed, and an implant-level impression was made.

Figure 15a
Figure 15b

Figures 15a, 15b: The team at Glidewell created the properly contoured BruxZir Zirconia screw-retained crown, which was then torqued into place at 35 Ncm using a seating jig provided by the lab.

Figure 16

Figure 16: The access hole of the implant-retained crown was filled with a composite resin.

Figure 17a
Figure 17b

Figures 17a, 17b: Figure 17a illustrates the virtual treatment planning of the implant during the treatment planning phase. The digital radiograph in Figure 17b shows the optimal positioning of the implant in all dimensions and complete seating of the restoration.

CONCLUSION

Recognizing when socket grafting is necessary for the long-term health of an implant restoration is a vital part of implant dentistry. With the methods used in this case study, dentists can be better equipped to provide quality care for their patients. By providing the necessary bone grafting materials, instruments, implants and precise-fitting restorations, Glidewell Implant Solutions enables doctors to perform implant procedures with ease and repeatability.

OsteoGen is a registered trademark of IMPLADENT, LTD. Reli and REDISORB are registered trademarks of Myco Medical Supplies, Inc.