Laboratory and Chairside Partnership for a Full-Mouth Restoration

November 28, 2023
 image
Justin Chi, DDS, CDT
Laboratory  and Chairside  Partnership for  a Full-Mouth  Restoration

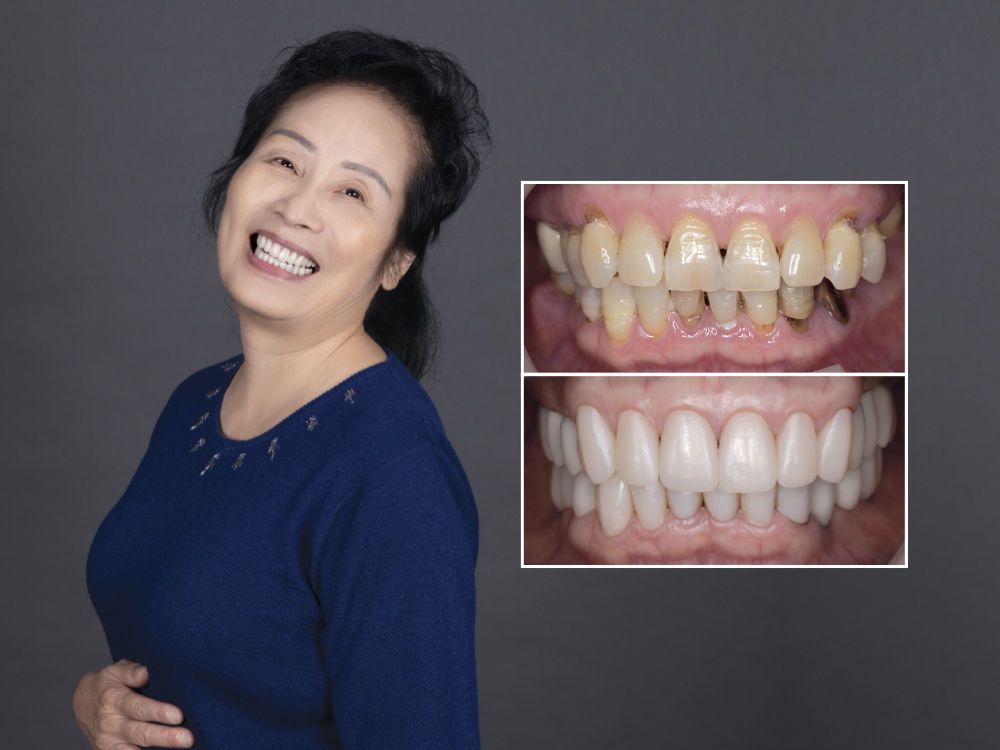
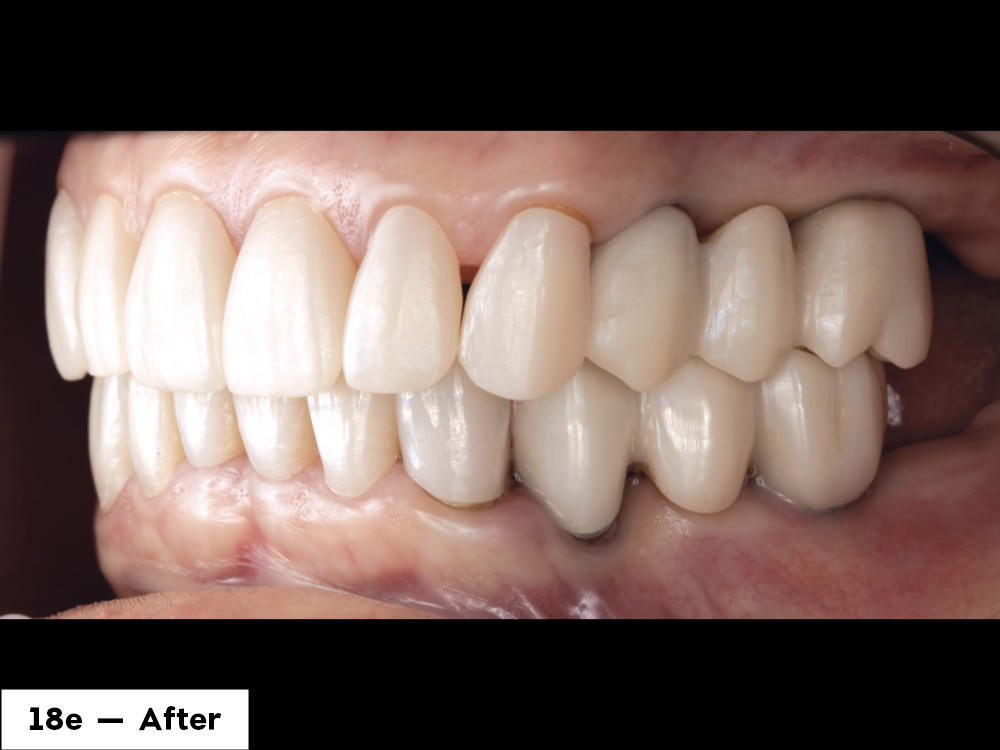
Obtaining the best outcome for our patients demands meticulous planning and attention to detail. In this article, I will highlight the advantages of combining both the laboratory and chairside processes to digitally plan and complete a complex full-mouth case.

Figure 1a
Figure 1b
Figure 1c

Figures 1a–1c: The patient presented with pain bilaterally in the mandibular posterior. Oral and radiographic examination showed moderate to severe periodontal disease with significant mobility. The treatment goal was to relieve the patient’s discomfort, remove the hopeless teeth, replace the missing teeth with implant-supported restorations, and restore the remaining teeth to improve esthetics and stabilize the occlusion.

Figure 2

Figure 2: Teeth #3, 4, 12, 13, 18–21 and 30 were determined to be hopeless and required extraction. Teeth #6–11 and 21–28 were salvageable but needed periodontal therapy. Although full-mouth extraction was a valid alternative, I decided to retain the patient’s anterior teeth, due to their relatively good periodontal condition and acceptable restorative position. This decision ultimately resulted in a more natural smile and better proprioception for the patient.

Figure 3a
Figure 3b

Figures 3a, 3b: The hopeless teeth were extracted. Granulation tissue was carefully and thoroughly removed with a curette.

Figure 4a
Figure 4b
Figure 4c

Figures 4a–4c: Following the extractions, I grafted the sockets using Newport Biologics™ Cortico/Cancellous Allograft Blend and Newport Biologics Resorbable Collagen Membranes 4-6 (Glidewell Direct; Irvine, Calif.). In four-wall sockets such as these, grafting with allograft particulate and collagen membrane is ideal to support and protect the graft material, as well as delay the in-growth of soft tissue. All sites were sutured using polytetrafluoroethylene (PTFE) sutures to stabilize the areas.

Figure 5a
Figure 5b
Figure 5c

Figures 5a–5c: On the upper arch, I used OsteoGen® Plugs (Glidewell Direct; Irvine, Calif.). Because the grafting sites on the upper arch were five-wall sockets, OsteoGen Plugs provided a convenient and predictable method for socket grafting.

Figure 6a
Figure 6b

Figures 6a, 6b: Immediate Valplast® partial dentures (available through Glidewell) were delivered to provide function for the patient and to protect the grafted sites.

Figure 7a
Figure 7b

Figures 7a, 7b: Following a four-month healing period, the sites were reassessed. A new 3D cone-beam computed tomography (CBCT) image was taken to determine if the bone volume and density were adequate to support implant placement.

Figure 8a
Figure 8b
Figure 8c

Figures 8a–8c: Once the bone support was confirmed, the proposed treatment plan, intraoral digital impression and CBCT files were submitted to the Glidewell Digital Treatment Planning (DTP) department. The DTP department delivered a plan for my approval, including the sizes of the Hahn™ Tapered Implants (Glidewell Direct; Irvine, Calif.).

Figure 9

Figure 9: Once I approved the treatment plan, a 3D-printed surgical guide was created by the DTP team. The surgical guide was used to accurately place the implants at the predetermined position, angulation and depth.

Figure 10a
Figure 10b
Figure 10c
Figure 10d
Figure 10e
Figure 10f

Figures 10a–10f: In the maxilla, Hahn implants were placed in an ideal position to support bilateral posterior bridges. In the mandible, a three-unit implant-supported bridge was planned for the left quadrant, with a single Hahn implant in the right. Cover screws were placed on the implants, and they were left submerged for the four-month healing period.

Figure 11a
Figure 11b

Figures 11a, 11b: After the healing period, I scheduled the patient for a second stage surgery to uncover the implants.

Figure 12a
Figure 12b
Figure 12c

Figures 12a–12c: Using the iTero Element® 2 scanner (Align Technology, Inc.; San Jose, Calif.), I took digital impressions with Hahn Tapered Implant Titanium Scan Bodies. The scans were submitted to the laboratory for the fabrication of custom abutments, and the healing abutments were reseated on the implants. I received the custom abutments from the laboratory and inserted them on the implants using the positioning templates provided by the laboratory.

Figure 13a
Figure 13b
Figure 13c
Figure 13d

Figures 13a–13d: Radiographs were taken of the custom abutments in position to verify that they were completely seated on the implants.

Figure 14

Figure 14: Using the iTero scanner, I scanned the abutments to provide a virtual model for the creation of the final restorations. I elected to design the restorations using our in-office milling system, the glidewell.io™ In-Office Solution. This gave me greater control over the design and the ability to mill the restorations chairside.

Figure 15

Figure 15: Establishing natural contours and optimal occlusion, I used the fastdesign.io™ Software and Design Station to create the posterior crowns & bridges. I selected BruxZir® NOW for these crowns & bridges, which I milled chairside using the fastmill.io™ In-Office Mill.

Figure 16a
Figure 16b

Figures 16a, 16b: The posterior restorations were cemented over the custom abutments using Ceramir® Bioceramic Implant Cement (Directa Inc.; Newton, Conn.), a biocompatible cement that is easy to clean and specifically designed for implant restorations.

Figure 17a
Figure 17b
Figure 17c

Figures 17a–17c: To improve the esthetics of the patient’s remaining anterior teeth, I prepared the teeth for BruxZir Esthetic NOW crowns, which offer more translucency and are ideal for the esthetic zone. I used a size #1 retraction cord to displace the gingival tissue and capture the margins in my impression. Using the iTero scanner, I scanned both arches, with special attention to the preparations. I then designed and milled all 14 crowns.

Figure 18a
Figure 18b
Figure 18c
Figure 18d

Figures 18a–18e: I milled out the individual restorations and finished them with a light polish using the BruxZir™ Adjustment and Polishing Kit (Glidewell Direct). There was no need for any staining or firing to improve the esthetics or make the material stronger, as BruxZir NOW materials are designed to be delivered right out of the mill.

Figure 19a
Figure 19b

Figures 19a, 19b: The patient was pleased with the outcome of her full-mouth restoration, which eliminated her pain, stabilized her bite, restored her chewing function and greatly improved her esthetics.

CONCLUSION

Advanced technologies like cone-beam scanning, digital treatment planning and 3D printing, allow clinicians and lab professionals to work in concert. As these workflows have become increasingly accessible and user-friendly, clinicians have a more predictable pathway for achieving success with full-mouth restorations.

All trademarks are property of their respective owners.