A Review of Implant-Retained Overdentures

December 27, 2023
 image
Timothy F. Kosinski, DDS, MAGD
 image
Stephanie Tilley, DMD
A Review of Implant-Retained Overdentures

Despite the popularity of fixed full-arched restorations, implant overdentures remain a valid treatment option for many patients. Considerations include:

  • Cost: Implant-retained overdentures can usually be provided at a significantly reduced cost compared to fixed restorations. In many cases, a patient’s existing complete denture can be retrofitted to the newly placed implants, reducing costs even further.
  • Insufficient Bone Volume: Some patients might not have enough bone volume for an adequate number of correctly positioned implants to provide the appropri­ate support for a fixed restoration. Instead, they may be eligible for an overdenture, which requires a minimum of two implants in some cases.
  • Grafting Contraindicated: In many cases, bone grafting is needed to facilitate the placement of the implants for a fixed full-arch prosthesis. If patients are unable to receive bone grafting due to health or finan­cial reasons, overdentures should be discussed.
  • Patient Preference: Some patients are content with their conventional removable appliances but simply want more retention. Overdentures offer the esthetics of traditional dentures with better retention.

CASE REPORT NO. 1

Freestanding Locator Attachments

Figure 1a: preoperative edentulous maxilla
Figure 1b: preoperative edentulous maxilla
Figure 1c: mandible

Figures 1a–1c: The preoperative edentulous maxilla (a, b) and mandible (c).

Figure 2: panoramic x-ray showing four maxillary Hahn™ Tapered Implants

Figure 2: A panoramic X-ray showed the four maxillary Hahn™ Tapered Implants (Glidewell Direct; Irvine, Calif.) and two mandibular implants strategically positioned in preparation for fabrication of maxillary and mandibular implant-retained overdentures.

Overdentures offer the esthetics of traditional dentures with better retention.
Figure 3a: 3-mm-tall healing abutments were placed in the maxilla
Figure 3b: 3-mm-tall healing abutments were placed in the maxilla
Figure 3c: 3-mm-tall healing abutments were placed in the maxilla

Figures 3a–3c: Following the integration of the implants, they were uncovered, and 3-mm-tall healing abutments were placed in the maxilla (a) and mandible (b, c) to promote successful tissue-cuff formation.

Figure 4a: patient's tissue-cuff formation after 3–4 weeks of healing
Figure 4b: patient's tissue-cuff formation after 3–4 weeks of healing

Figures 4a, 4b: Note the successful tissue-cuff formation after 3–4 weeks of healing. This supports long-term gingival health and ease of seating of the Locator® abutments (Zest IP Holdings LLC; Escondido, Calif.) at the time of restoration.

Figure 5a: open-tray implant impressions
Figure 5b: angulation of the implants in the available bone

Figures 5a, 5b: Open-tray implant-level impressions were made. Note the angulation of the implants in the available bone. Such angulation would pose a challenge for a fixed, full-arch prosthesis.

Figure 6: analog impressions using medium and heavy body vinyl polysiloxane (VPS) impression material

Figure 6: Analog impressions were made using medium and heavy body vinyl polysiloxane (VPS) impression material.

Figure 7a: soft-tissue model
Figure 7b: soft-tissue model

Figures 7a, 7b: Soft-tissue models help the laboratory technician determine the correct Locator abutment heights to be used.

Figure 8a: locator abutments screwed in
Figure 8b: locator abutments screwed in

Figures 8a, 8b: Locator abutments were screwed into place at 35 Ncm.

Figure 9a: locator impression copings snapped in
Figure 9b: locator impression copings snapped in

Figures 9a, 9b: Intraorally, the Locator impression copings were snapped into place.

Figure 10a: Custom trays used for impressions
Figure 10b: Custom trays used for impressions

Figures 10a, 10b: Custom trays were provided by the lab to ensure an accurate impression. This helped to eliminate potential processing errors that can result in an unstable overdenture and inadvertent wear of the nylon Locator attachments. An accurate analog impression helps create an accurate master cast with minimal discrepancies.

Figure 11a: locator analogs placed into locator impression copings
Figure 11b: locator analogs placed into locator impression copings

Figures 11a, 11b: Locator analogs were placed into the Locator impression copings.

Figure 12a: wax rims
Figure 12b: wax rims

Figures 12a, 12b: Wax rims were used to establish the proper bite, midline, incisal edge position, vertical dimensions of occlusion, and phonetics.

Figure 13a: black processing Locator attachments in its metal housings
Figure 13b: black processing Locator attachments in its metal housings

Figures 13a, 13b: The intaglio surface of the wax rims includes black processing Locator attachments in its metal housings. This added stability makes the wax rim process, and the subsequent wax try-in, much more reliable.

Figure 14a
Figure 14b
Figure 14c
Figure 14d

Figures 14a–14d: Based on the approved wax setups, the overdentures were fitted, and adjustments were made chairside.

Figure 15a: overdentures
Figure 15b: overdentures

Figures 15a, 15b: The intaglio surfaces of the overdentures were smooth and fit precisely over the Locator abutments and soft tissue.

Figure 16: patient satisfied with the result

Figure 16: The final overdentures were delivered over the Locator attachments, providing a stable prosthesis that improved stability and function. The patient was satisfied with the result.

CASE REPORT NO. 2

Bar-splinted Mandibular Case
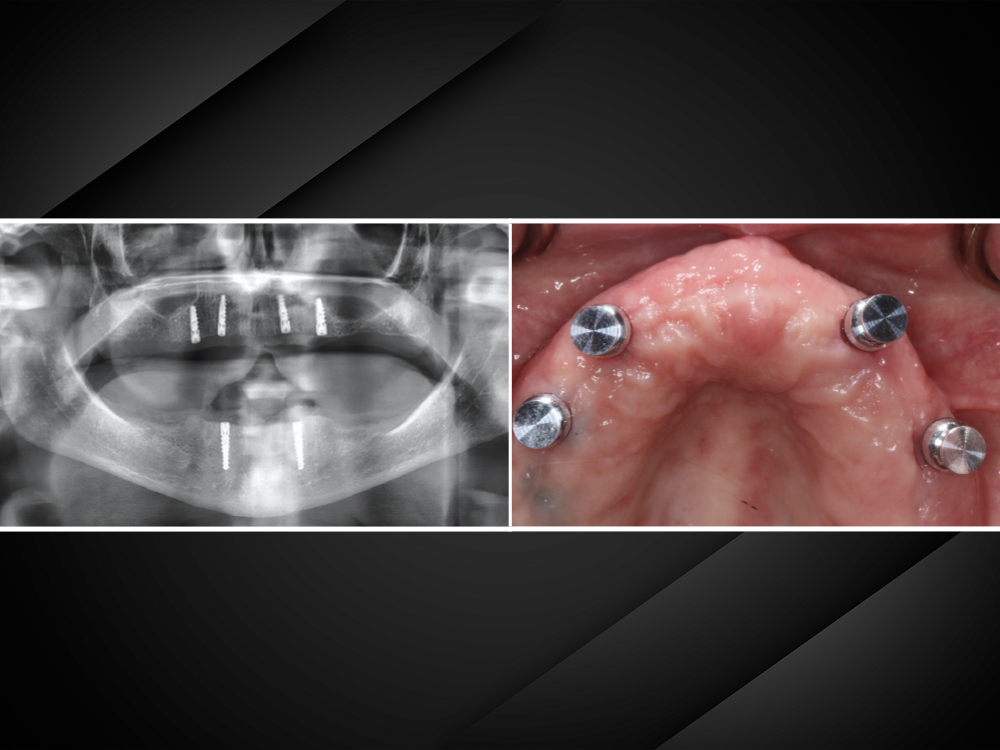
Figure 17a: milled bars can be attached to dental implants
Figure 17b: milled bars can be attached to dental implants
Figure 17c: milled bars can be attached to dental implants

Figures 17a–17c: In some circumstances, individual Locator abutments do not provide enough anterior-posterior (AP) stability. This may occur when implants are positioned without sufficient AP spacing due to inadequate bone contours. Milled bars can be attached to dental implants and provide a mechanism to extend the Locator abutments in a more acceptable AP spread. This process benefits the stability of the final prosthesis.

Figure 18: intaglio surface of an overdenture

Figure 18: The intaglio surface of the overdenture was designed to seat over the milled bar.

Figure 19: patient's front view of teeth

Figure 19: The mandibular overdenture was delivered over the titanium bar, with the Locator attachments seated over the Locator abutments to provide improved stability.

CASE REPORT NO. 3

Maxillary Case with Intraoral Pickup and Chairside Processing of Locator Housings

Figure 20: o-shaped blackout rings placed over Locator abutments

Figure 20: Locator housings with lab-processing rings were snapped onto the maxillary Locator abutments intraorally. O-shaped blockout rings were placed over the Locator abutments prior to seating the housings. This helped prevent any locking-in of acrylic while hardening.

Figure 21: VOCO® Fit Test C & B

Figure 21: VOCO® Fit Test C & B, a flowable blockout, was injected under the O-ring to ensure that no acrylic was locked under the abutment.

Figure 22: Quick Up® adhesive

Figure 22: Quick Up® adhesive (VOCO America, Inc.; Indiana Land, South Carolina) was dripped into the prepared receptacles prior to injecting the acrylic.

Figure 23: Quick Up self-curing luting material

Figure 23: Quick Up self-curing luting material (VOCO America, Inc.) was injected into each receptacle. The overdenture was completely seated over the housings and black processing attachments.

Figure 24: Quick Up LC added in denture

Figure 24: After setup, the denture was removed and Quick Up LC (VOCO America, Inc.), a flowable resin, corrected any voids that may have been present.

Figure 25: Locator attachment snapped into metal housings

Figure 25: The appropriate retentive Locator attachment was then snapped into the metal housings.

Figure 26: four locators provided stability

Figure 26: The four Locators provided a stable and retentive appliance that was supported both by the abutments and soft tissue, with no rocking or instability.

Figure 27a: patient's teeth post bar-splinted mandibular
Figure 27b: patient's teeth after procedure

Figures 27a, 27b: The overdentures were examined for occlusion, phonetics and comfort.

CONCLUSION

When determining the best treatment plan for an edentulous patient, their health, available bone structure and budget are the most important factors. Implant-retained overdentures can greatly improve a patient’s quality of life. To ensure success, it’s crucial to have open communication with patients about which procedures are feasible, predictable and affordable.

VOCO is a registered trademark of VOCO America, Inc.