Solving a Difficult Esthetic Challenge with BruxZir® Esthetic NOW

May 30, 2023
 image
Paresh B. Patel, DDS
Solving a Difficult Esthetic Challenge with BruxZir® Esthetic NOW

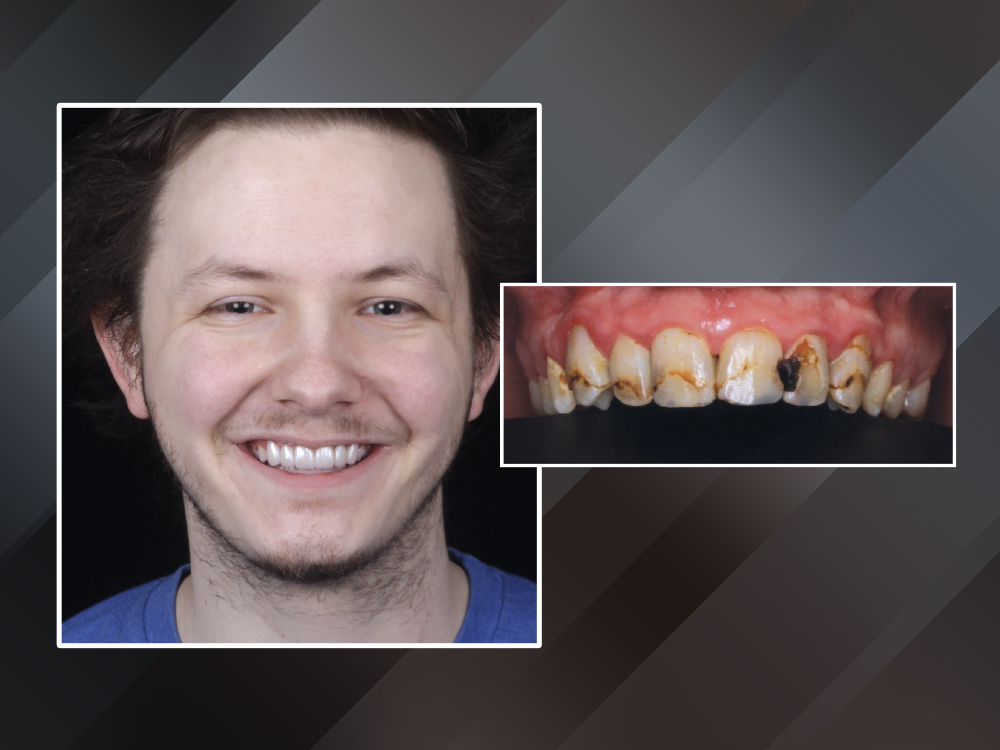
This patient sought my care because he was having difficulty finding a job due to extensive decay in the anterior, resulting in a very unesthetic smile. He had recently turned his life around after overcoming substance abuse and wanted his smile to reflect his newfound optimism.

This case report shows how I used both the dental laboratory and my in-office mill in a hybrid process to satisfy the esthetic needs of the patient. Using the laboratory’s diagnostic wax-up as a treatment plan, I merged the wax-up and pre-treatment scans to design and mill BioTemps® NOW temporaries (Glidewell; Newport Beach, Calif.). After validating the design in the provisionals, I milled BruxZir® Esthetic NOW (Glidewell) crowns to provide the long-lasting and esthetic solution he needed.

CASE REPORT

Figure 1 severe tooth decay

Figure 1: The patient presented with severe decay and discoloration in the upper anterior region. After careful examination, I determined that there was enough remaining healthy tooth structure to support restorations. We decided to place BruxZir Esthetic NOW on teeth #6–11 due to its combination of strength and esthetics.

Figure 2 intraoral scan using an iTero Element®

Figure 2: First, I asked the lab to create a printed model of the patient’s diagnostic design. I performed an intraoral scan using an iTero Element® (Align Technology, Inc.; San Jose, Calif.) to get a detailed image of his dentition, and then I sent his digital impressions to the lab to create the printed model. VPS impressions can also be used, but for this case I chose to send digital impressions to get a faster turnaround time.

We decided to place BruxZir Esthetic NOW ... due to its combination of strength and esthetics.
Figure 3 mock-up from putty matrix wax-up

Figure 3: At the second appointment, we reviewed the wax-up from the lab and the patient approved the esthetic design on the model. I then created a putty matrix of the wax-up and used it to create a mockup by using bis-acryl temporary composite resin in the matrix over his unprepared teeth. As this photo shows, the patient left my office wearing the mockup and was instructed to monitor any issues with occlusion, comfort and speech. On his next visit he reported complete satisfaction with the design. Because the patient presented with significant gingival inflammation, I recommended the additional step of creating milled provisionals to allow the soft tissue to resolve and promote a clean environment for his final restorations. This would also allow us to provide additional oral hygiene instruction and for the patient to demonstrate his ability to maintain the restorations.

Figure 4 size #0 cord around the gingival margins

Figure 4: I proceeded with tooth preparations directly through the bisacryl mockups. For an accurate intraoral scan, I used a double-cord technique by placing size #0 cord around the gingival margins with a size #1 cord over it, helping displace the tissue.

Figure 5 design proposal for the BioTemps NOW provisionals

Figure 5: Using my fastdesign.io™ Software and Design Station, I was able to receive a design proposal for the BioTemps NOW provisionals with just a few clicks.

Figure 6 fastmill.ioâ ¢ In-Office Mill used to fabricate BioTemps NOW temporaries for teeth #6-11

Figure 6: I used my fastmill.io™ In-Office Mill (Glidewell) to fabricate BioTemps NOW temporaries for teeth #6–11. The process was remarkably fast, with an average milling time of 10 minutes per single-unit crown.

Figure 7 patient wore BioTemps NOW temporaries for three weeks

Figure 7: The patient wore BioTemps NOW temporaries for three weeks, confirming that the provisionals were comfortable, functional and esthetic. In addition, his soft tissue appeared pink and healthy — showing that he had made significant improvements in his oral hygiene. I determined that we were ready to go ahead with the BruxZir Esthetic crowns.

I scanned the patient’s preparations again, then merged the impression with the preoperative wax-up scans to create the restoration designs. I recommend this step to save time on designing the case. I then used my fastmill.io In-Office Mill to mill the crowns.

Figure 8a BruxZir Esthetic crowns
Figure 8b hand-polishing crowns before delivery

Figures 8a, 8b: BruxZir Esthetic crowns were ready for delivery with no oven firing required. I then hand-polished the crowns before delivery.

Figure 9 BruxZir Esthetic

Figure 9: The combination of lifelike translucency with high flexural strength makes BruxZir Esthetic an ideal choice for anterior cases.

Figure 10a Image of patient before procedure
Figure 10b Image of patient after procedure

Figures 10a, 10b: The patient was thrilled with the results.

CONCLUSION

The natural appearance and luster of the BruxZir Esthetic NOW crowns exceeded the patient’s expectations, and he was delighted with the results. With a newfound sense of confidence, the patient walked out of my office ready to grasp the opportunities before him.