The Implant-Retained Mandibular Overdenture (1 CEU)

May 30, 2023
 image
Taylor Manalili, DDS, DICOI
The Implant- Retained Mandibular Overdenture Hero Image

Note: The Hahn Tapered Implant System is now known as the Glidewell HT Implant System

Removable dentures have been the standard prosthesis for edentulous arches, relying on surface area, suction and muscle control to remain in place. On the maxillary arch, this is typically not an issue; however, on the mandible, it is a different story. Mandibular removable dentures tend to lack stability and retention, which results in discomfort and diminished function. Instead, we can utilize implant-supported dentures with as few as two or three implants to improve the quality of life for denture wearers by increasing stability and retention for a more secure fit and improved function.

The number of dental implants required for a stable mandibular overdenture depends on several factors, including the quality and quantity of bone, the prosthetic design, available restorative space, opposing dentition, and the patient’s dexterity. And, of course, the associated costs are an important consideration. In general, a minimum of two implants placed in the mandible can significantly improve the patient’s masticatory function and overall retention of the denture.

Case Report

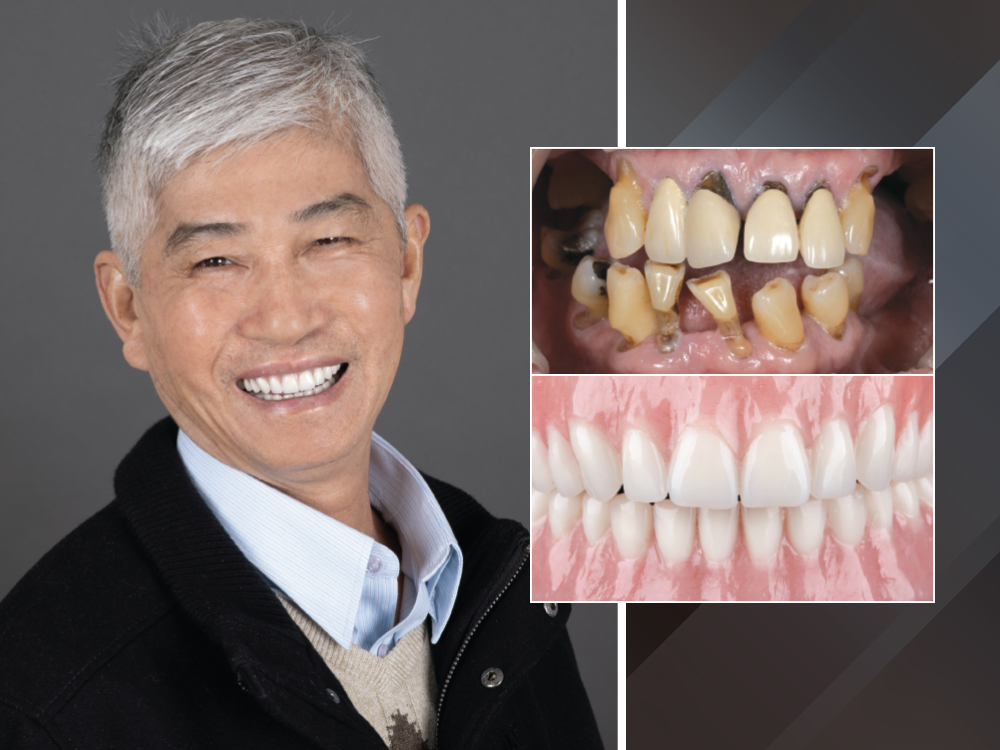
The patient presented with terminal dentition, looking to improve his overall dental esthetics and function. When evaluating a patient, it is important to keep in mind the effects of edentulism, including bone loss, nutritional challenges and an overall compromised quality of life.1 Keeping this in mind, we discussed options including removable dentures, implant-supported fixed restorations and implant-retained removable overdentures.

After weighing the options, the patient and I decided on a treatment plan using a Simply Natural Handcrafted Denture (Glidewell; Newport Beach, Calif.) for the maxillary arch with a three-implant-retained Locator® Overdenture (available through Glidewell) for the mandible.

Working with Glidewell’s Digital Treatment Planning (DTP) service, we took a top-down approach by first establishing the desired esthetic outcome. Along with the intraoral scan and CBCT image, a full-face-smile photograph helps establish a midline and visualize the ideal smile line. This allowed Glidewell to not only fabricate the dentures accurately, but also construct the surgical guide needed for optimal implant placement in the lower arch.

A minimum of two implants placed in the mandible can significantly improve the patient’s masticatory function and overall retention of the denture.
The patient before treatment full face picture
The patient before treatment oral picture
The patient before treatment oral x-ray

Figures 1a–1c: The patient presented with terminal dentition.

the Green CT 2 imaging system was taken to evaluate the available bone

Figure 2: Because the patient was interested in the placement of implants, a CBCT scan utilizing the Green CT® 2 imaging system (Vatech America Inc.; Fort Lee, N.J.) was taken to evaluate the available bone. Placing implants in the maxilla would have required additional grafting procedures that the patient did not want; however, with some ridge recontouring, the mandible showed ample bone for implant placement to help retain the lower prosthesis.

The placement of implants for an implant-retained overdenture is a critical step in the process of creating a functional and successful prosthesis. The ideal number of implants for an overdenture varies based on the patient’s specific anatomy and needs. The shape of the arch form can affect the tooth setup and therefore can impact the number and position of the implants.

Place three implants in the mandible to help retain the denture
Two implants in the canine positions with a third at the midline

Figures 3a–3c: For this patient, we decided to place three implants in the mandible to help retain the denture. There is higher patient satisfaction in three-implant-retained overdentures compared to two-implant-retained overdentures.2 Generally, placing two implants in the canine positions with a third at the midline, as shown in these planning diagrams, helps to decrease anterior-posterior movement, increasing the stability of the denture.3

Our goal was to place the implants at the time of tooth extraction to limit the number of surgeries for the patient. Working with the Removable and DTP departments at Glidewell, we took a top-down approach by first determining the esthetic and functional outcome I wanted to achieve. We did this by evaluating the patient’s current dentition and vertical dimension, allowing us to estimate where the definitive tooth position should be. We could then plan enough bone reduction to make room for the desired Locator implant overdenture and plan the placement of the implants in an optimal position.

DTP department fabricated a bone-supported surgical guide
Excess bone was reduced to the indicated level

Figures 4a, 4b: For this case, Glidewell’s DTP department fabricated a bone-supported surgical guide and bone-reduction guide. After the teeth were extracted, excess bone was reduced to the indicated level to ensure there was adequate restorative space.

Working with the Removable and DTP departments at Glidewell, we took a top-down approach by first determining the esthetic and functional outcome I wanted to achieve.
The osteotomy guide was then seated and secured with two anchor pins for the placement of the Hahn Tapered Implants
Guided surgery ensures parallel implant placement that reduces wear to the restorative components
X-ray with implants seated and secured

Figures 5a–5c: The osteotomy guide was then seated and secured with two anchor pins for the placement of the Hahn  Tapered Implants (Glidewell Direct; Irvine, Calif.). Utilizing a guided surgery approach ensures parallel implant placement that significantly reduces wear to the restorative components. DTP services like Glidewell’s make these procedures more affordable in the long run by reducing maintenance costs for the patient and saving chair time through more efficient implant placement.

Locator abutments were placed

Figure 6: After healing, the tissue heights were confirmed and the Locator abutments were placed.

The final Simply Natural dentures were then fabricated

Figure 7: The final Simply Natural dentures were then fabricated, bringing the final esthetic outcome to life.

Wells for the Locator abutments and attachments were created by the lab and then verified for passivity chairside

Figure 8: Wells for the Locator abutments and attachments were created by the lab and then verified for passivity chairside. Vent holes were then drilled through to the lingual surface to allow for chairside pickup of the Locator housings.

White blockout spacer rings were then placed around each Locator abutment

Figure 9: White blockout spacer rings were then placed around each Locator abutment, and then the metal housings with the black processing inserts were snapped into place.

All Locator housings were picked up at once utilizing Quick Up luting material

Figure 10: All Locator housings were picked up at once utilizing Quick Up® luting material (VOCO GmbH; Cuxhaven, Germany), by guiding the patient gently into occlusion, ensuring the soft tissue was not compressed.

Excess acrylic was trimmed from the prosthesis to prepare it for delivery

Figure 11: Excess acrylic was trimmed from the prosthesis to prepare it for delivery. The patient wore the processing caps home to practice the insertion and removal of the new prosthesis.

Extended-range, regular retention inserts were used as easier for the patient to keep clean.

Figure 12: One week after delivery, the patient returned for follow-up, including adjustment of any sore spots and changing of the nylon inserts. Extended-range, regular retention inserts were used as they are easier for the patient to keep clean.

Utilizing a guided surgery approach ensures parallel implant placement that significantly reduces wear to the restorative components.
The initial condition of the patient’s teeth necessitated a full-mouth restoration.
Patient with predictable esthetic and functional restoration after treatment

Figures 13a, 13b: The initial condition of the patient’s teeth necessitated a full-mouth restoration. Thorough treatment planning ensures greater long-term stability of the definitive prostheses. The Glidewell DTP team and I were able to provide a predictable esthetic and functional restoration.

Conclusion

Edentulous patients often seek removable dentures as the final solution, especially when they reach an age where ease-of-use becomes their priority. Implant-retained overdentures are an effective alternative to the frequent problems caused by removable mandibular dentures. Through collaboration with the Removable and DTP teams at Glidewell, we were able to utilize a surgical guide for increased accuracy, reduced surgical time, improved patient comfort, and enhanced esthetic and functional predictability.

Locator is a registered trademark of ZEST IP Holdings, LLC.

References

  1. Carpentieri JR, Tarnow DP. The mandibular two-implant overdenture: First-choice standard of care for the edentulous patient. Montage Media Corporation; 2007.
  2. Kheur M, Lakha T, Mühlemann S, Hämmerle C, Haider A, Qamri B, Kheur S. Evaluation of oral health related quality of life and patient satisfaction in three implant retained mandibular overdentures: A randomized cross-over clinical trial. Int J Prosthodont. 2022 Dec 6.
  3. Emami E, Alesawy A, de Grandmont P, Cerutti-Kopplin D, Kodama N, Menassa M, Rompré P, Durand R. A within-subject clinical trial on the conversion of mandibular two-implant to three-implant overdenture: Patient-centered outcomes and willingness to pay. Clin Oral Implants Res. 2019 Mar;30(3):218-28.